Stepping Through Trials
For some conditions in your experiment, you may want to repeat several trials of the same event. Smile provides a trial stepper for organizing and managing sequenced events within a View.
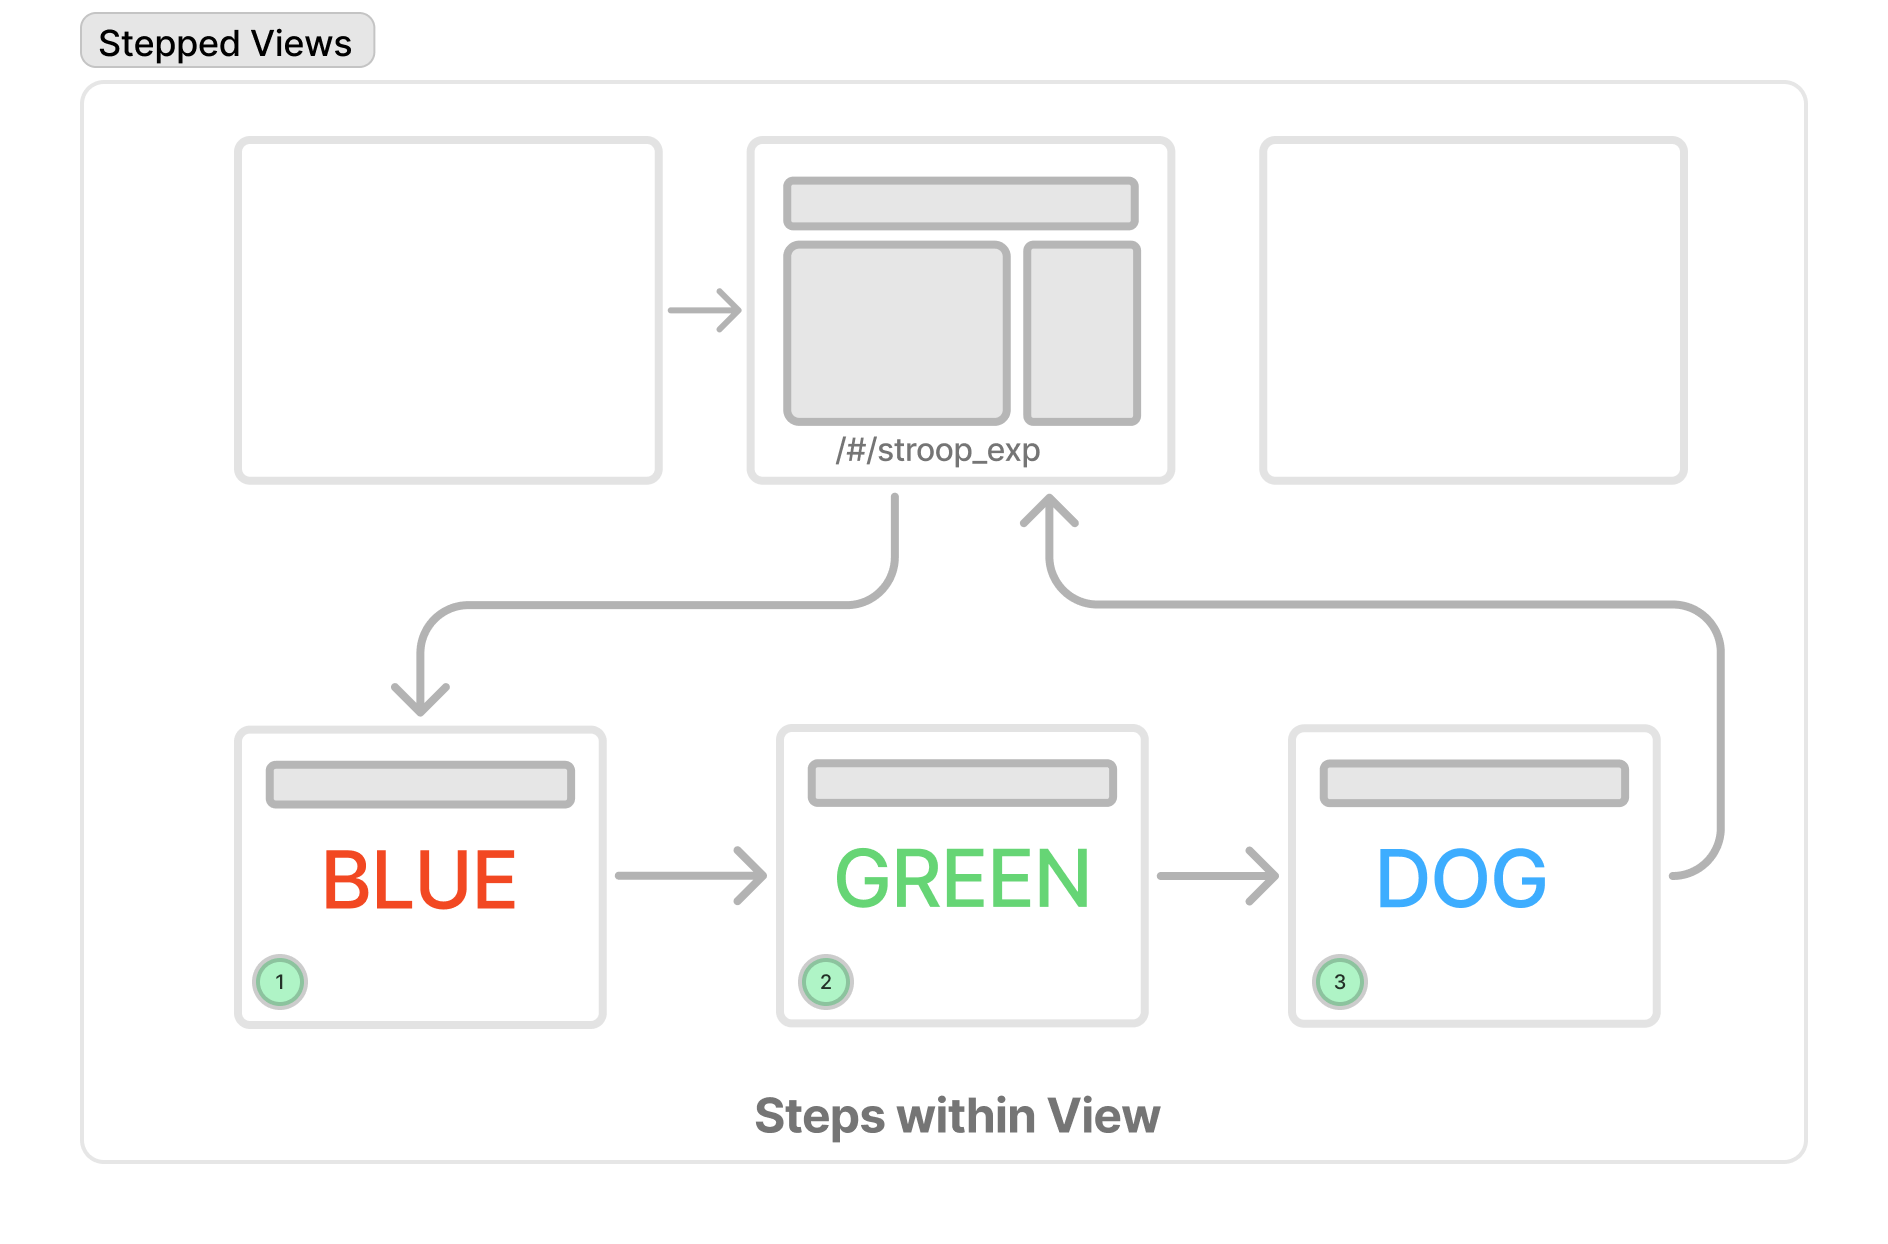
Steps are like builds in a Keynote/Powerpoint animation
By way of analogy, think of different Views as slides in a Keynote/Powerpoint presentation while a step is like a build or animation within a slide.
A key feature of stepped Views is that their state persists in the browser through the use of local storage. This means that if the subject reloads the page, or navigates to a different site and then returns, the task will resume from the same step. This is nice because it helps ensure that subjects are always completing the set of steps/trials assigned to them and are not able to start the task over (possibly introducing biased data from practice effects or exposure to different manipulations). You can learn more about this feature by reading about how to persist stepper state. The stepper also integrates with the developer mode interface.
Creating a stepped View
All views are stepped by default in Smile. However, if you don't register any steps, the the functionality is disabled. To register steps, use the .steps method to get access to the stepper structure. A common pattern is to use api.steps.append() to add a list of steps:
<script setup>
import useViewAPI from '@/core/composables/useViewAPI'
const api = useViewAPI()

// Add a series of steps to the experiment
const trials = api.steps.append([
  { id: 'a', word: 'SHIP', color: 'red', condition: 'unrelated' },
  { id: 'b', word: 'MONKEY', color: 'green', condition: 'unrelated' },
  { id: 'c', word: 'ZAMBONI', color: 'blue', condition: 'unrelated' },
  { id: 'd', word: 'RED', color: 'red', condition: 'congruent' },
  ...
])
</script>
Hierarchical Steps
Steps can be nested within each other. This can be useful to break up sections of a task. For example, your View might have several trials then a summary feedback page. It might make sense to group the trials separately from the feedback page like this:
<script setup>
import useViewAPI from '@/core/composables/useViewAPI'
const api = useViewAPI()

const trials = api.steps.append([{ id: 'stroop' }, { id: 'summary' }])

trials[0].append([
  { id: 'a', word: 'SHIP', color: 'red', condition: 'unrelated' },
  { id: 'b', word: 'MONKEY', color: 'green', condition: 'unrelated' },
  { id: 'c', word: 'ZAMBONI', color: 'blue', condition: 'unrelated' },
  { id: 'd', word: 'RED', color: 'red', condition: 'congruent' },
])
</script>
The resulting structure is:
├── id: stroop
|   ├── {id: 'a', word: 'SHIP', color: 'red', condition: 'unrelated'}
|   ├── {id: 'b', word: 'MONKEY', color: 'green', condition: 'unrelated'}
|   ├── {id: 'c', word: 'ZAMBONI', color: 'blue', condition: 'unrelated'}
|   └── {id: 'd', word: 'RED', color: 'red', condition: 'congruent'}
└── id: summary
Importantly only the leaf nodes of the tree are considered steps. This means that the structure above has 6 nodes but only 5 steps (the stroop node is nested and so is ignored).
This also shows how you can access rows of the steps using array-like indexing:
const trials = api.steps.append([{ id: 'stroop' }, { id: 'summary' }])

trials[0].data // { id: 'stroop' }
trials[1].data // { id: 'summary' }
Accessing the data per step via the .stepData object
The API provides a getter method .stepData that returns the data for the current step. For example, when the stepper is on the first step, the .stepData object will contain the data for that step. When the stepper is on the second step, the .stepData object will contain the data for that step.
// on first step
api.stepData.word // 'SHIP'

api.goNextStep()

// now we are on second step
api.stepData.word // 'MONKEY'
A common use case then would be to use the <template> section of your View to display the current steps data:
<template>
  <h1
    class="text-6xl font-bold mb-8"
    :class="{
      'text-red-500': api.stepData.color === 'red',
      'text-blue-500': api.stepData.color === 'blue',
      'text-green-500': api.stepData.color === 'green',
    }"
  >
    {{ api.stepData.word }}
  </h1>
</template>
Advanced uses of Hierarchical Steps
When a step is nested within another step, the .stepData object will contain the data for that step and the ones above it (it's parents) via a merge operation.
Merge Behavior
The merge uses a merge-right approach, meaning that if a key or property is defined at a lower level node, it replaces the one from the higher level. This allows for inheritance of data from parent blocks while still allowing individual steps to override specific values.
For example, if you have a nested structure like:
trial/
  ├── block1/
  │   ├── step1 (has data: {response: 'A', score: 10})
  │   └── step2 (has data: {response: 'B', score: 20})
  └── block2/
      └── step3 (has data: {response: 'C', score: 30})
When you're at trial/block1/step2, the api.stepData will contain:
- Data from
trial(if any) - Data from
trial/block1(if any) - Data from
trial/block1/step2(if any)
All merged together, with lower-level data taking precedence over higher-level data.
stepData vs stepDataLeaf
The ViewAPI provides two ways to access step data:
api.stepData: Gets merged data from all steps in the current path (parent blocks + current step)api.stepDataLeaf: Gets data for only the current step (leaf node)
// Get merged data from current path (includes parent block data)
const data = api.stepData
console.log(data.blockType) // Access block-level property
console.log(data.response) // Access step-level property

// Get data from only current step
const leafData = api.stepDataLeaf
console.log(leafData.response) // Only current step data

// Set data on current step
api.stepDataLeaf.response = 'some value'

// Modify merged data (changes are saved to current step)
api.stepData.response = 'new value'const api = useViewAPI()
// define the trials for the experiment as a spec
const trials = api.steps.append([
{
id: 'stroop',
rt: () => api.faker.rnorm(500, 50), // add the autofill/expected data fields
hit: () => api.faker.rbinom(1, 0.8),
response: () => api.faker.rchoice(['r', 'g', 'b']),
},
])
trials[0]
.append([
{ id: 'a', word: 'SHIP', color: 'red', condition: 'unrelated' },
{ id: 'b', word: 'MONKEY', color: 'green', condition: 'unrelated' },
{ id: 'c', word: 'ZAMBONI', color: 'blue', condition: 'unrelated' },
{ id: 'd', word: 'RED', color: 'red', condition: 'congruent' },
{ id: 'e', word: 'GREEN', color: 'green', condition: 'congruent' },
{ id: 'f', word: 'BLUE', color: 'blue', condition: 'congruent' },
{ id: 'g', word: 'GREEN', color: 'red', condition: 'incongruent' },
{ id: 'h', word: 'BLUE', color: 'green', condition: 'incongruent' },
{ id: 'i', word: 'RED', color: 'blue', condition: 'incongruent' },
])
.shuffle()
trials.append([{ id: 'summary' }])Abstract Dependent Variable Definition
The merge-right behavior enables a powerful pattern for defining expected dependent variables abstractly at parent nodes. This allows you to specify what data should be collected at the step level without having to repeat the definition for each individual trial.
In the example above, the parent node (stroop) defines abstract expected values for rt, hit, and response using faker functions:
{
  id: 'stroop',
  // Define expected dependent variables using faker functions
  rt: () => api.faker.rnorm(500, 50),    // Expected response time
  hit: () => api.faker.rbinom(1, 0.8),   // Expected accuracy (hit/miss)
  response: () => api.faker.rchoice(['r', 'g', 'b']), // Expected response
}
Each leaf node (individual trials) inherits these definitions. When a leaf node records a real value (e.g., api.stepData.rt = 450), it replaces the abstract definition. This makes it very efficient to see what data is expected to be collected at each step.
In a real expermient we might update the data like this:
// At the trial level, record real participant data
api.stepData.rt = 450 // Real response time
api.stepData.hit = 1 // Real accuracy (1 = correct)
api.stepData.response = 'r' // Real response

// The abstract definitions from the parent are now replaced with real values
console.log(api.stepData.rt) // 450 (real value)
console.log(api.stepData.hit) // 1 (real value)
console.log(api.stepData.response) // 'r' (real value)
This construction makes it very efficient to see what data is expected to be collected on each step, while allowing for flexible data collection and analysis. This is a key enabling of the Autofill function.
Blocks and Block-Level Addressing
Blocks provide ways of addressing the current cluster of trials at the same level. In the stroop example, you might want to know what trial you are on within the stroop trials, ignoring the summary leaf node.
Block-Level Properties
The ViewAPI provides several properties for working with blocks:
api.blockLength- The number of steps in the current blockapi.blockIndex- The index of the current step within the current blockapi.isLastBlockStep()- Whether the current step is the last step in the current block
Example Usage
// In the stroop example structure:
// ├── id: stroop (block)
// │   ├── {id: 'a', word: 'SHIP', color: 'red', condition: 'unrelated'}
// │   ├── {id: 'b', word: 'MONKEY', color: 'green', condition: 'unrelated'}
// │   ├── {id: 'c', word: 'ZAMBONI', color: 'blue', condition: 'unrelated'}
// │   ├── {id: 'd', word: 'RED', color: 'red', condition: 'congruent'}
// │   ├── {id: 'e', word: 'GREEN', color: 'green', condition: 'congruent'}
// │   ├── {id: 'f', word: 'BLUE', color: 'blue', condition: 'congruent'}
// │   ├── {id: 'g', word: 'GREEN', color: 'red', condition: 'incongruent'}
// │   ├── {id: 'h', word: 'BLUE', color: 'green', condition: 'incongruent'}
// │   └── {id: 'i', word: 'RED', color: 'blue', condition: 'incongruent'}
// └── id: summary

// When on the first stroop trial (id: 'a'):
console.log(api.blockLength) // 9 (total stroop trials)
console.log(api.blockIndex) // 0 (first trial in block)
console.log(api.isLastBlockStep()) // false

// When on the last stroop trial (id: 'i'):
console.log(api.blockLength) // 9 (total stroop trials)
console.log(api.blockIndex) // 8 (last trial in block)
console.log(api.isLastBlockStep()) // true

// When on the summary step:
console.log(api.blockLength) // 1 (only the summary step)
console.log(api.blockIndex) // 0 (first and only step in block)
console.log(api.isLastBlockStep()) // true
Block-Level Navigation
You can also navigate within blocks:
// Check if you're at the end of the current block
if (api.isLastBlockStep()) {
  // Do something when finishing a block
  console.log('Finished stroop block!')
}

// Get progress within current block
const progress = (api.blockIndex + 1) / api.blockLength
console.log(`Trial ${api.blockIndex + 1} of ${api.blockLength}`)
Navigating through steps
The ViewAPI object provides methods for controlling trial navigation:
api.goNextStep(resetScroll = true)- Advance to the next trial. Returns the index of the next state (0, 1, 2, etc.) ornullif at the end. TheresetScrollparameter controls whether to automatically scroll to the top of the page after navigation.api.goPrevStep(resetScroll = true)- Go back to the previous trial. Returns the index of the previous state ornullif at the beginning. TheresetScrollparameter controls whether to automatically scroll to the top of the page after navigation.api.stepData- An array of data objects along the current path (e.g.,[{ shape: 'circle', color: 'red' }])api.stepIndex- The index of the current step in the stepper (i.e., the current index of leaf node)api.blockIndex- The index of the current block in the stepper (i.e., the current index of the block node)api.pathString- The path to the current step as a string (e.g., "0" for first trial, "0-0" for nested trials)api.path- The path to the current step as an array (e.g., ["0", "0"] for nested trials)api.length- The number of steps in the stepperapi.blockLength- The number of steps in the current blockapi.stepLength/api.nSteps- The number of steps in the current stepapi.isLastStep()- Whether the current step is the last step in the stepperapi.isLastBlockStep()- Whether the current step is the last step in the current block
Recording data from a step
There is one easy to use function for recording data from the current step into the firestore data store.
api.recordStep()- Record the current step data to the state machine
When you record data using api.recordStep(), the data is immediately saved to the local browser storage and persisted across page reloads. However, the data is not immediately sent to Firestore - it's queued for synchronization until the next View navigation occurs. This design provides both immediate local persistence and efficient batch synchronization. Since step data is persisted locally and survives browser reloads, the data is effectively saved and ready for syncing to Firestore when the participant navigates to the next View. This approach ensures data integrity while optimizing network requests by batching multiple step recordings together.
Persisting data for the view (not just a step)
All the data for the steps are persisted in the browser's local storage. This means that if the subject reloads the page, or navigates to a different site and then returns, the task will resume from the same step. This is nice because it helps ensure that subjects are always completing the set of steps/trials assigned to them and are not able to start the task over (possibly introducing biased data from practice effects or exposure to different manipulations).
The ViewAPI object provides a .persist object that can be used to persist data for the view that is not associated with a step. This data is stored in the browser's local storage and is available even after the page is reloaded.
api.persist.myVar = 'value'This variable will now be available in the View even after the page is reloaded. It is also visible in the developer tools side panel.
Methods of defining steps
append()
The append() method is used to add a list of steps to the stepper.
const trials = api.steps.append([
  { id: 'a', word: 'SHIP', color: 'red', condition: 'unrelated' },
  { id: 'b', word: 'MONKEY', color: 'green', condition: 'unrelated' },
  { id: 'c', word: 'ZAMBONI', color: 'blue', condition: 'unrelated' },
  { id: 'd', word: 'RED', color: 'red', condition: 'congruent' },
])
zip()
The zip() method combines multiple arrays of values into trial objects, pairing values by their position:
const trials = api.steps.zip({
  shape: ['circle', 'square', 'triangle'],
  color: ['red', 'green', 'blue'],
})

// Results in:
// [
//   { shape: 'circle', color: 'red' },
//   { shape: 'square', color: 'green' },
//   { shape: 'triangle', color: 'blue' }
// ]
By default, zip() requires all arrays to have the same length. If the arrays have different lengths, you must specify how to handle this using the method option:
// Loop shorter arrays
const trials1 = api.steps.zip(
  {
    shape: ['circle', 'square'],
    color: ['red', 'green', 'blue'],
  },
  { method: 'loop' }
)
// Results in:
// [
//   { shape: 'circle', color: 'red' },
//   { shape: 'square', color: 'green' },
//   { shape: 'circle', color: 'blue' }
// ]

// Pad with a specific value
const trials2 = api.steps.zip(
  {
    shape: ['circle', 'square'],
    color: ['red', 'green', 'blue'],
  },
  { method: 'pad', padValue: 'unknown' }
)
// Results in:
// [
//   { shape: 'circle', color: 'red' },
//   { shape: 'square', color: 'green' },
//   { shape: 'unknown', color: 'blue' }
// ]

// Repeat the last value
const trials3 = api.steps.zip(
  {
    shape: ['circle', 'square'],
    color: ['red', 'green', 'blue'],
  },
  { method: 'last' }
)
// Results in:
// [
//   { shape: 'circle', color: 'red' },
//   { shape: 'square', color: 'green' },
//   { shape: 'square', color: 'blue' }
// ]
Non-Array Values
The zip() method can handle non-array values by treating them as single-element arrays:
const stepper = api.useHStepper()

const trials = stepper.spec().zip(
  {
    shape: 'circle', // Treated as ['circle']
    color: ['red', 'green', 'blue'],
  },
  { method: 'loop' }
)

// Results in:
// [
//   { shape: 'circle', color: 'red' },
//   { shape: 'circle', color: 'green' },
//   { shape: 'circle', color: 'blue' }
// ]
Warning: Dealing with different lengths
When using zip(), if the arrays have different lengths:
- By default, it will throw an error
- You must specify a
methodto handle the difference:'loop': Repeats the shorter array values'pad': Fills with a specifiedpadValue(required)'last': Repeats the last value of each shorter array
outer()
The outer() method creates all possible combinations of values:
const trials = api.steps.outer({
  shape: ['circle', 'square'],
  color: ['red', 'green'],
})

// Results in:
// [
//   { shape: 'circle', color: 'red' },
//   { shape: 'circle', color: 'green' },
//   { shape: 'square', color: 'red' },
//   { shape: 'square', color: 'green' }
// ]
Like zip(), the outer() method can handle non-array values by treating them as single-element arrays:
const trials = api.steps.outer({
  shape: 'circle', // Treated as ['circle']
  color: ['red', 'green'],
})

// Results in:
// [
//   { shape: 'circle', color: 'red' },
//   { shape: 'circle', color: 'green' }
// ]
Warning: safety Limit
The outer() method has a safety limit of 5000 combinations to prevent accidentally creating too many trials. If you exceed this limit, it will throw an error.
forEach()
The forEach() method allows you to modify each trial:
const trials = api.steps
  .append([
    { shape: 'circle', color: 'red' },
    { shape: 'square', color: 'green' },
  ])
  .forEach((row, index) => {
    if (index === 0) {
      return { ...row, color: 'blue' }
    }
    return row
  })

// Results in:
// [
//   { shape: 'circle', color: 'blue' },
//   { shape: 'square', color: 'green' }
// ]
The id Field
When building trial tables, you can use a special id field in your trial data to explicitly control the node identifiers in the state machine. This is useful when you need specific path values rather than the default sequential numbering:
const trials = api.steps.append([
  { id: 'intro', type: 'instruction' },
  { id: 'practice', type: 'trial' },
  { id: 'main', type: 'trial' },
])

// Results in nodes with paths:
// - "intro"
// - "practice"
// - "main"
// Instead of the default:
// - "0"
// - "1"
// - "2"
This also works with nested tables:
const trials = api.steps.append({ id: 'block1' })
trials[0].append([
  { id: 'stim', type: 'stimulus' },
  { id: 'feedback', type: 'feedback' },
])

// Results in paths:
// - "block1/stim"
// - "block1/feedback"
If no path field is provided, the stepper will use default sequential numbering for node identifiers.
Dynamically building steps
Sometimes you may want to build steps incrementally or dynamically. This can be useful if you want to add steps to the stepper after the task has started. For example, you may want to add steps to the stepper after the user has completed a task, or conditionally based on the user's response. Here is an example of a simple component that steps through 10 steps which are added incrementally. This example leverages several of the concepts above including the use of the id field to control the node identifiers in the state machine, and the use of the persist object to persist data across browser reloads. The nice thing about this is that if the user reloads the page, the task will resume from the same step they were on.
<script setup>
// An Incremental Test
// import and initalize smile API
import useViewAPI from '@/core/composables/useViewAPI'
const api = useViewAPI()
// import the constrained task window layout and a nice button
import { ConstrainedTaskWindow } from '@/uikit/layouts'
import { Button } from '@/uikit/components/ui/button'
// initialize the persistent variables
// these will persist across browser reloads
if (!api.persist.isDefined('i')) {
api.persist.i = 0 // the current trial number
api.persist.nTrials = 10 // the number of regular trials (feedback is added after)
}
// add the first trial to the steps
// note that the id is the trial number and the val is the value of the trial
// each trial needs to be unique so we use the trial number as the id
const trials = api.steps.append({
id: 'trial' + String(api.persist.i),
val: api.persist.i,
})
// start the timer
if (!api.isTimerStarted()) {
api.startTimer()
}
// Handle the key presses for the task
const stop = api.onKeyDown(
['n', 'N'], // list of keys to listen for
(e) => {
// if we are not at the feedback trial, increment the trial number and add a new trial
if (api.stepIndex < api.persist.nTrials) {
e.preventDefault()
// record the reaction time and the response
const reactionTime = api.elapsedTime()
api.stepData.rt = reactionTime
api.stepData.response = e.key
api.recordStep() // record the step data
api.persist.i++ // increment the trial number
// add the new trial to the steps (feedback after all regular trials)
const isFeedback = api.persist.i === api.persist.nTrials
trials.append({
id: isFeedback ? 'feedback' : 'trial' + String(api.persist.i),
val: api.persist.i,
})
// go to the next trial
api.goNextStep()
}
},
{ dedupe: true }
)
function finish() {
// record the reaction time for the feedback screen
const reactionTime = api.elapsedTime()
api.stepData.rt = reactionTime
api.stepData.response = 'finish'
api.recordStep()
api.goNextView()
}
</script>
<template>
<ConstrainedTaskWindow
variant="ghost"
:responsiveUI="api.config.responsiveUI"
:width="api.config.windowsizerRequest.width"
:height="api.config.windowsizerRequest.height"
>
<div class="page prevent-select">
<!-- Show feedback trial (after all regular trials) -->
<div class="text-center" v-if="api.stepIndex === api.persist.nTrials">
<h1 class="text-2xl font-bold mb-4">Feedback</h1>
<p class="text-lg text-muted-foreground mt-4 mb-6">
You completed all the trials!
</p>
<Button class="button is-success" id="finish" @click="finish()">
Finish
<i-fa6-solid-arrow-right />
</Button>
</div>
<!-- Show this for regular trials -->
<div class="text-center" v-else>
<h1 class="text-2xl font-bold mb-4">
Increment {{ api.stepData.val }}
</h1>
<p class="text-lg text-muted-foreground mt-4">
Type "N" to increment the value.
</p>
</div>
</div>
</ConstrainedTaskWindow>
</template>Here is a video of the example above in action showing the steps being added to the side bar incrementally and also the state reloading after a page reload.