Set up for new organization
Labs and organizations that are looking to start using Smile will have to configure a small set of services (GitHub, Firebase, Slack, and a web server) to communicate with one another. This configuration only needs to be done one time for a new organization, and then multiple users in a group will be able to share these resources. If you are using Smile for the first time as a solo user, you will need to configure these services for yourself before you develop your first experiment.
First time user of an existing lab?
You're in luck! If your lab already has a base repo in place, please skip this guide and jump straight to adding a new user to be added to your organization. If you would like to learn more about how to set up your own configuration for smile, keep reading.
Overview
Smile glues together several affordable or free web services in order to make developing and launching experiments relatively painless.
GitHub (required).
The project relies heavily on GitHub for managing code and projects. GitHub not only organizes versions of your code usinggitbut also allows you to run scripts each time you make a change to the code that can upload the latest version of your project to the web.Google Firebase/Firestore (required).
Smile stores the data from your experiments in a Google Firestore database. Firestore is a robust schema-less database solution ideally suited for the web. The cost is low for even fairly large experiments and datasets (although there are some technical limits, see here for more info).Slack (optional).
In order to notify you and your other lab members when certain tasks are complete or if there are errors, Smile uses a Slack bot. You need to have a Slack account and get API keys to enable this. If you don't want to use Slack it is possible to modify the scripts to provide notifications another way (e.g., email), but currently, that is not implemented.Slack alternatives
One very simple option is to modify the scripts to send you an email when your task is deployed. Another option is ntfy.sh, which can send notifications to your phone or computer (using browser notifications) when a script completes (see StackOverflow for a discussion).
An SSL-signed HTTP/web server (required).
Finally, you need to provide a web hosting site to host your experiments. The requirements of this website are quite simple: you just need a regular static HTTP server with a secure signed certificate (SSL). Many web hosting services provide this type of account, as well as many universities. If you are looking for recommendations, gureckislab uses Dreamhost.com, which costs as little as $3/month for a single SSL-hosted website. This would cover all possible experiments you would want to run, so the cost would never be much more than that.
The general overview of how these services interact is shown below:

You push code to GitHub. Each time this happens, your code is deployed to your web (i.e., http) server. In addition, a message is posted to Slack to let you know that deployment was successful (or to let you know that there were errors preventing deployment). Participants access your task via their web browser, which is able to write to the Google Firebase database.
The following sections walk you through configuring each of these services. This takes a few steps, but it is a one-time setup. Afterwards, multiple members of a lab can deploy multiple projects using the same infrastructure, without worrying about the details of this underlying configuration.
Setup GitHub
The following steps walk you through setting up GitHub to use with Smile and introduce some basic concepts.
Create accounts
GitHub acts as a hub for most things in Smile. Each person in your lab needs to have a GitHub account (these are free). In addition, it makes sense for your lab to create a GitHub organization (also known as team). GitHub organizations are meta-accounts that multiple individuals can belong to, granting them access to multiple private and public repositories.
- First, create a new organization, using the docs provided by GitHub here.
- Next, optionally, you can use the GitHub Education for Teachers program to request a free "Team" level upgrade to your organization, allowing you to use several useful and required GitHub services for free, including GitHub Actions. This might be preferred if you anticipate heavy usage of your organization's GitHub page. However, even the free level (called GitHub Free) works!
- Finally, you can locate the organization in GitHub and invite the members of your lab to be members of the organization.
Set up a "base" Smile repo for your organization/lab
Next, you want to create a fork of the main Smile GitHub repo for use in your organization. A fork is a copy of all the code in a repository that can then be developed and changed independently of the parent. However, you maintain a connection to the original repository so you can pull down and synchronize changes from the child and parent repositories when you want. This new forked repo will be your lab's "base" repo. All your individual projects will then fork from your lab's "base" repo. This allows you to share the lab/organization-specific configuration files with all the repos that fork from your base repo. For example, you might have a custom university logo or informed consent form, and if you make a base repo for your lab, every sub-project can automatically grab these changes from the base Smile repo. It is recommended you fork from your lab's base repo because you can then make common changes that should apply to all your experiments (e.g., logos, branding, consent forms). Of course, you can also fork from the main Smile repo as well.
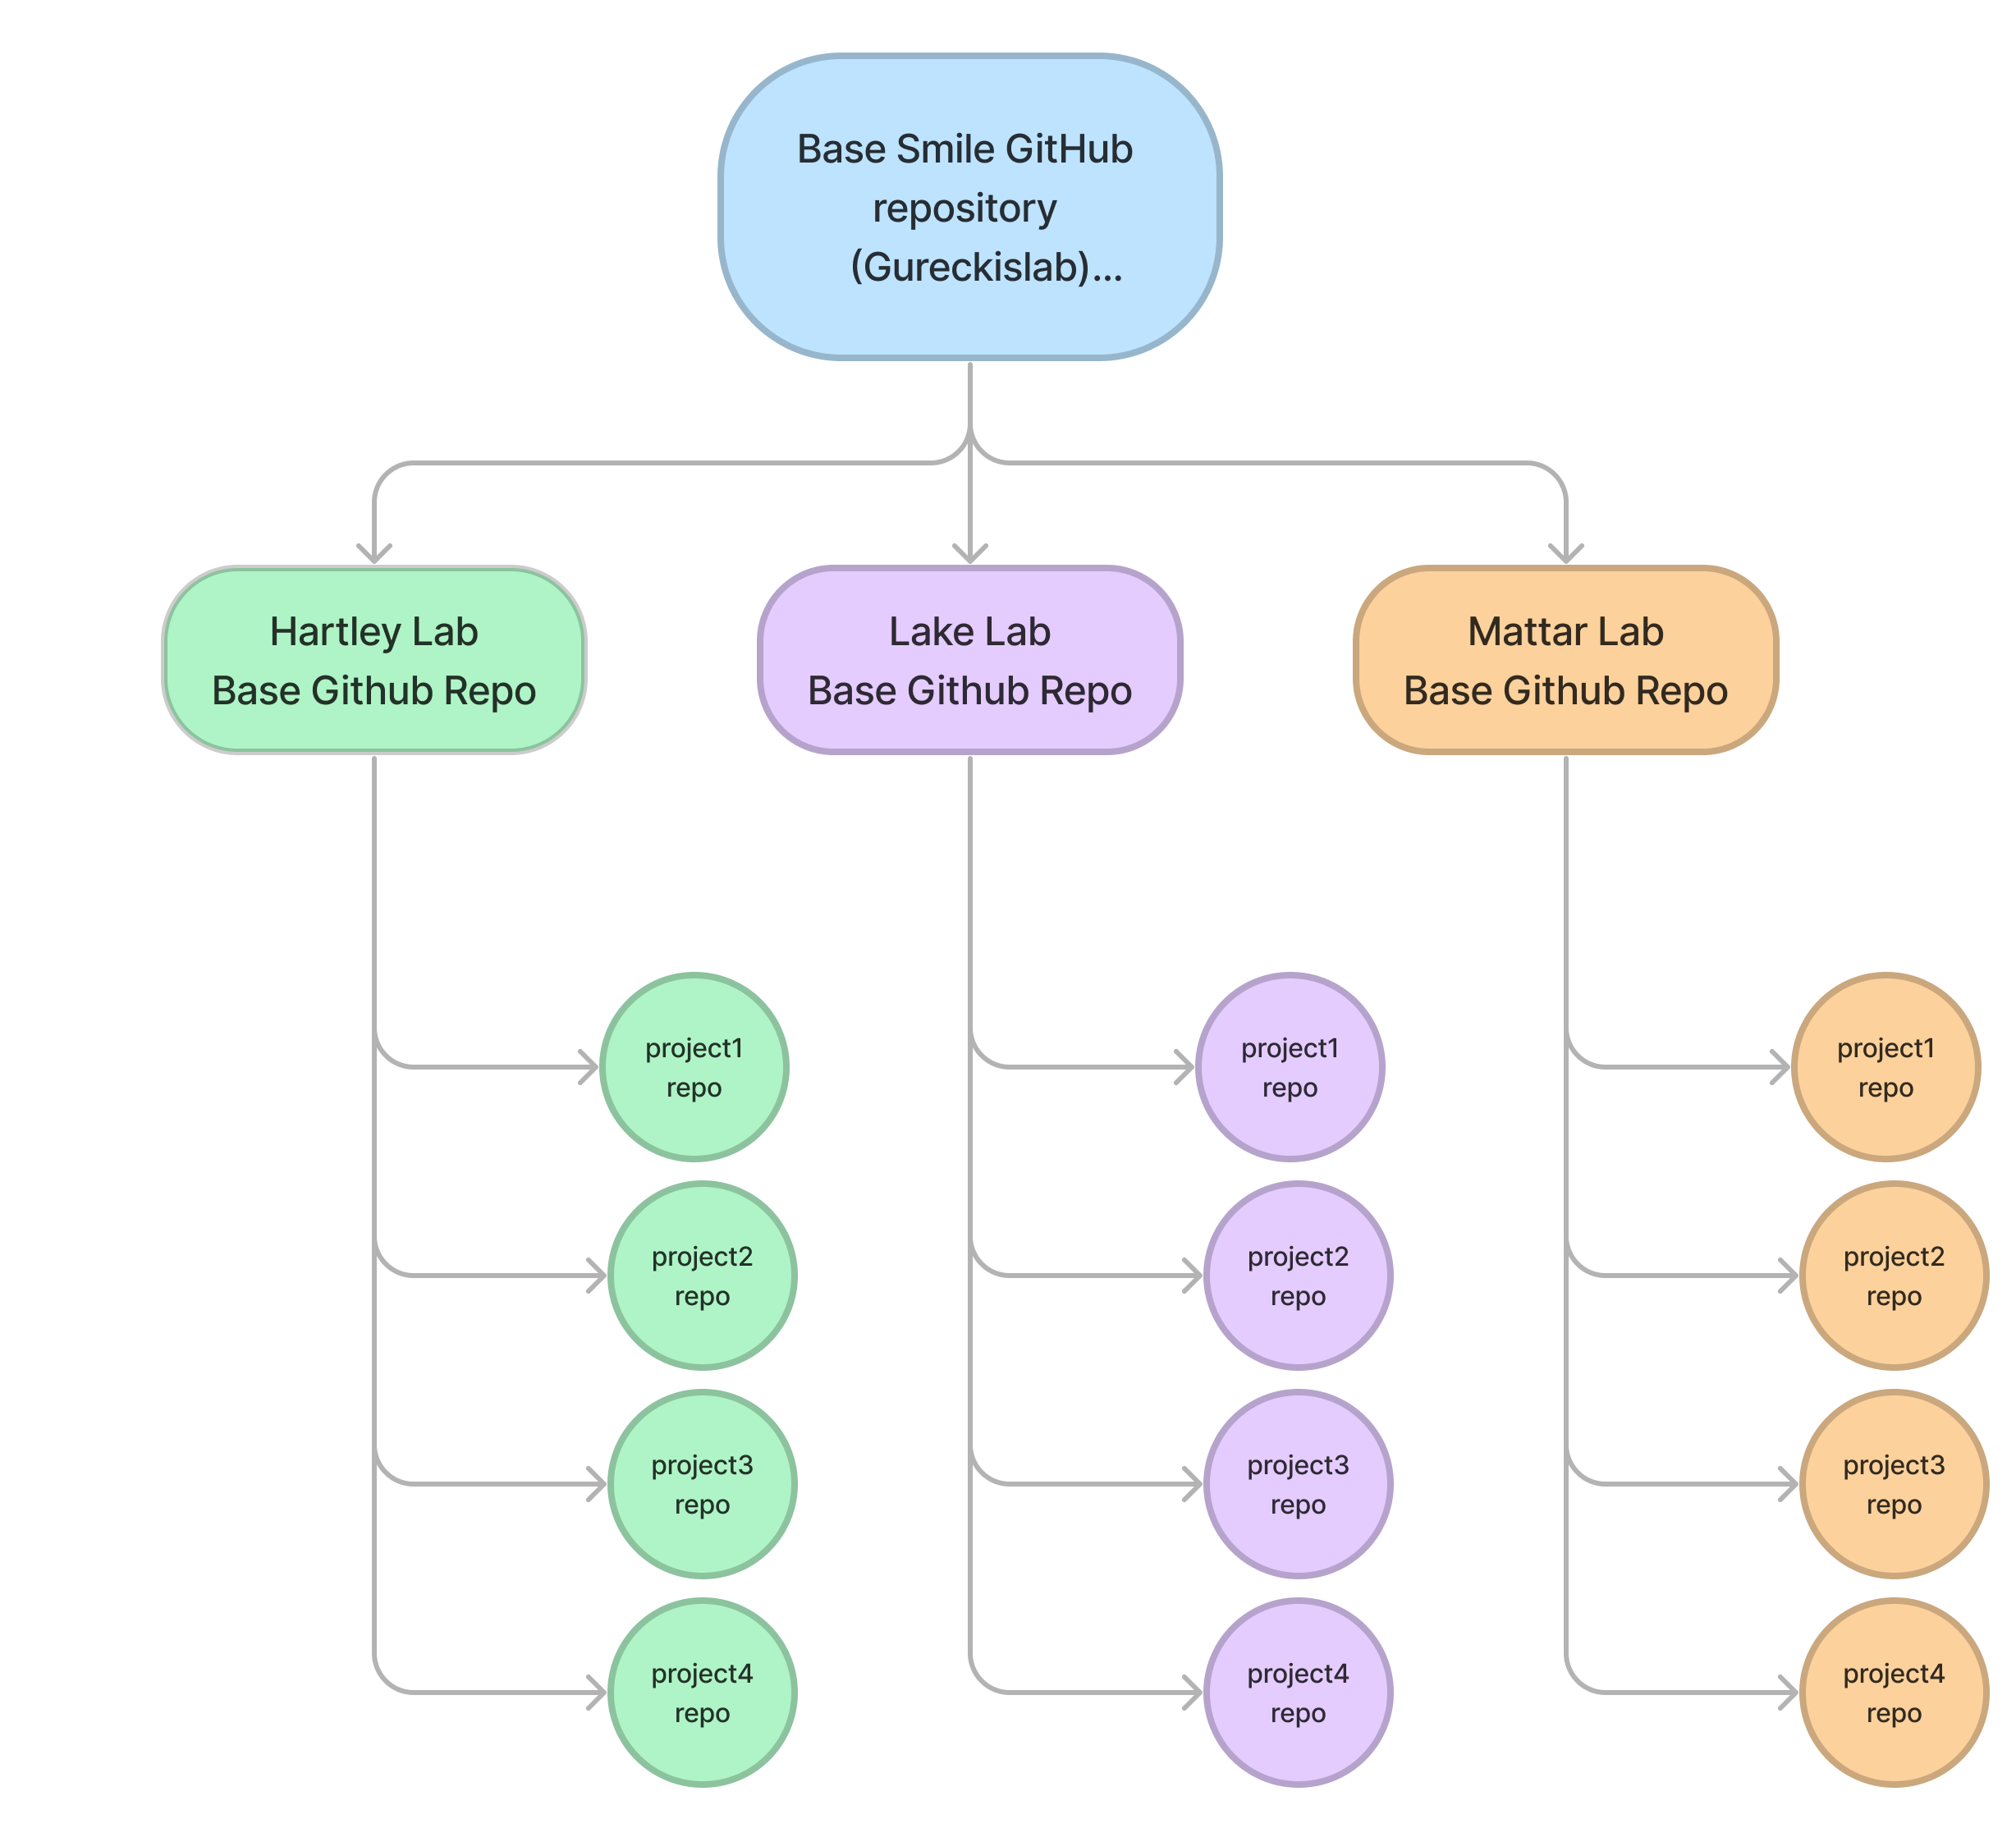
In the figure above, each node is a GitHub repository. Each lab (Hartley Lab, Lake Lab, Mattar Lab) forks from the base Smile repo. Then, student projects for that lab fork from the lab's base and inherit the lab-specific configuration files.
To create this base repo, navigate to the main Smile repo here. A screenshot of this page should look like this:
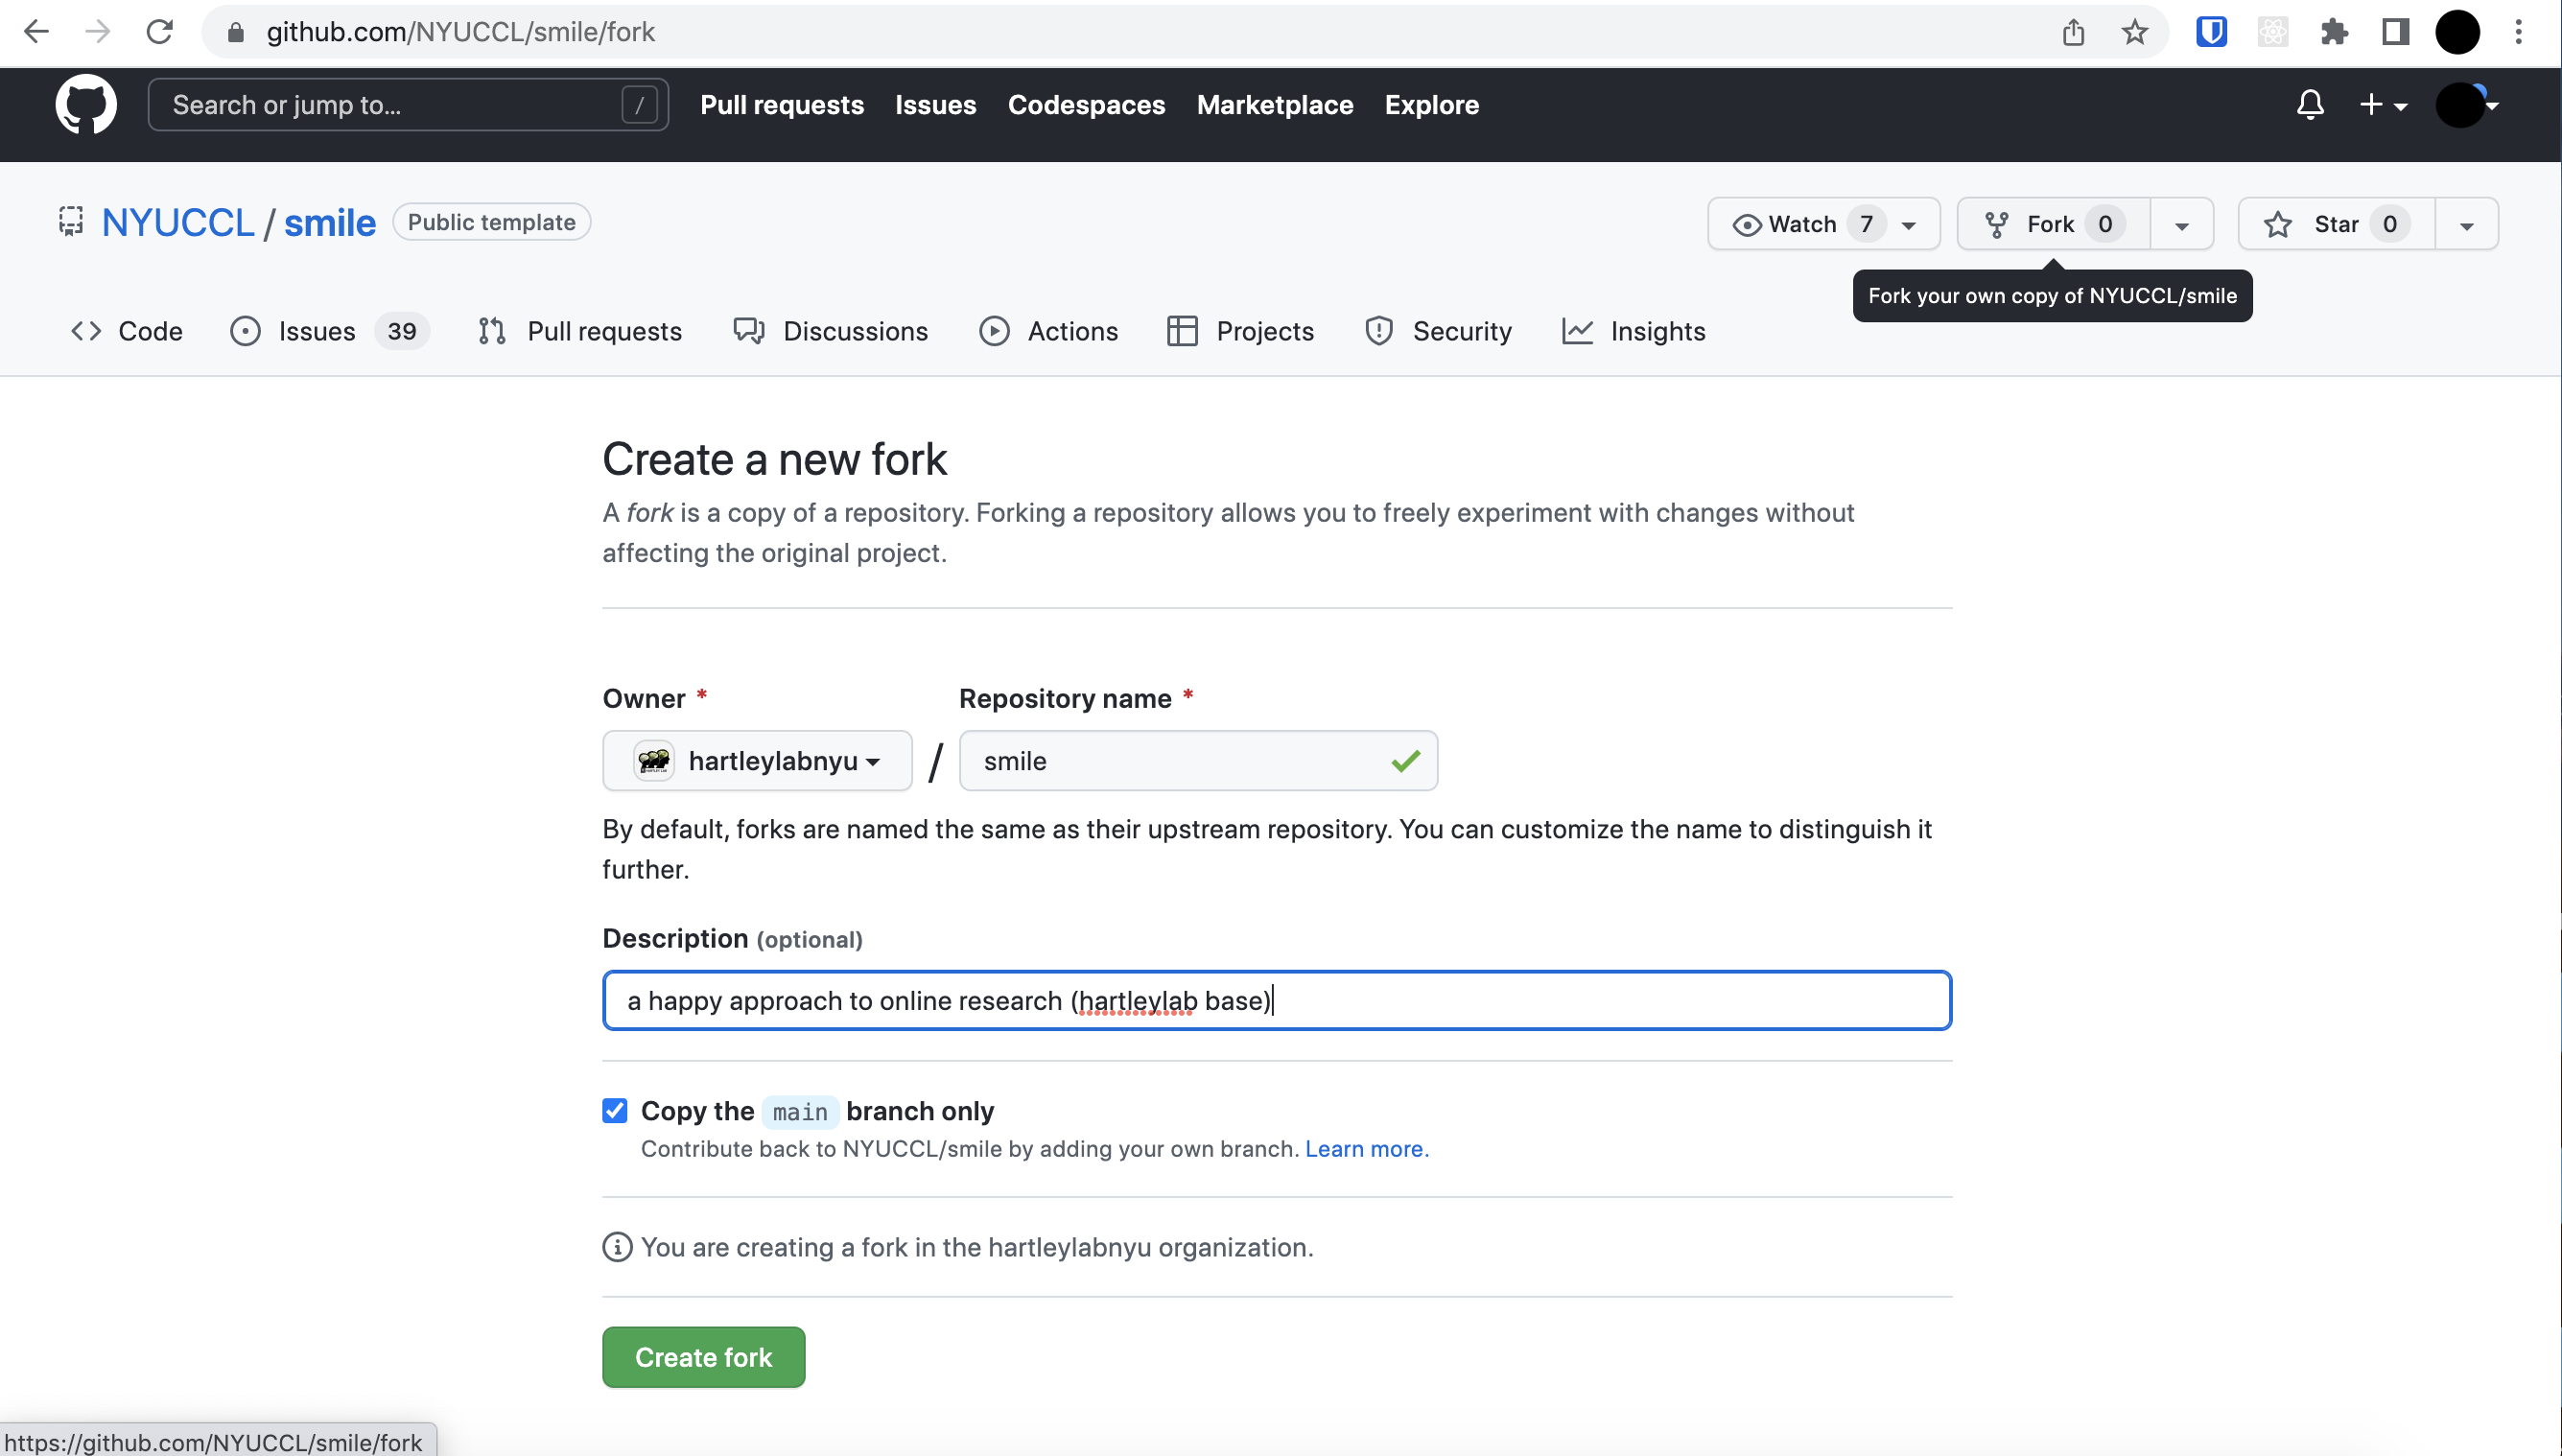
Be sure to make the owner of the account your organization rather than your personal GitHub account. The name can be anything, but smile works. The description is up to you. It's fine to copy only the main branch.
This will create a new repository that will look like this (assuming your organization was hartleylabnyu):
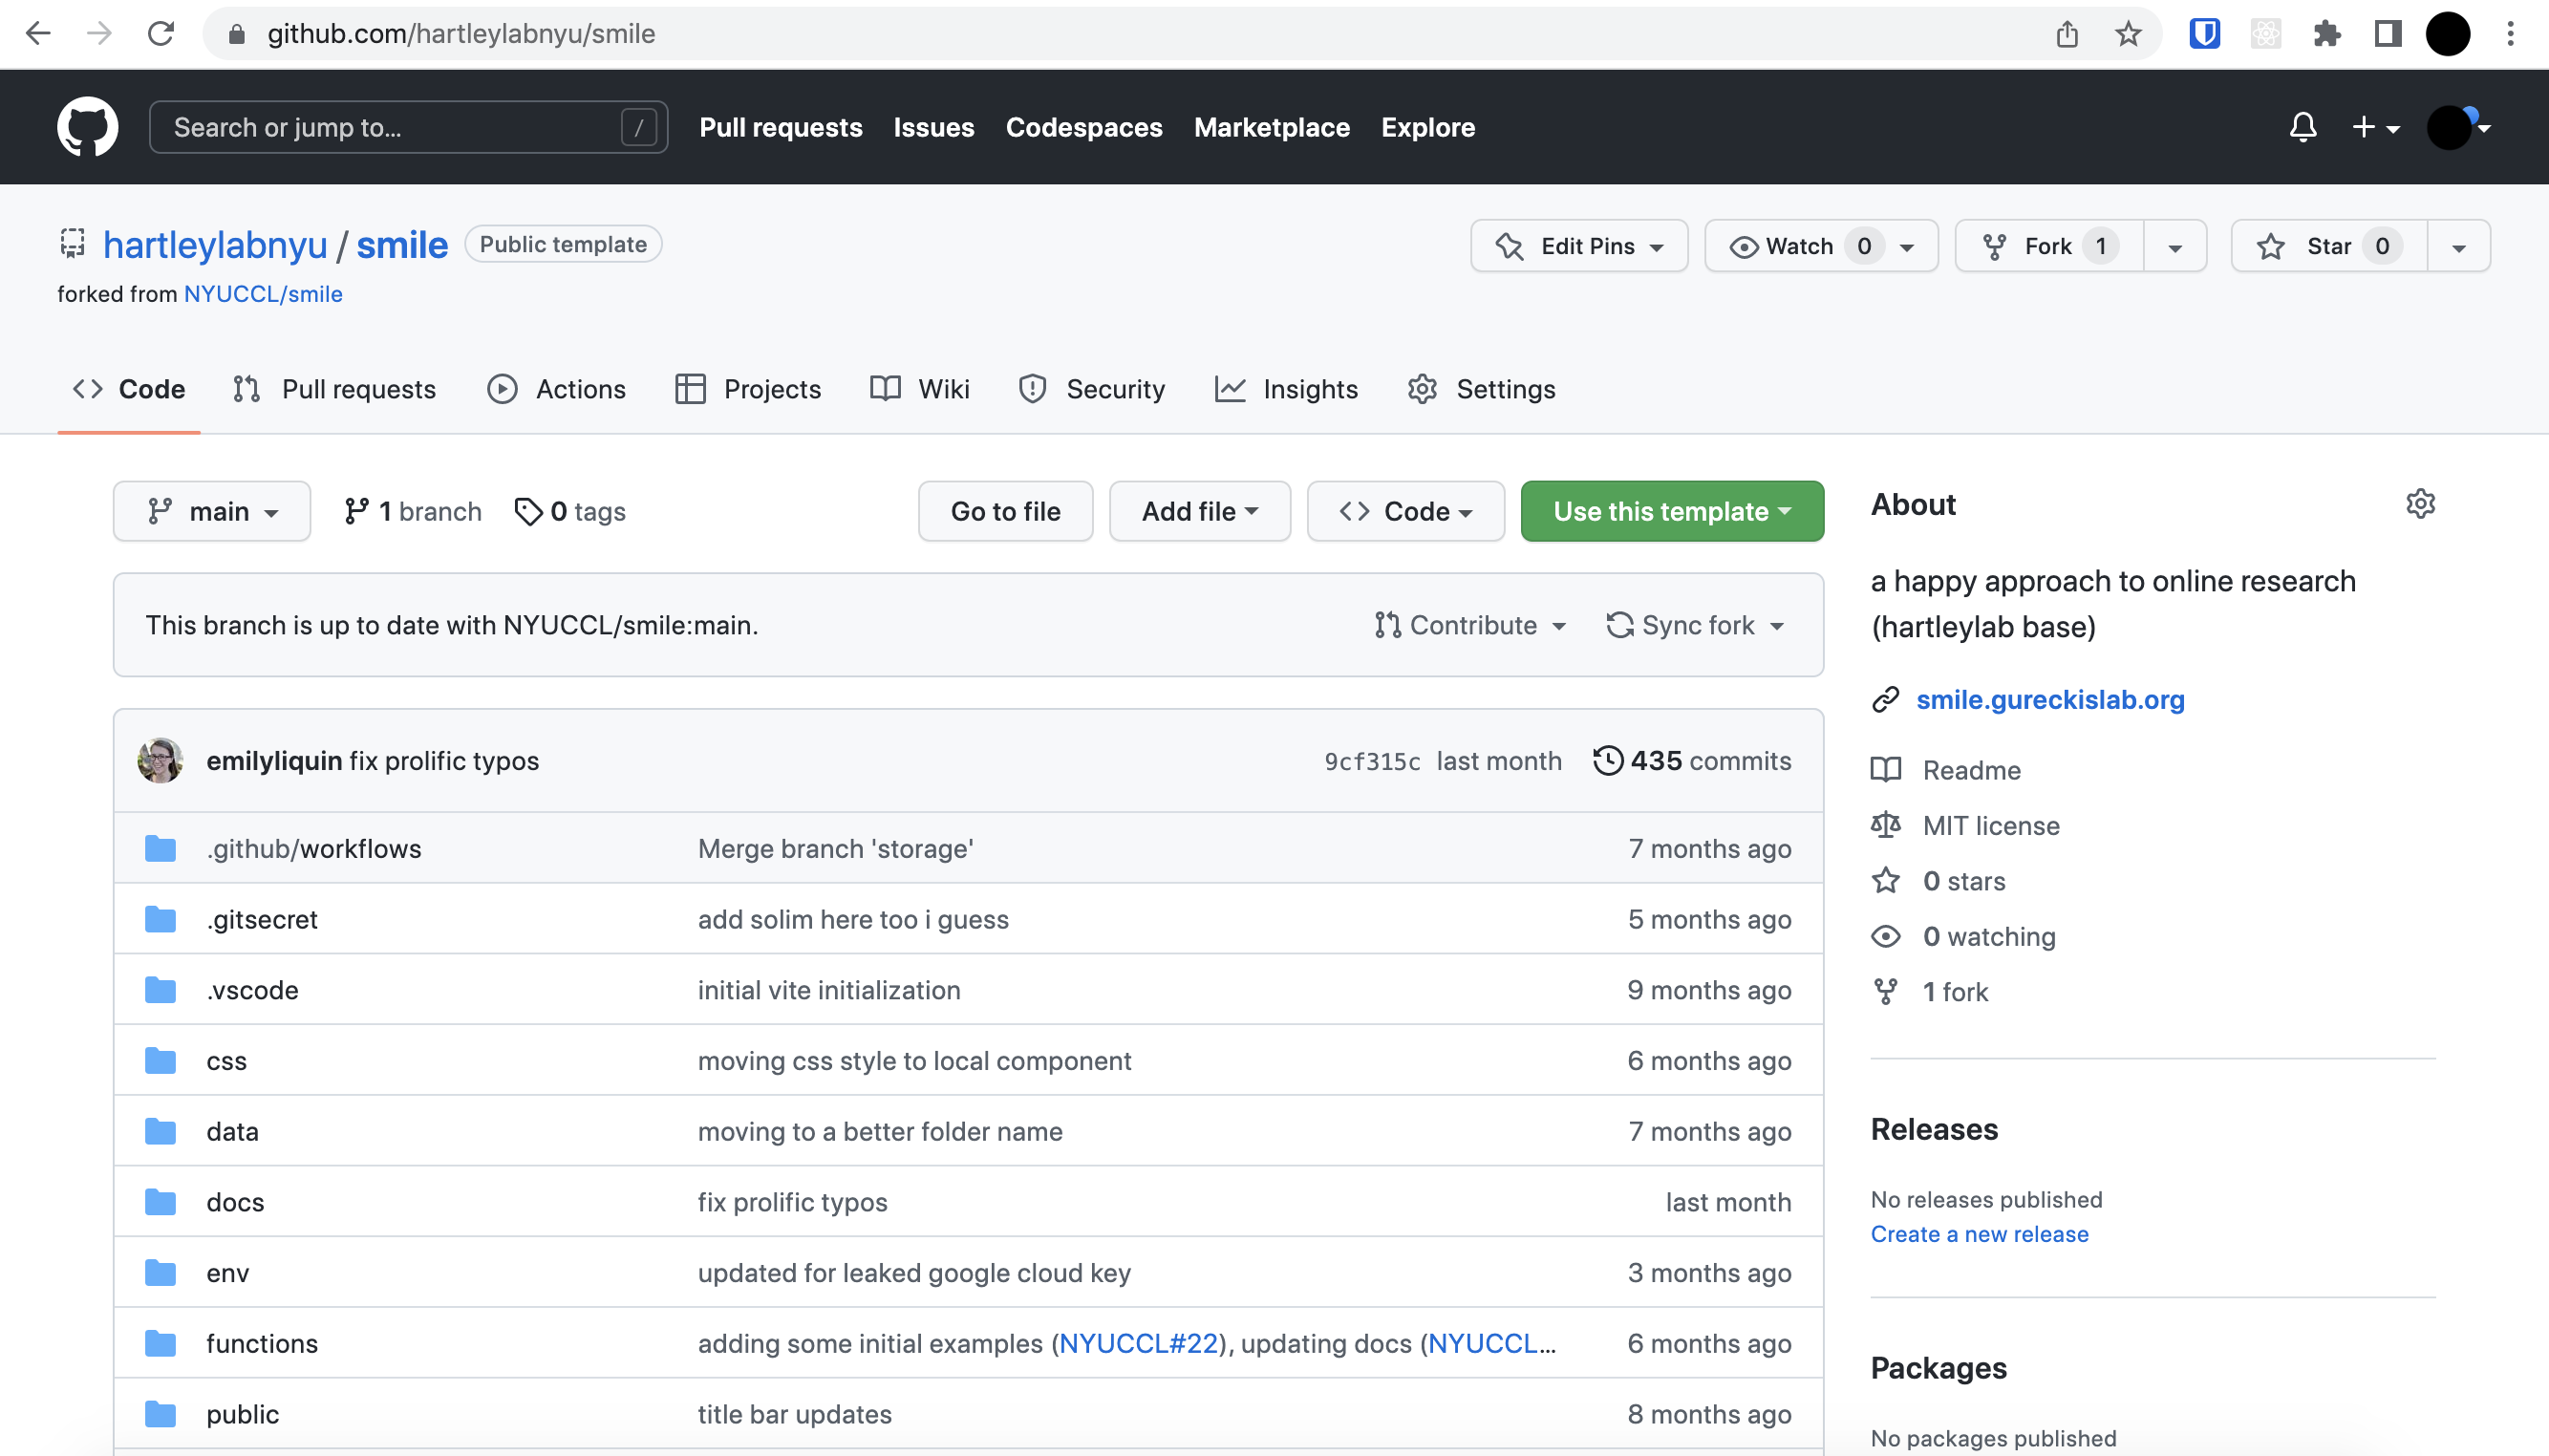
By default, GitHub will not run Workflows on a forked repository. Smile uses GitHub Workflows to automatically deploy your experiment whenever changes are pushed to GitHub (see deploy docs for full details). If you'd like to take advantage of this functionality, you'll need to enable Workflows on your new template repository. Go to the "Actions" tab for your new GitHub repo, and click the button to enable Workflows: 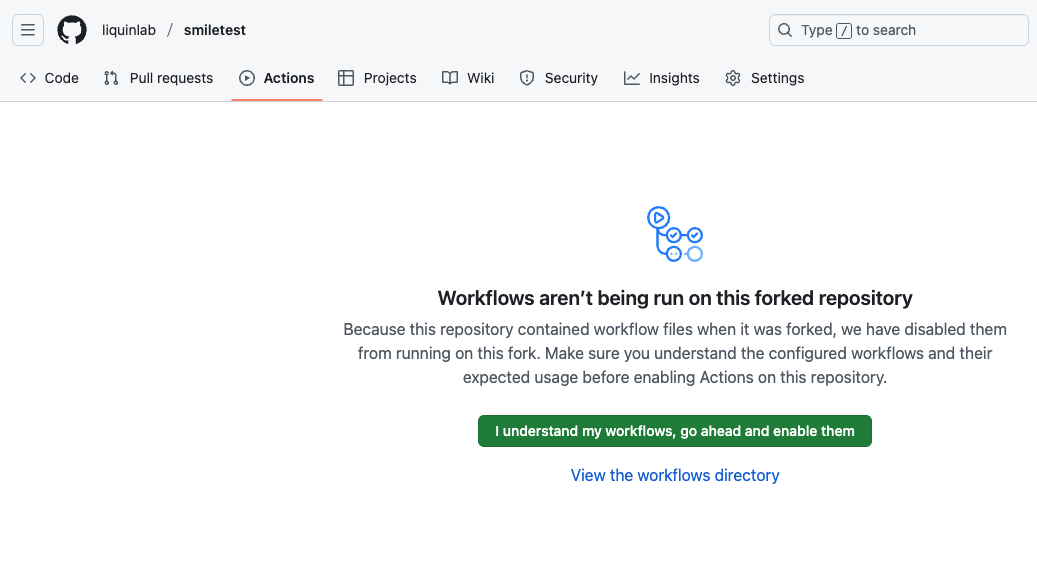
Next, you should clone a local copy of this repo to your computer with the link found under the "Use this template" tab shown below:

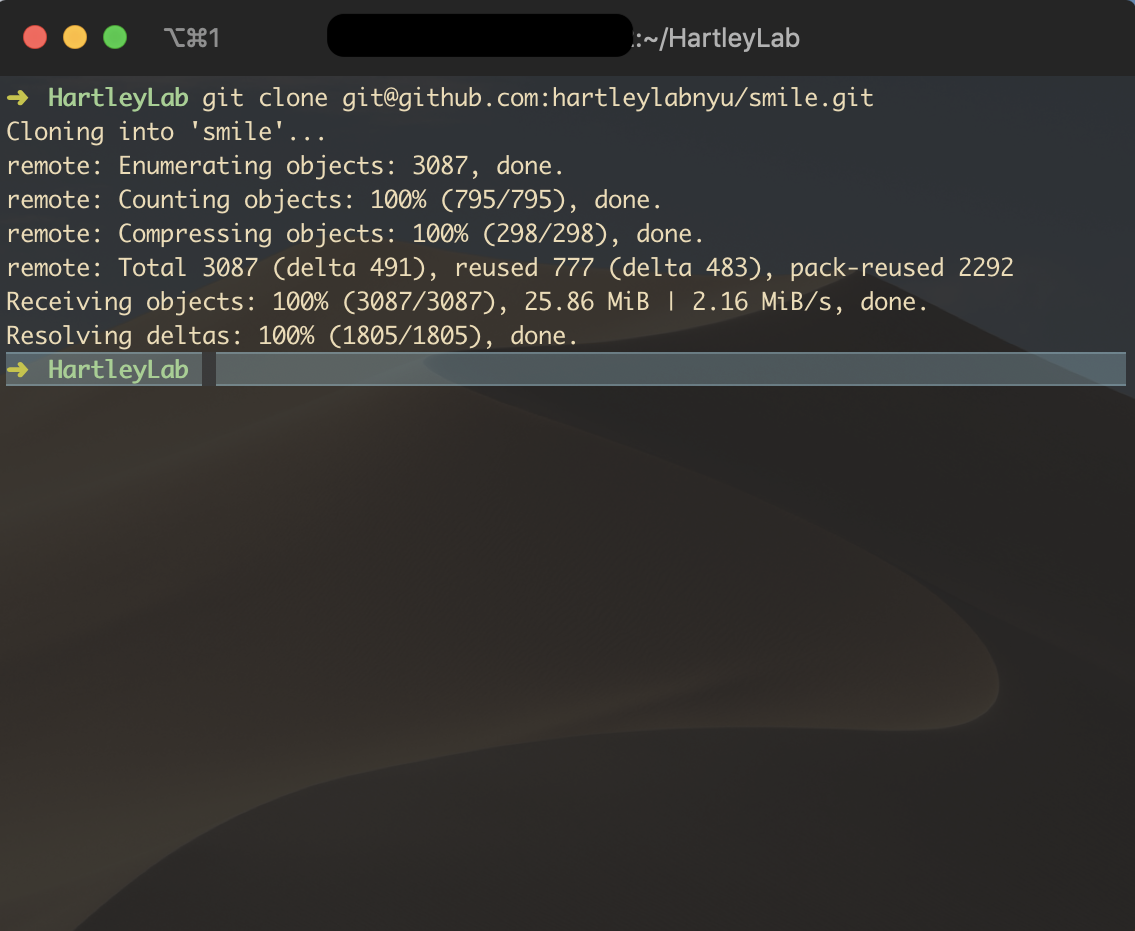
After successfully cloning your repository to your local system, you will have a fresh copy of the Smile project files in a folder on your computer. This repository/folder will now serve as a template for each new project/experiment.
Setup Firebase
Data storage and recording is provided using Firebase cloud services (specifically Firestore, which is a database service provided under the general Firebase system). You need to create a Firebase account and a Firestore project.
First, go to https://console.firebase.google.com and create an account. After your account is created, you are presented with a page that looks like this:

Click create project and then choose a project name (can be anything, e.g., your lab/org name): 
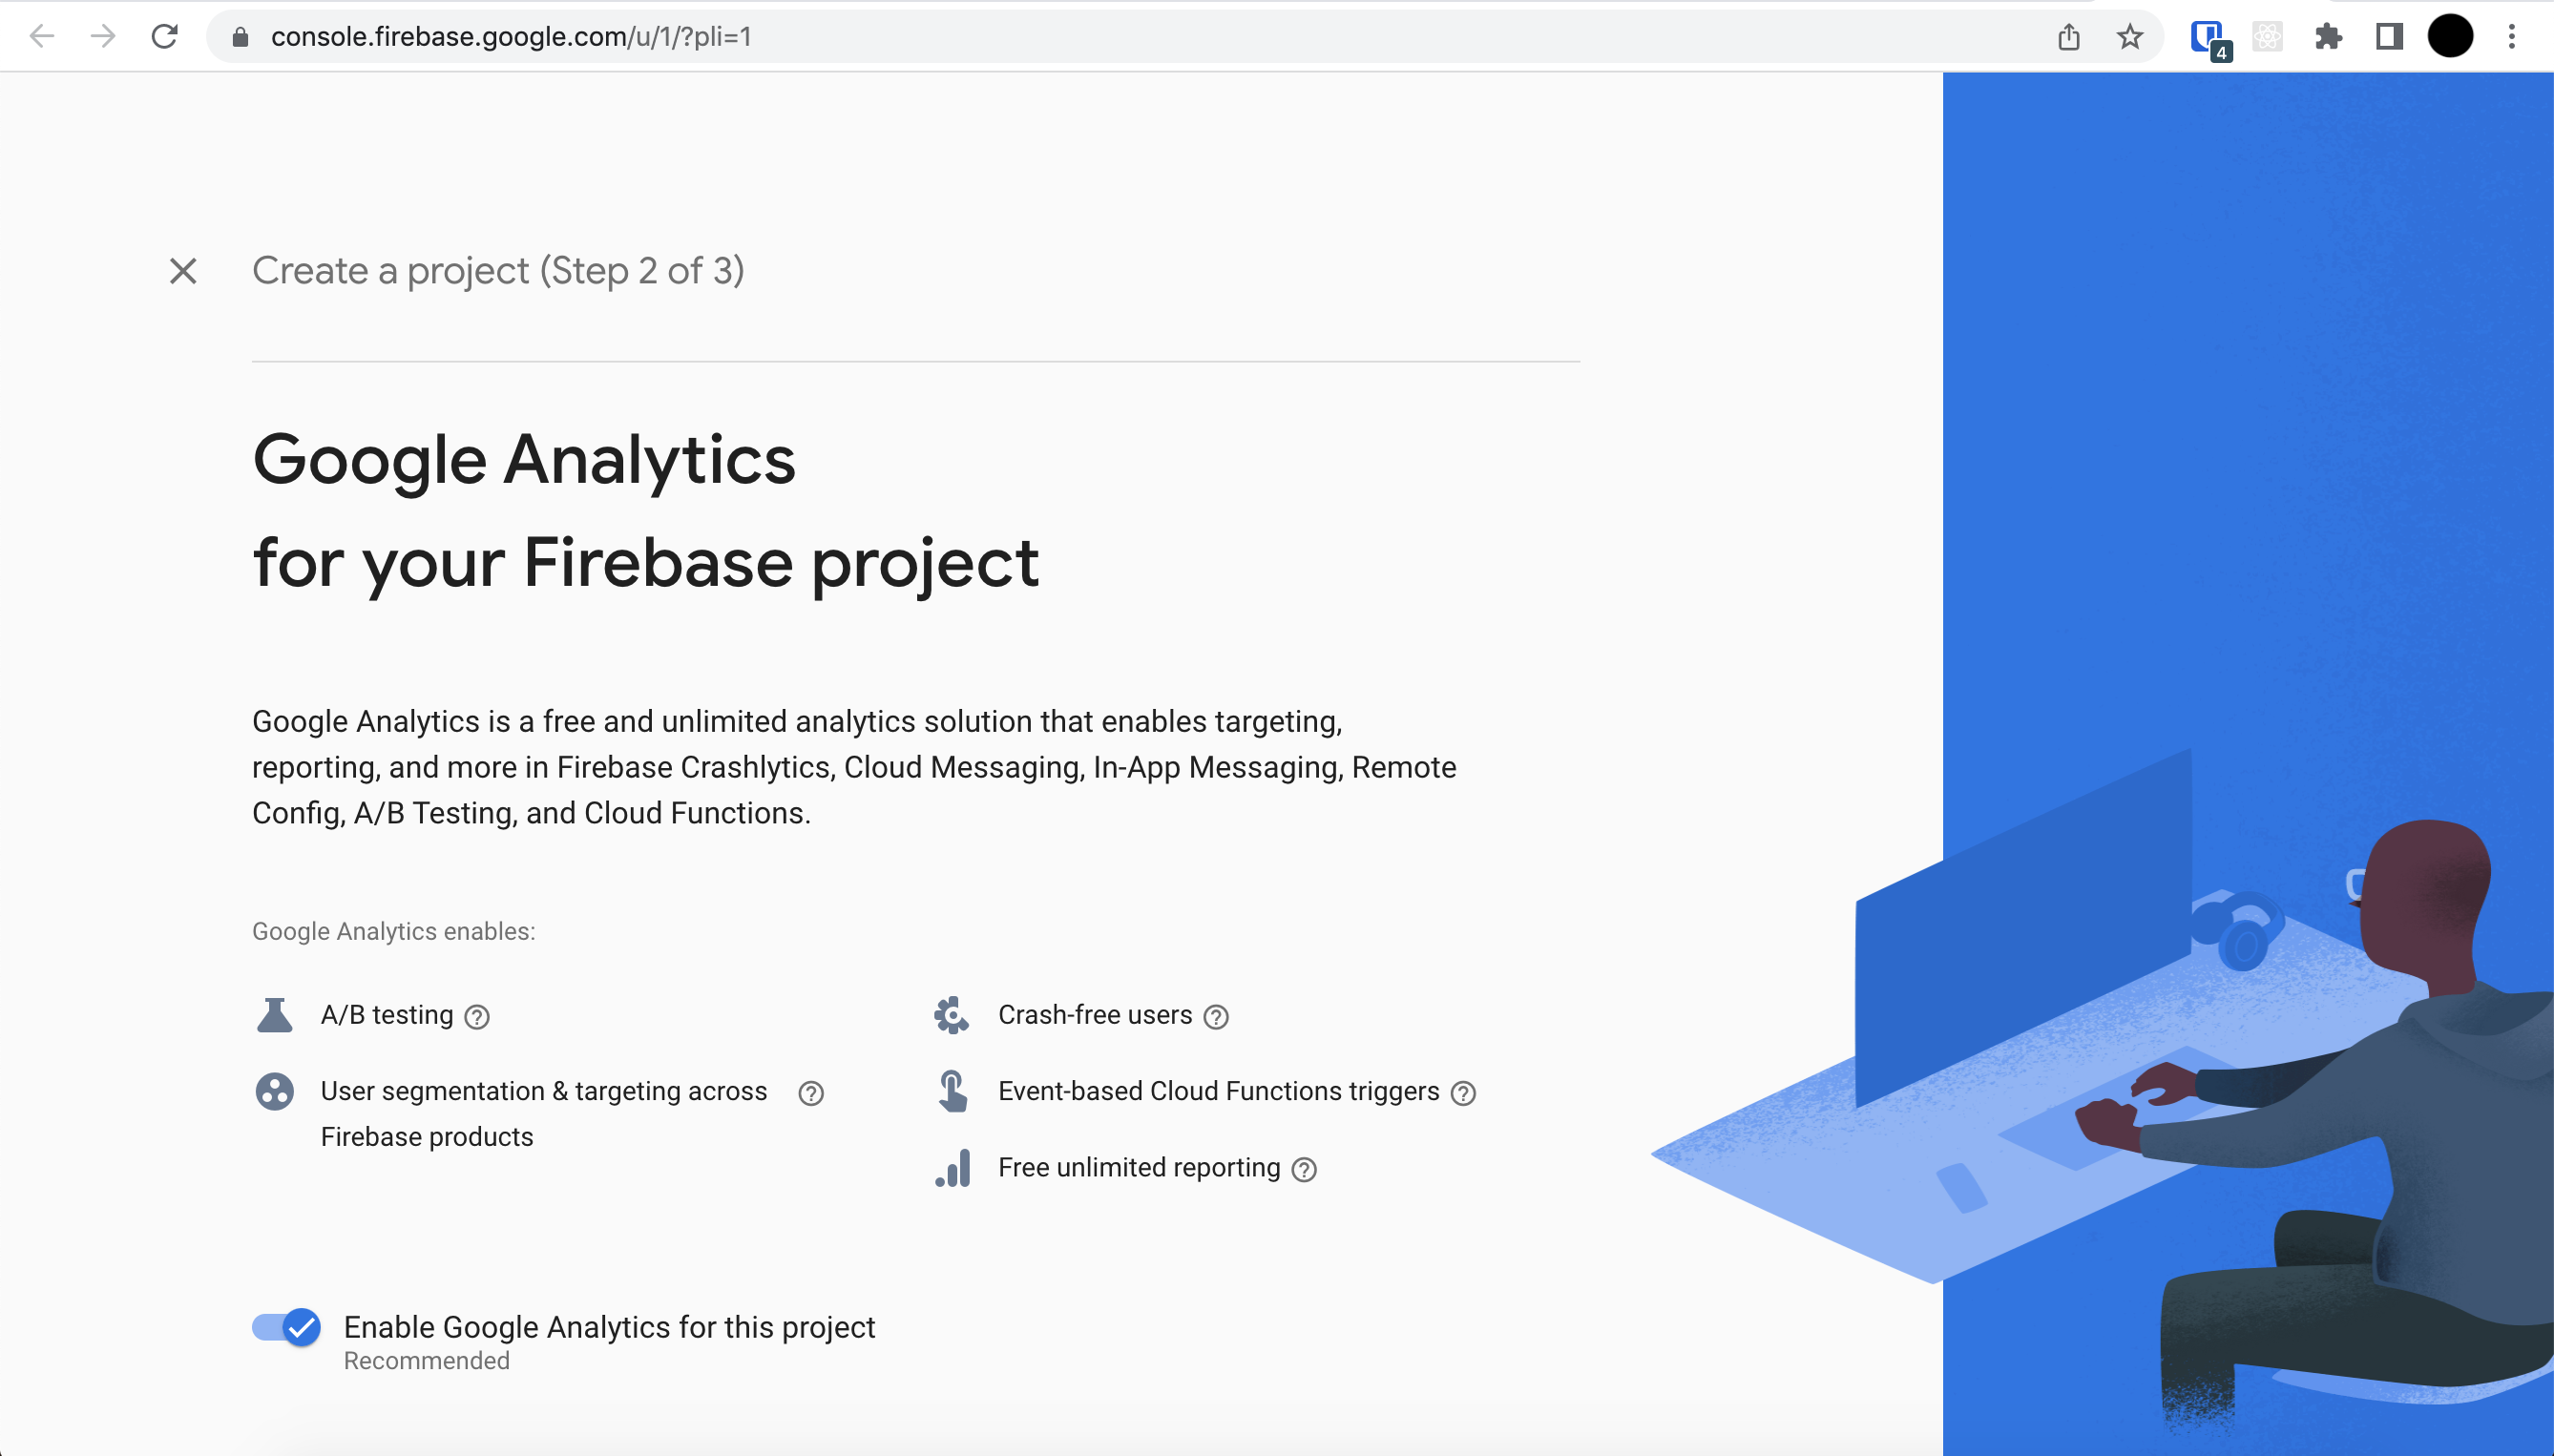
Enabling analytics is optional. While this may give you some statistical insight into who is using your experiments, this choice will not affect your experiment.
Next, go to the project page in the Firebase console and click add web app (the icon that looks like <\>): 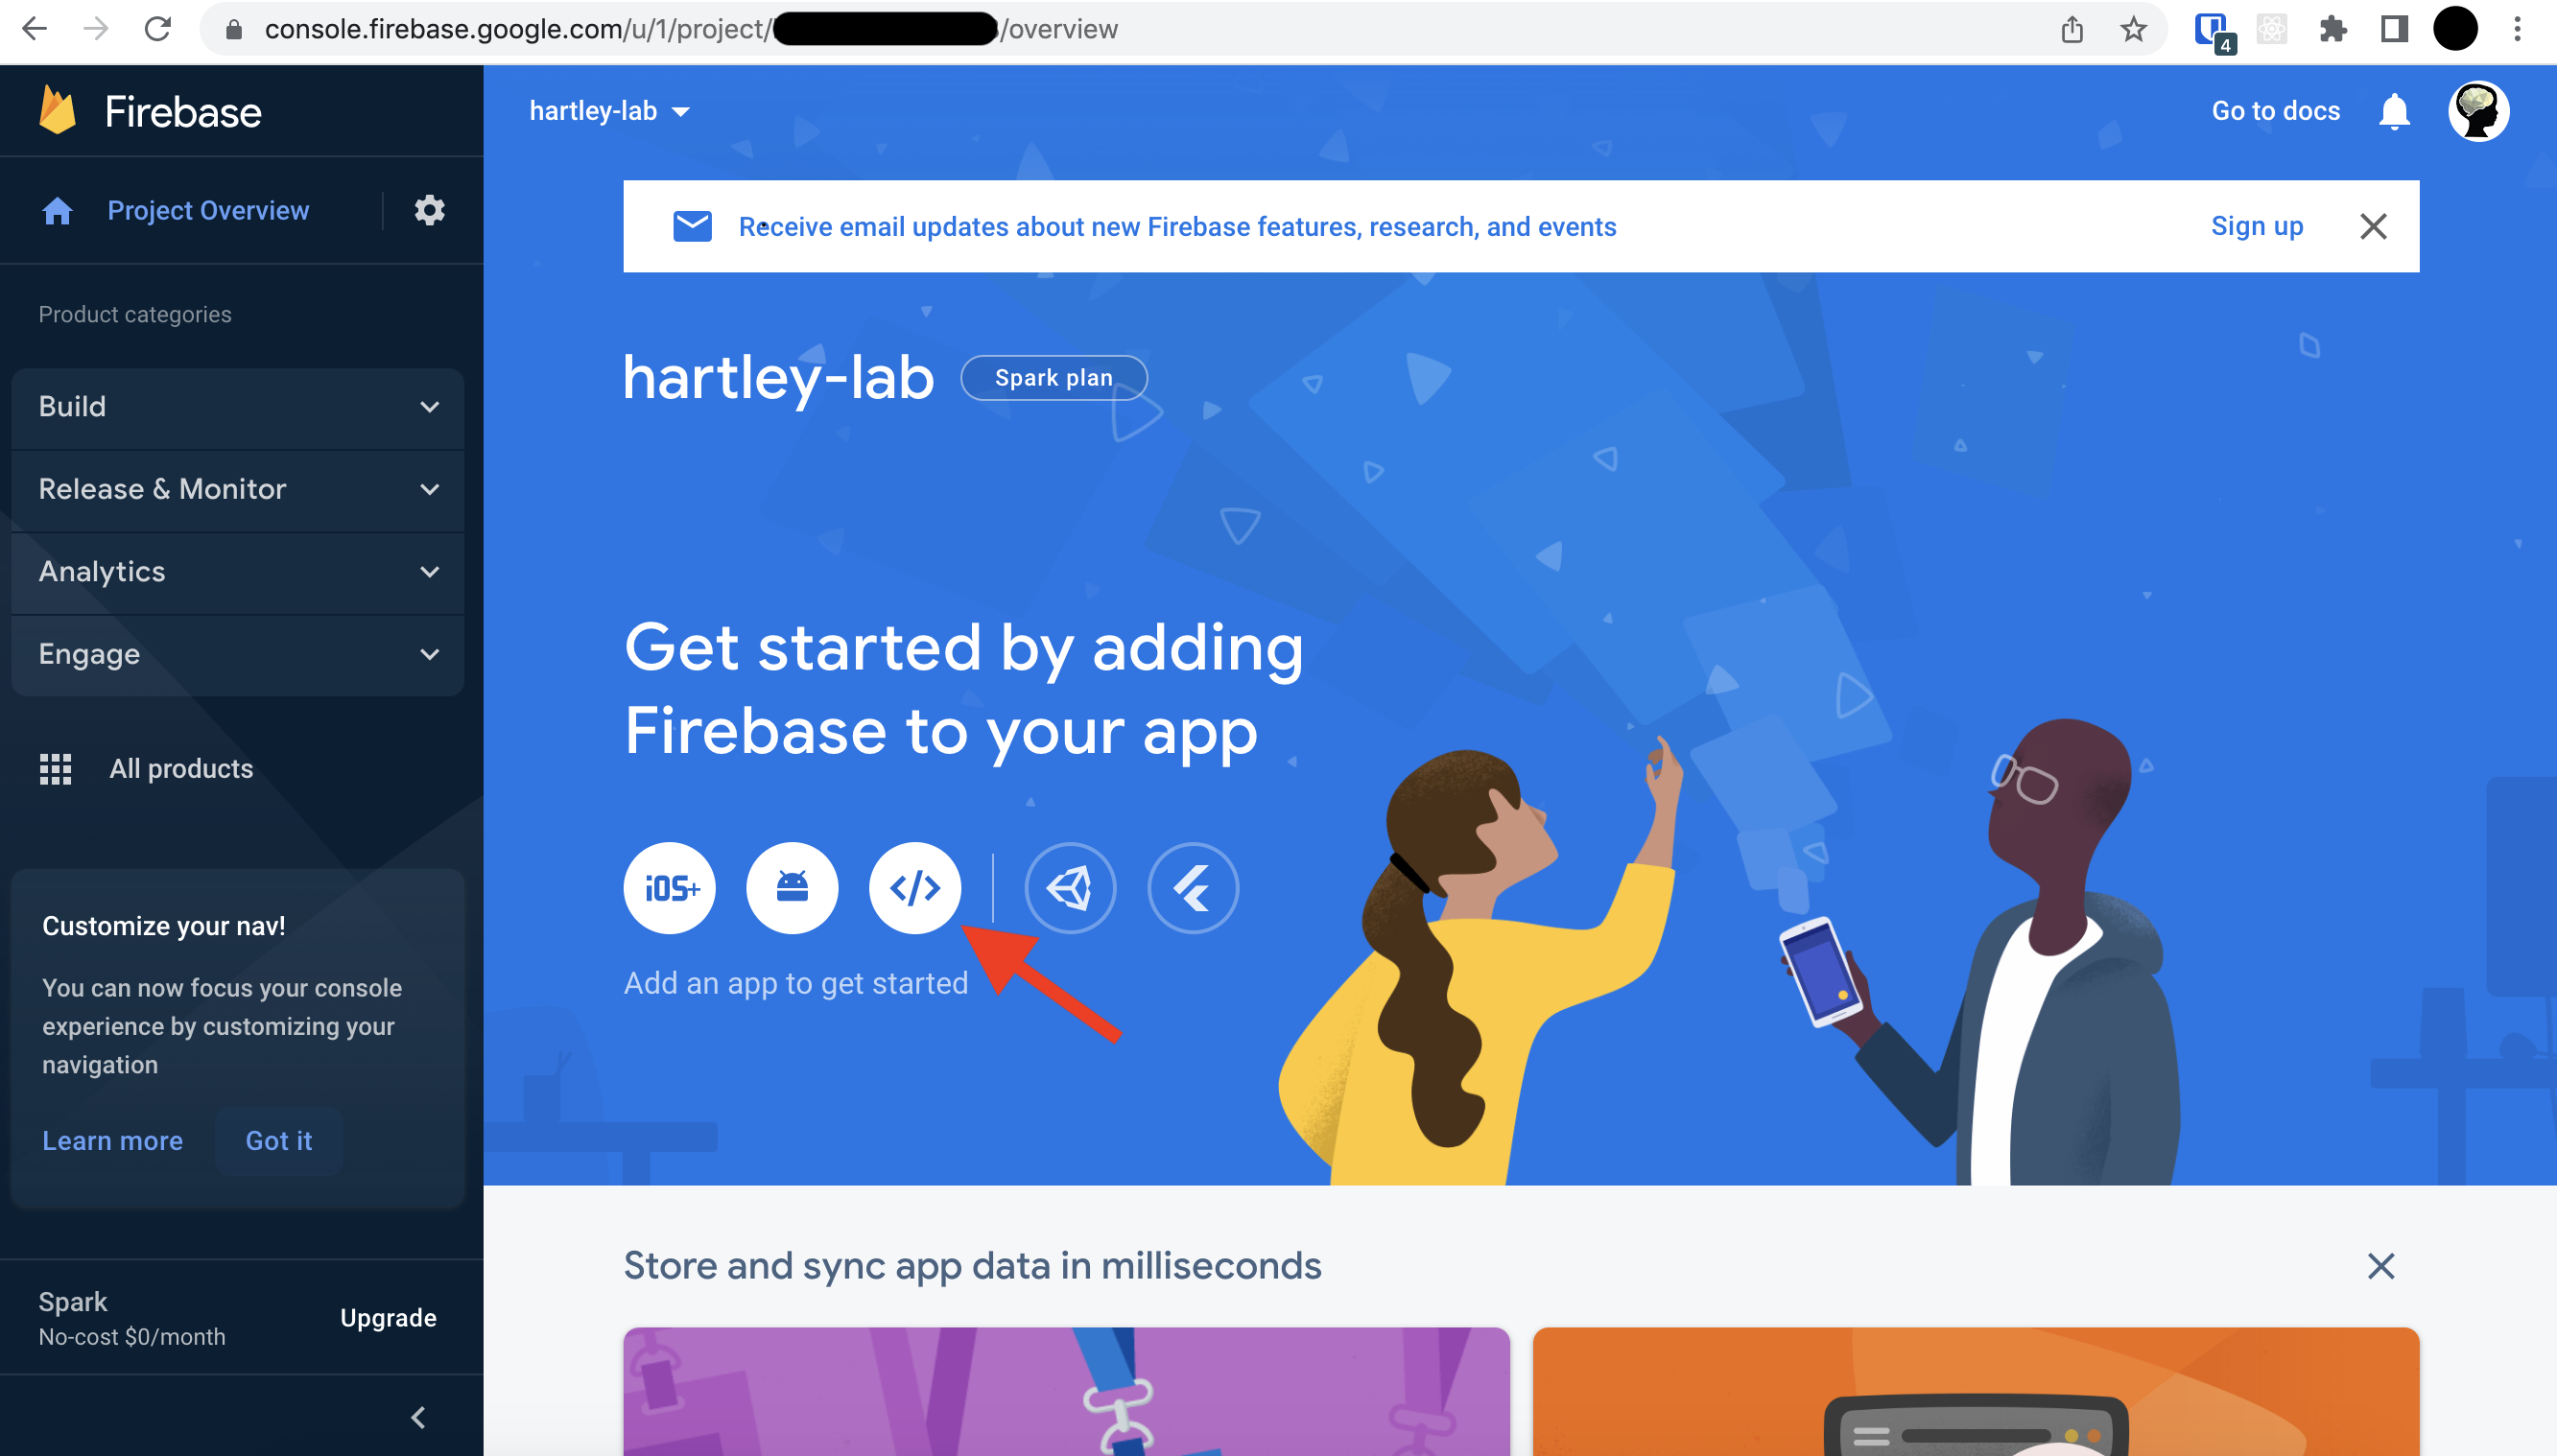
Register the new web app, giving it a nickname (something like smile-db might make sense, but it's up to you).
You do not need to also set up Firebase Hosting.

Next, add the Firebase SDK (select use npm). Make sure to copy the Firebase configuration keys, which are shown as a chunk of JavaScript code lower on the page (highlighted below). Save the keys somewhere safe, as you will need these later:

Enable anonymous authentication
You need to enable anonymous authentication for your Firebase project. When participants access your experiment, they will be authenticated anonymously. This means they can only write or read to their own data and not the data of other participants.
To do this choose "Authentication" from the left sidebar:
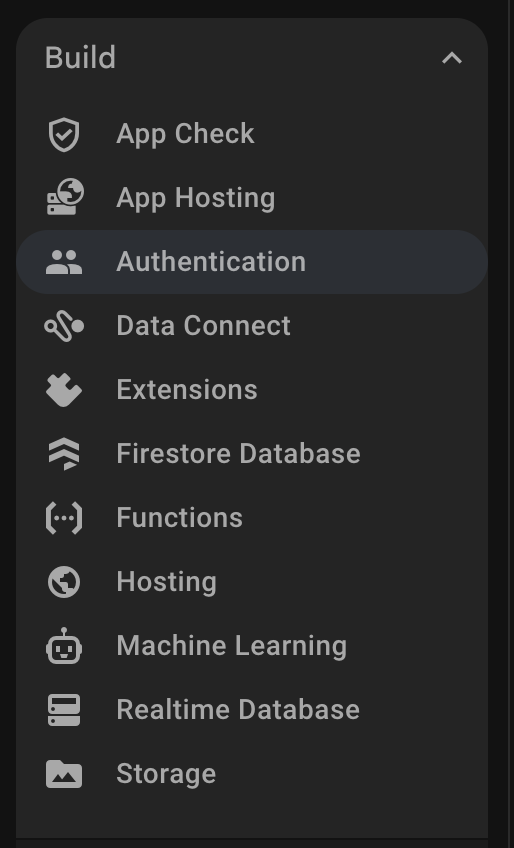
and then click "Get started".
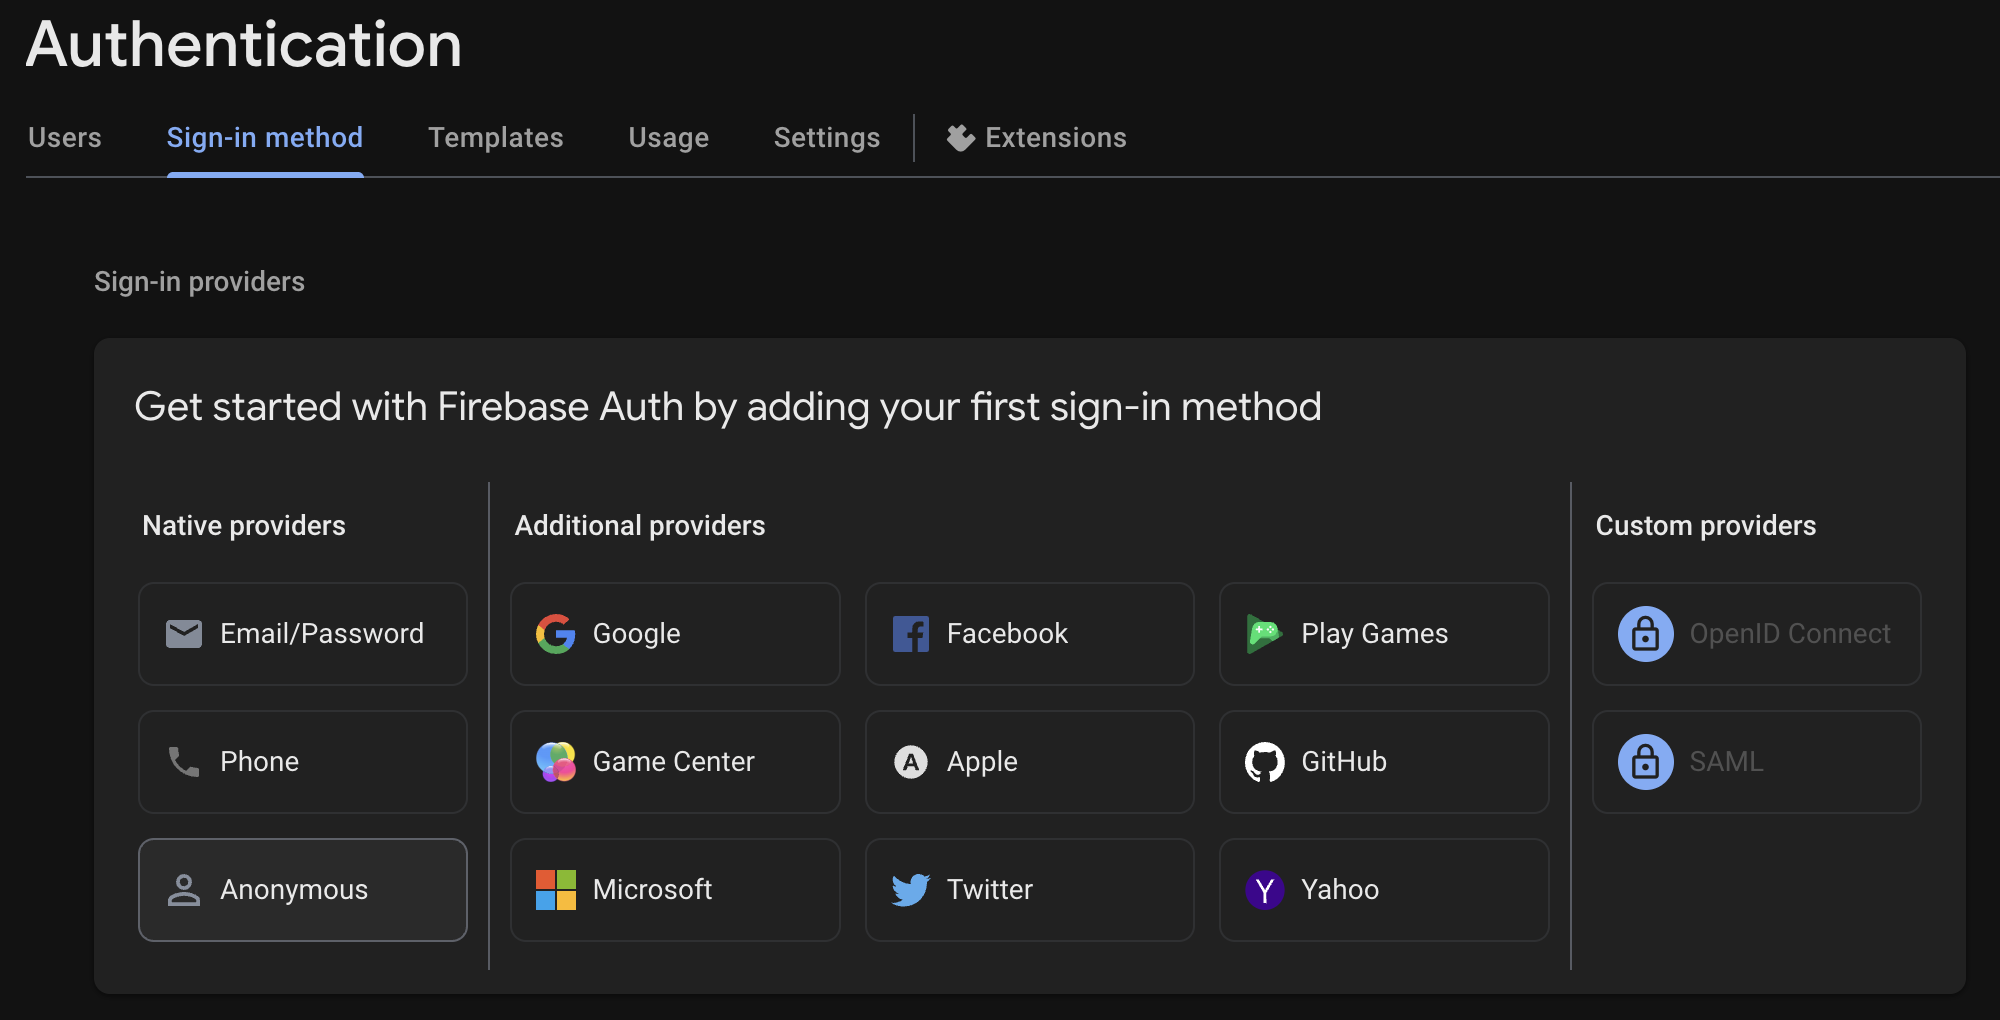
Under "Sign in method" click "Anonymous" and then click "Enable".
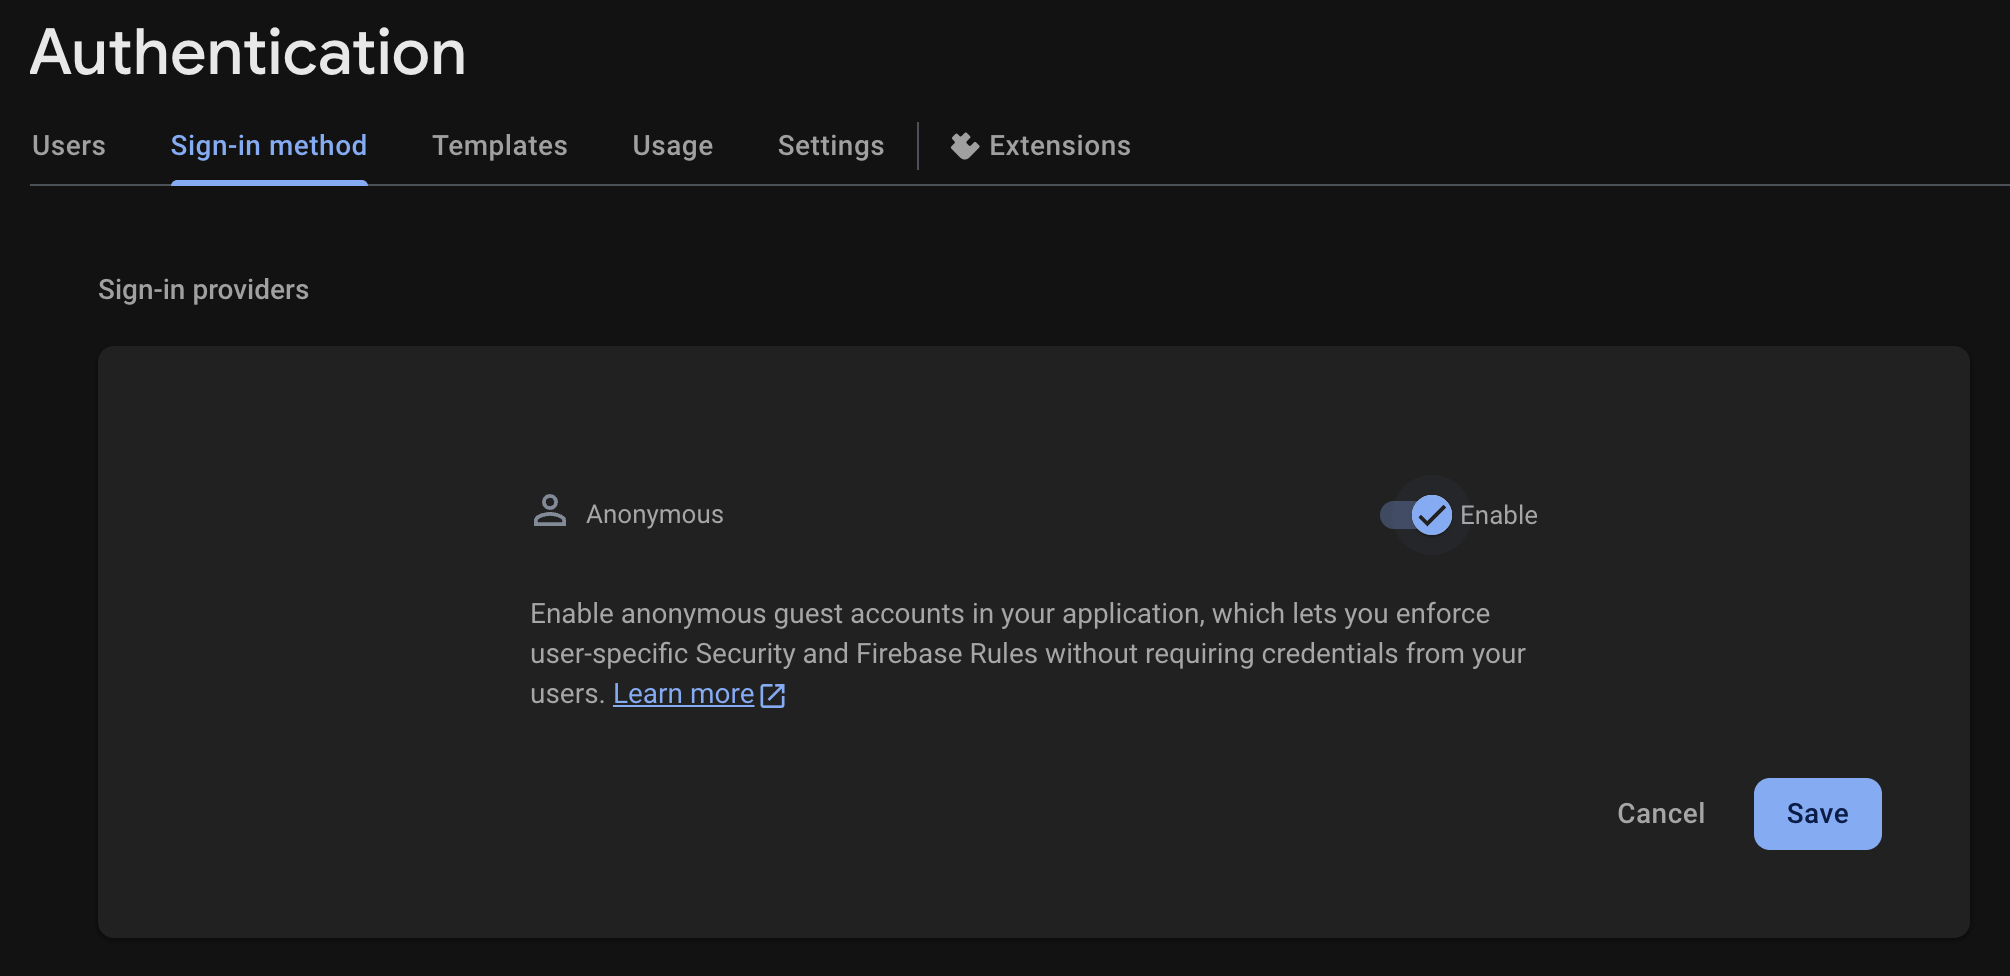
Then click "Save".
Setup Firebase rules
You next need to set up the rules for your Firebase database. These rules are used to define the structure of the database and the permissions for accessing it. The firebase.rules file in the /firebase/ directory of your project has an example of the rules which work well for most Smile Experiments. These rules allow participants to write data to the database and read their own data, but not the data of other participants. In addition, private data (personally identifiable information) is more heavily protected and is write-only. You can upload these rules to your Firestore database in the Firebase console. Read more about Firebase rules in the Firebase rules documentation. These rules rely on the anonymous authentication you enabled above.
Here is an example of the rules file that works well with Smile experiments (in firebase/firebase.rules of the main Smile repo):
rules_version = '2';
service cloud.firestore {
  match /databases/{database}/documents {

    // Helper function to check if user is authenticated
    function isAuthenticated() {
      return request.auth != null;
    }

    // Helper function to check if user is document owner
    function isOwner(doc) {
      return isAuthenticated() &&
             request.auth.uid == doc.data.firebaseAnonAuthID;
    }

    // Rules for testing collection
    match /testing/{studyID} {
      allow create: if isAuthenticated() && !exists(/databases/$(database)/documents/testing/$(studyID));
      allow read: if isAuthenticated();  // Add this line
      allow update: if isAuthenticated() &&
                      request.resource.data.diff(resource.data).affectedKeys().hasOnly(['lastUpdated']);
      match /data/{partID} {
        allow create: if isAuthenticated() &&
                        request.resource.data.firebaseAnonAuthID == request.auth.uid;
        allow read, update: if isOwner(resource);
        allow delete: if false;

        match /private/private_data {
          allow create: if isAuthenticated() &&
                          request.resource.data.firebaseAnonAuthID  == request.auth.uid;
          allow read, update: if isOwner(resource);
          allow delete: if false;
        }
      }
    }

    // Rules for real collection (identical to testing)
    match /real/{studyID} {
      allow create: if isAuthenticated() && !exists(/databases/$(database)/documents/real/$(studyID));
      allow read: if isAuthenticated();  // Add this line
      allow update: if isAuthenticated() &&
                      request.resource.data.diff(resource.data).affectedKeys().hasOnly(['lastUpdated']);
      match /data/{partID} {
        allow create: if isAuthenticated() &&
                        request.resource.data.firebaseAnonAuthID  == request.auth.uid;
        allow read, update: if isOwner(resource);
        allow delete: if false;

        match /private/private_data {
          allow create: if isAuthenticated() &&
                          request.resource.data.firebaseAnonAuthID  == request.auth.uid;
          allow read, update: if isOwner(resource);
          allow delete: if false;
        }
      }
    }

    // Deny access to all other paths
    match /{document=**} {
      allow read, write: if false;
    }
  }
}
Setup Slack
When you're developing an experiment and push changes to GitHub, your experiment code goes through a pre-processing step, which optimizes the speed at which the code is delivered to participants. Also, when your code builds successfully, it is deployed to a unique URL (see deploy docs for full details). If things go wrong in this process, it is helpful to get a notification.
If you don't want to use Slack, skip these instructions and go to the next section.
First, from the sidebar in Slack, choose your organization name and select "Tools" from the dropdown menu, then "Workflow Builder". You'll get a screen that looks like this:

Select the green "Create" button in the top right of the screen and choose a name for your workflow ("smile deployment notifications" is fine): 
Next, select "Webhook" as the type of workflow you are creating.

Click add variables and add the following variable names to your workflow deploy_base, deploy_base_codename, github_username,github_hash, qr_code, prolific_url, cloudresearch_url, mturk_url, citizen_url. This screenshot shows only a subset being added:

Next, select the option to "Send a message" and select an appropriate channel (#smile_deploy is a nice way to segregate these messages out for your lab). Configure the message template to look something like this (you can use emojis for fun):

Here is an example you could build from (with placeholder values for the variables, you have to click the "Insert a variable" button in the Slack UI to add the variables to the message):
:robot_face: Hi, github_username just automatically deployed an experiment to deploy_base.  Hooray!

- Prolific URL: prolific_url
- CloudResearch URL: cloudresearch_url
- MTurk URL: mturk_url
- Citizen URL: citizen_url

QR Code: qr_code
The GitHub hash for this commit: github_hash
Click save and you'll see get something like this (although Slack updates the UI slightly differently over time):

You can make some changes here, including making a custom icon for your bot, etc... When you are happy with it, click publish and it will show you the URL for using this workflow:

Be sure to copy the URL down for later.
Next, you need to repeat the process to create a separate workflow for errors. Start over from the start of this section, creating a new workflow. The name can be "smile deployment error", webhook is the type, and the variables need to be github_username and message. The message you send should look like this:

Once again, you can customize the icon and then click "Publish", copying down the URL for later.
Setup a SSL signed HTTP/web server
Smile requires you to host your HTML files on a webserver with an SSL-signed certificate (so that it loads using the https:// prefix in a browser). Many universities provide these (sometimes called web hosting accounts), and they are available cheaply from many internet service providers. We use Dreamhost, which is a very long-standing internet hosting provider. Their basic shared hosting plan can host all of a lab's experiments for about $2/month: Dreamhost shared hosting plans.
The main requirement is that you can SSH to the server and upload files that way.
Configure your base repo
Once you have all these services set up, you need to configure your new base lab repo for use with your services. The configuration files for your lab's base Smile install will be located in the env/ folder. In the initially cloned version (see above), your listing in that folder will look like this:
.envNext, you need to create a file called .env.local in the env/ folder. The content of that file should look like this:
# this file is not tracked by github and contains
# semi-sensitive information
# note these variables are complied in the final javascript
# source so don't add very high security stuff to them
#

# enter firebase database credentials
VITE_FIREBASE_APIKEY             = xxxx
VITE_FIREBASE_AUTHDOMAIN         = xxxx
VITE_FIREBASE_PROJECTID          = xxxx
VITE_FIREBASE_STORAGEBUCKET      = xxxx
VITE_FIREBASE_MESSAGINGSENDERID  = xxxx
VITE_FIREBASE_APPID              = xxxx

# enter google analytics id
VITE_GOOGLE_ANALYTICS            = xxxx
You will want to replace the values for the entries that contain the word FIREBASE with the corresponding values you obtained above when setting up your Firebase (you should have copied them down, but it is possible to look them up again on your Firebase project page). The VITE_GOOGLE_ANALYTICS field can be empty, or you can add a Google Analytics ID. The VITE_BUG_REPORTS is an unimplemented feature currently and can be ignored.
Next, you need to create a file called .env.deploy.local in the env/ folder. The content of that file should look like this:
# this file is not tracked by github and contains
# sensitive information inluding write access to our experiment
# hosting web server!

# enter experiment hosting web server information here
EXP_DEPLOY_HOST        = "xxx"
EXP_DEPLOY_PATH        = "/home/user/exps"
EXP_DEPLOY_PORT        = 22
EXP_DEPLOY_USER        = xxx
SLACK_WEBHOOK_URL      = https://hooks.slack.com/workflows/xxx
SLACK_WEBHOOK_ERROR_URL= https://hooks.slack.com/workflows/xxx
SLACK_DOCS_WEBHOOK_URL = https://hooks.slack.com/workflows/xxx
EXP_DEPLOY_KEY         = "-----BEGIN RSA PRIVATE KEY-----\nxxx\n-----END RSA PRIVATE KEY-----"
The EXP_DEPLOY_HOST is the domain name of the http hosting service you set up above. For example, www.psych.nyu.edu. The EXP_DEPLOY_PATH is the path to the folder on that server where you will upload your web files. The EXP_DEPLOY_PORT should be 22 for ssh access unless something very special is configured on your hosting service. The EXP_DEPLOY_USER should be the username of the account you use to access your http hosting service. The SLACK_WEBHOOK_URL is the URL you received when setting up your first Slack workflow above (for successful deployments). The SLACK_WEBHOOK_ERROR_URL is the URL you received when setting up your second Slack workflow above (for errors). The SLACK_DOCS_WEBHOOK_URL is optional and only needed if you are hosting your own documentation site (typically only the base Smile repo needs this). If you set up this webhook, it should accept github_username and github_hash as payloads. Finally, EXP_DEPLOY_KEY should be the private SSH key you use to access your HTTP server using passwordless ssh. Instructions on creating that key are provided here for Dreamhost. The key needs to be all on one line with \n characters where there are new lines and should include the part that says BEGIN RSA PRIVATE KEY as is visible above. It will be very long.
You can safely ignore the .env.docs.local file since the main docs are hosted by the main NYUCCL repo.
By default, all of the env/.env.*.local files are ignored by GitHub (using the .gitignore file). This is because they have sensitive information. However, you need to distribute those files out to people working in your lab. To do that, we recommend you store them in a safe place accessible only by members of your lab, such as a file server or Slack channel.
Configure your secrets on GitHub
To configure the GitHub repo correctly:
gh auth loginif you haven't already
Then, upload the configuration settings
npm run upload_configThis configures your base repo to deploy to your configured webserver, configures your live experiments to use your Firebase database, and configures Slack. See more docs on GitHub action secrets.
Making changes to the env files for your project
You may update the env files for the lab at any point. Just make sure to re-upload them to GitHub using the following command.
npm run upload_configThen be sure to redistribute the changed files to members of your lab.
Other things to configure in your base repo
A few files you might want to modify in your base repo are:
user/assets/universitylogo.png(currently this is an NYU logo, but you can change it to your favored version)user/components/InformedConsentText.vue(the basic informed consent form for your experiment; currently it is boilerplate, but if you share the same form for all your downstream lab projects, it might make sense to modify this in your base repo. Users can, of course, edit/override it on a project-by-project basis)
All done!
Now, your organization-specific base Smile template is all set! You can go ahead with Adding a new user if you have other lab members, or skip to Starting a new project if you're ready to get started on a Smile experiment!