🔀 Timeline and Design File
Web experiments are often composed of several parts presented in sequence. For example, we might show a welcome page → informed consent → instructions → etc. 🫠 Smile provides a central "sequencing" feature which makes it easy to configure, customize, and move through different stages of an experiment. We call this the "timeline."
The timeline feature is more than just a way to control the presentation order of different phases. It also acts as a way to prevent subjects from doing things in the tasks that you might not want. For example, in many web-based experiments if the subject reloads the webpage the task will start over. Although researchers often add a warning about this, it would allow subjects to repeat the instructions after seeing the task, accidentally participate in multiple conditions, or start over if they make a mistake to increase their bonus. Smile's timeline logic prevents this by controlling the flow of the experiment even across reloads of the webpage. For instance, when properly configured, a subject in a Smile experiment can close their browser, restart their computer, and come back to the experiment on the same trial they left off on.
This page shows how to configure and control 🫠 Smile's timeline implementation, and how to customize it with more complex behaviors.
The Design File (user/design.js)
Perhaps the most important user-configurable file in a 🫠 Smile experiment is the design file located in src/user/design.js. This file is where you configure the timeline of your experiment. You can take a look at the default version of this file which is short, self-explanatory, and well commented.
The design file sets up the sequence of Views that the participant will encounter, and it can configure Branching/Randomized Flows if needed to create different timelines for different experimental conditions. It is very likely you will need to edit this file to create your experiment!
The following sections of this page describe the technical details of the Timeline object and how to configure your design file.
Single-page Applications and Routing
Moany modern apps such as 🫠 Smile are what are known as Single-page Applications (SPAs). Rather than having content spread across multiple HTML pages, these apps load a single HTML page and then use a Javascript framework to control the dynamic interactions of the page including showing and hiding different elements, handling events like clicks, loading data to or from a server, etc... However, it is often useful to be able to directly access different content in a web app using URLs. For example, users might want to bookmark the login or settings page of a web app, so they need a distinct URL that will pull each of these views up.
Because SPAs load the entire app from a single URL, the solution to this for SPAs is known as a router. A router is a piece of software running in the browser which interprets URL requests and programmatically changes the visible content on the webpage, mimicking normal browser requests for specific pages. In
🫠 Smile, routing is handled by the Vue Router,which is a powerful open-source project built for routing in Vue applications.
🫠 Smile does all of the router set-up for you, soall you need to do is provide a list of Views, as well as any logic that connects them to each other. However, if you want to learn more about the Vue router, you can check out the Vue Router documentation.
URLs and Routes
A quick note about URLs and routes. We sometimes mention a base path or base URL for a project. This is the full deployment URL to your experiment including the protocol (http://), the domain (exps.gureckislab.org), as well as subfolders (/ghuser/repo/branch/) etc... For example, http://exps.gureckislab.org/ might be the base path. This is configured via the VITE_CODE_NAME_DEPLOY_URL or VITE_DEPLOY_URL in the env/.env.git file (see the docs on configuration).
Routes are configured beneath this base URL so / means the original base URL but /about means http://exps.gureckislab.org/#/about. The base URL can also include subfolders so for instance the base route could just as easily be https://exps.gureckislab.org/ghuser/repo/branch/#/about. The base folder is where your index.html for the SPA is located during deployment or development.
The # character in these URLs is not a typo. When you access a URL with slashes on it typically it is interpreted by the browser as a new network request for a particular resource on the webserver. An exception is for content that follows # character which indicates a link to different content on the same page (e.g., read about the <a name> tag also known as fragment identifiers in HTML). Changes to this part of the URL do not trigger page reloads ordinarily.
The easiest way to think about it is like this:
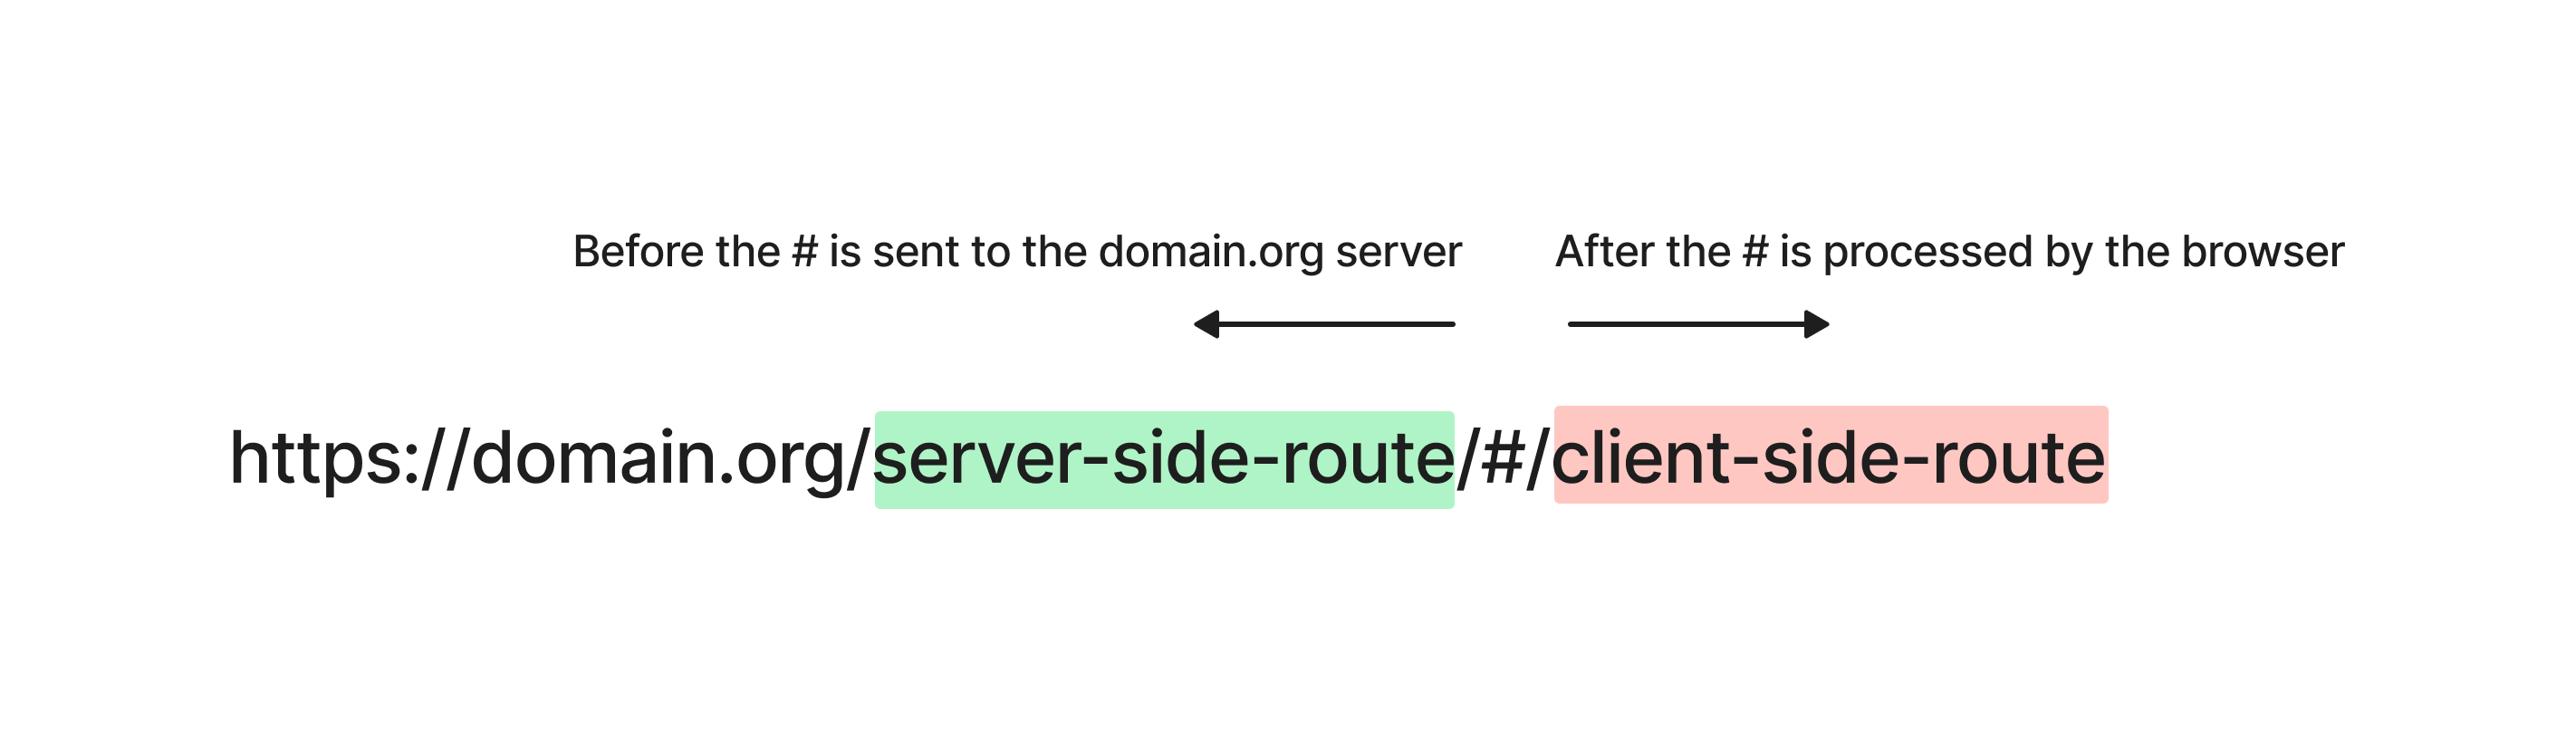
Words that are separated by slashes appearing before the # (or everything, if there are no #s) are sent by the browser to the web server as resource requests using standard http protocol, which triggers a page reload from the server. Things that appear after the # do not trigger a page reload. The Vue Router interprets changes appearing after the #, parses the content, and uses it to determine what Vue components to load (based on the routing table that you configure).[1]
In 🫠 Smile, key steps in the experiment are indexed by routes that map to page-level components called Views. So /consent would load the consent View and /debrief would load the debriefing View. This is good organization but also helpful for debugging/developing since you can easily jump to different sections of the task.
Timeline
As just described, the Vue Router is a mapping between different URLs and Vue components (i.e., Views) to load. However, in experiments, we often want to step through content sequentially. For this purpose, Smile implements a simple Timeline class (see src/timeline.js) which acts as a wrapper around the basic Vue Router.
The timeline class allows you to configure a sequence of Views as well as allow for Views that are not part of a sequence:
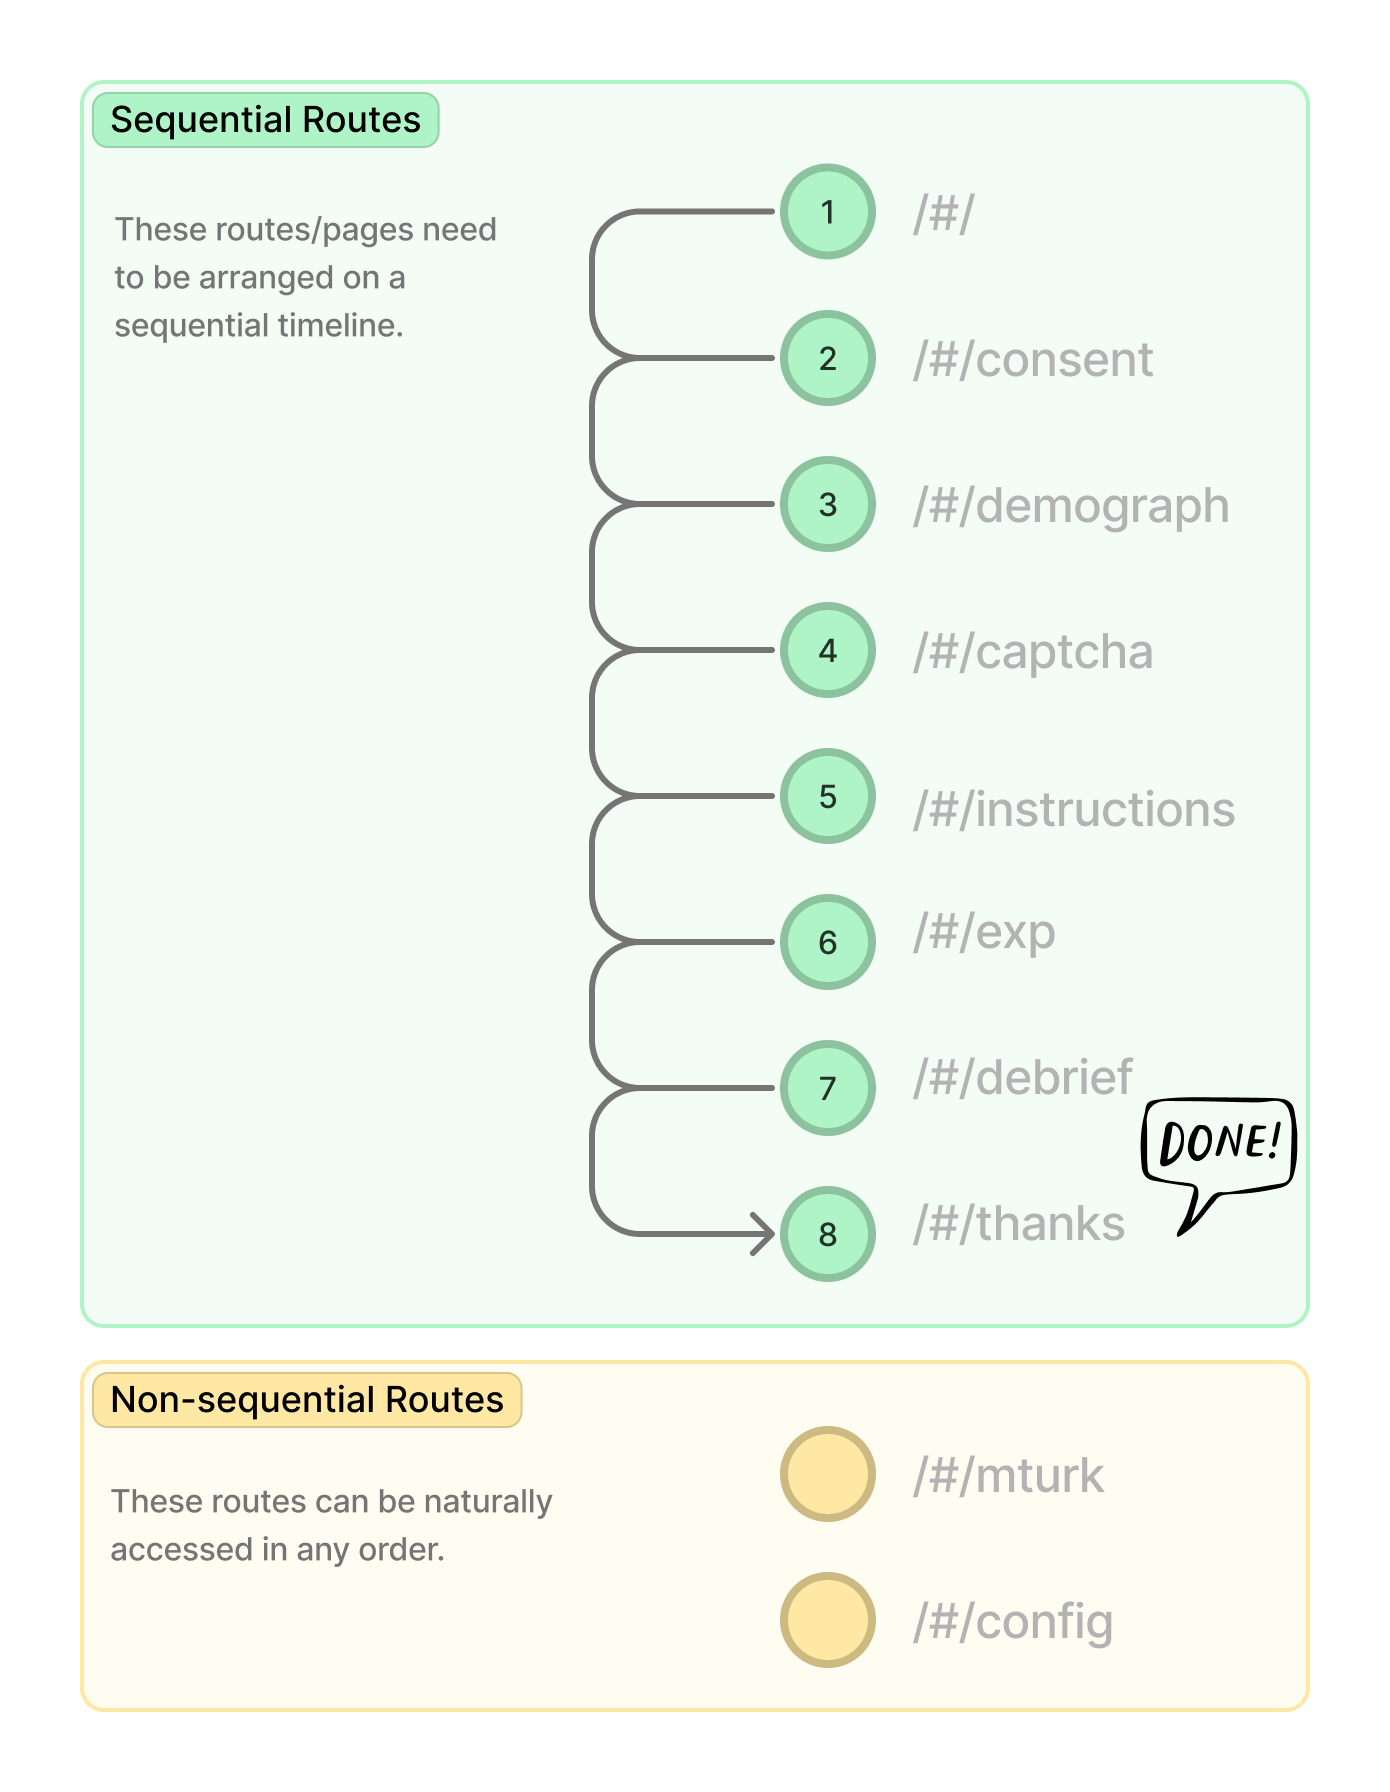
Sequential Views are accessed in a timeline. Non-sequential Views are not part of that timeline.
The View object
Each View is specified by a javascript object, which usually contains at least the following fields:
{
  name: 'my_name',
  component: MyViewComponent,
  meta: { ... },  // optional
}
By default, if you do not provide a path in the object (as in the example above), the client-side route will be automatically set to match the name. For example, the path in the example above would be set to /my_name. See details in the vue-routerdocumentation for more information on name vs. path. The component field specifies the View component that should be loaded when the route is requested.
If you'd like to specify a different path (that doesn't match the name), you can do that:
{
  name: 'my_name',
  path: '/testcomponent'
  component: MyViewComponent,
  meta: { ... },  // optional
}
The meta field specifies additional optional information about the View:
- It can be used to specify different previous and next Views, in case the experiment timeline flow branches (see Branching and randomized flows for more details).
- It can also be used to allow direct navigation to particular Views, which can allow for unconditional navigation by setting
allowAlways: truein themeta. - It can be used to block access to particular Views until the user has consented to the study (
requiresConsent: true) as well as only showing content when the user is "done" with the experiment (requiresDone: true). Another option (requiresWithdraw: true) requires the participant to have withdrawn from the page before showing. - It can be used to set a particular state when leaving a View (e.g.
meta: { setDone: true },will set thedonestate totruebefore entering the next View). Similarlymeta: { setConsented: true }will set theconsentedstate before entering the next View. These are provided in the timeline to make it more obvious when consent or completion has occurred in your timeline.
IMPORTANT
It is important that your timeline (design.js) actually uses meta: { setDone: true } and meta: { setConsented: true } so that other aspects of your experiment work correctly. For instance the setConsented is used to create an initial database record for the subject. If this step is passed the data will not be created. Similarly repeat participation is controlled by the done state. If this is not set correctly the subject be prevented from starting the experiment again or not access the final page.
Creating a timeline
A timeline is created like this:
import Timeline from '@/core/timeline' // note that the '@' resolves to /src in Smile
const timeline = new Timeline()
There are four key methods available on the timeline instance:
timeline.pushSeqView(view_obj)
Pushes a new View (specified in view_obj) into the sequential timeline. The first call to this function will make the configured View the first View in the sequence, the second call will make it the second View in the sequence, and so on. The format of view_obj should correspond to the View object discussed above.
timeline.registerView(view_obj)
This registers a new View (specified in view_obj) without adding it to the timeline. This View will exist in the Vue router but will not be in the timeline sequence. This is useful for configuration and debugging Views, as well as View you want to define and even link to but not present in the regular timeline flow. The notation registerView, as opposed to the push... method, is meant to indicate that the View is not part of the sequence.
timeline.build()
This should be called to construct the sequence. It takes the configured timeline and figures out which View is the successor or predecessor of each (allowing for manual overrides using the meta field).
Here is an example configuring three sequential routes and one non-sequential route:
import Timeline from '@/core/timeline'
const timeline = new Timeline()

// first route
timeline.pushSeqView({
  path: '/',
  name: 'welcome',
  component: WelcomeComponent,
})

// second route
timeline.pushSeqView({
  path: '/instructions',
  name: 'instructions',
  component: InstructionsComponent,
})

// third route
timeline.pushSeqView({
  path: '/thanks',
  name: 'thanks',
  component: ThanksComponent,
})

// a non-sequential route available for debugging
timeline.registerView({
  path: '/config',
  name: 'config',
  component: ConfigComponent,
})

timeline.build()
During development you can, of course, comment out certain Views to help isolate and test particular aspects of your experiment. In addition, since Views are mapped to distinct URLs, it is easy to jump between sections of your experiment during development (especially using the developer mode tools).
Branching and randomized flows
Simple branching flows
Sometimes you need timeline structures a little more complex than a simple sequence. For example, there might be multiple initial landing pages depending on if you come in from a particular recruitment service:
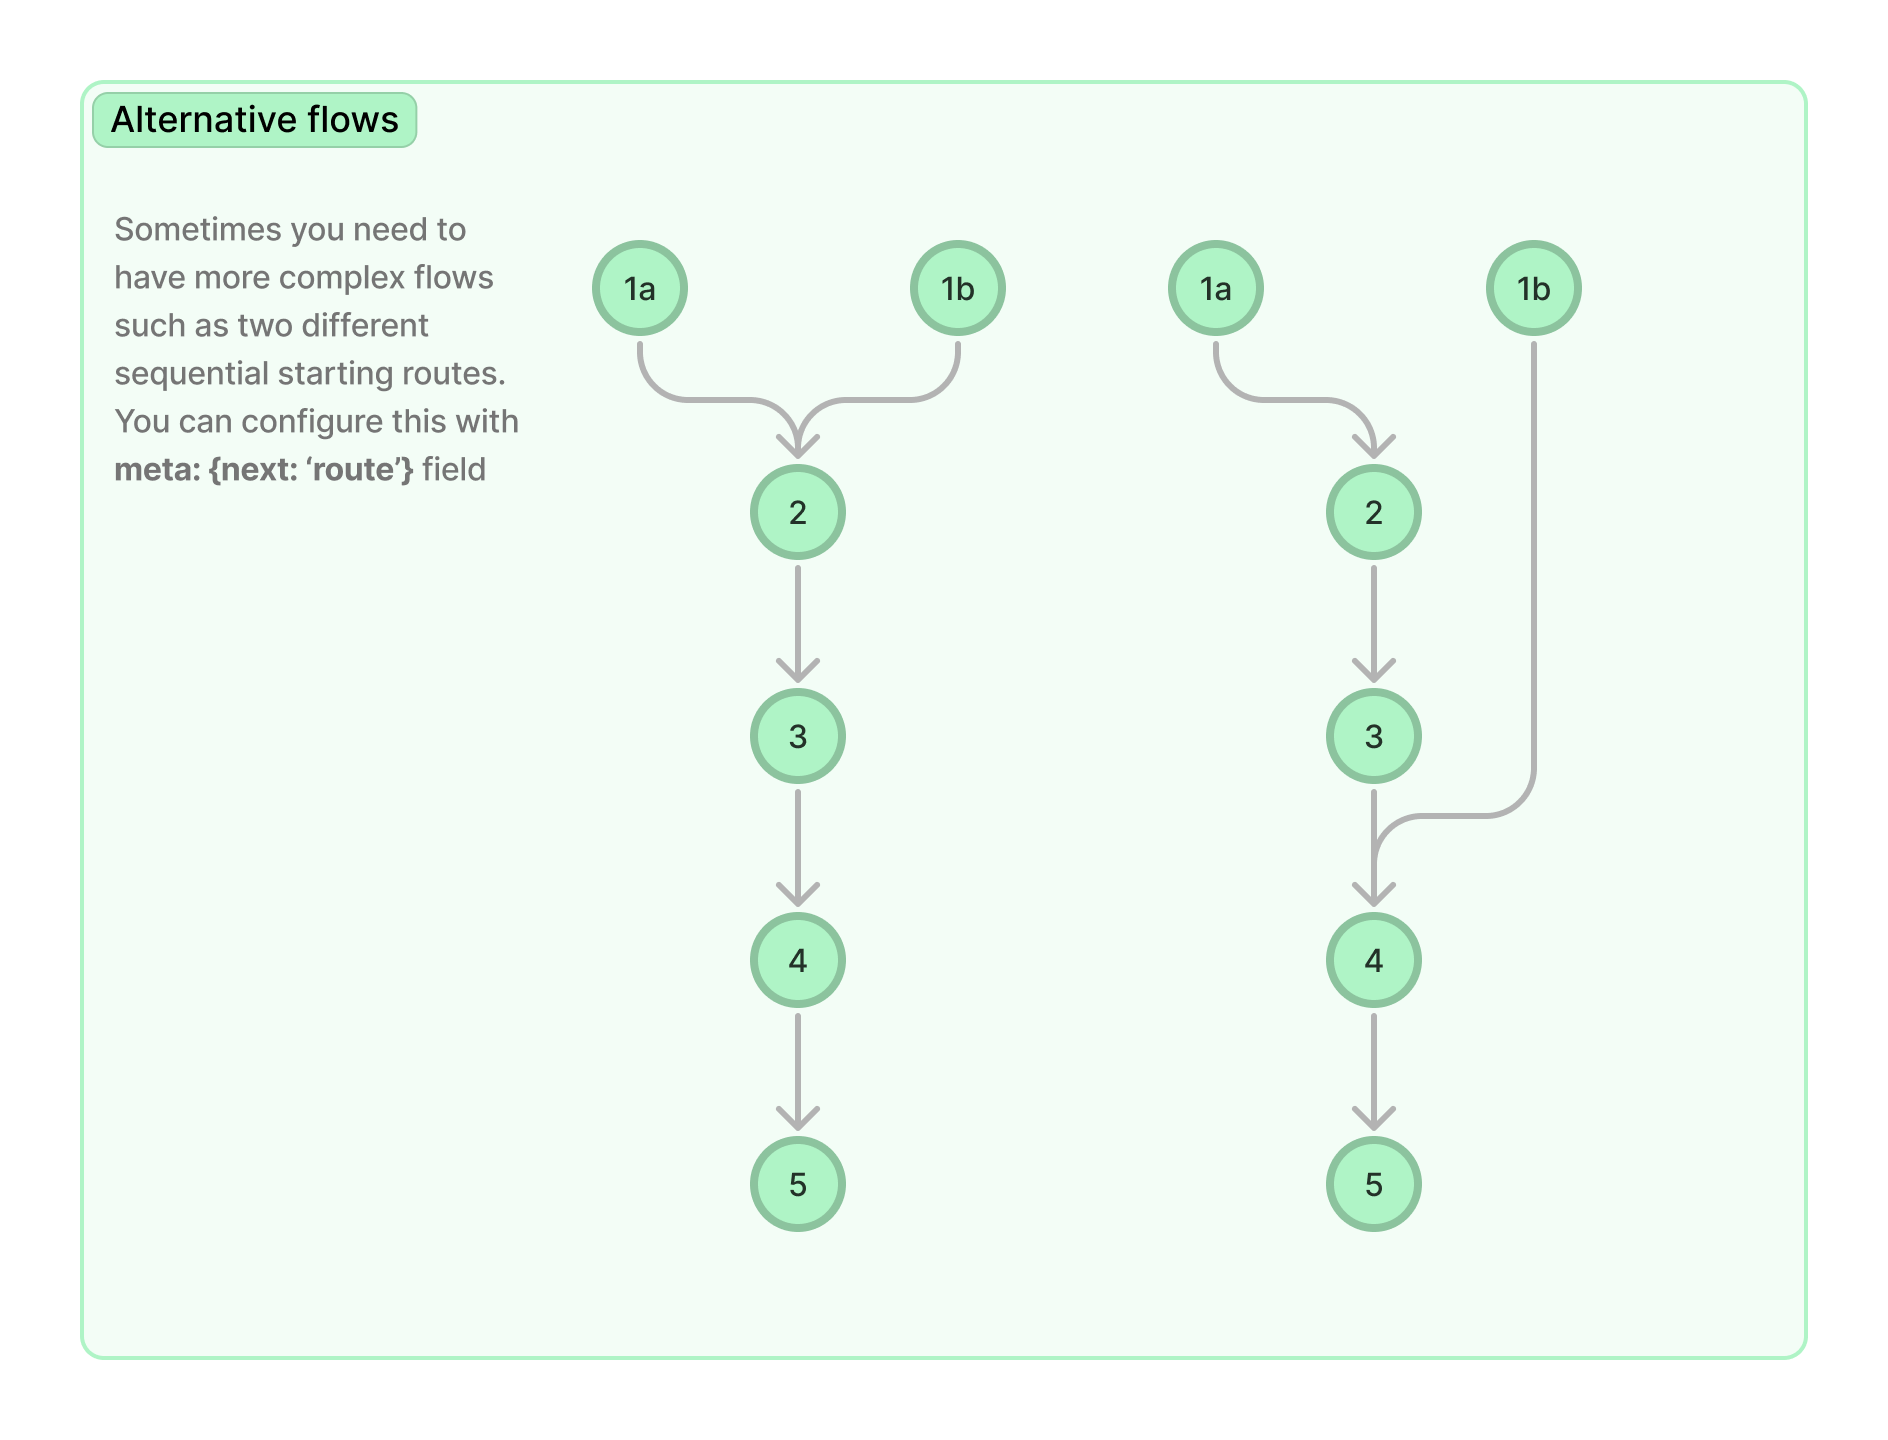
To configure this we need multiple routes (1a and 1b in the figure) to all point to the same successor. We can do this using Vue router meta fields. In particular, when we create a sequential route we can configure a specific successor using meta: {next: 'some_name'} (or predecessor using meta: {prev: 'some_name'}):
// first route
timeline.pushSeqView({
  name: 'first',
  meta: { next: 'second' }, // this should jump to a specific route (by name)
  component: FirstComponent,
})

// alternative first route
timeline.pushSeqView({
  name: 'first_alternate',
  meta: { next: 'second' }, // this should jump to a specific route (by name)
  component: AlternativeFirstCompomnet,
})

// second route
timeline.pushSeqView({
  name: 'second',
  component: SecondComponent,
})

// third route
timeline.pushSeqView({
  name: 'third',
  component: ThirdComponent,
})

timeline.build()
Using this approach, you can configure fairly complex branching flows through pages.
Note: the timeline.build() method steps through all Views pushed using pushSeqView(). For each View, it makes the next field in meta point to the next View in the timeline and prev field in meta point to the previous View in the timeline. If this is not what you want (because your Views need more complex flows) you can simply omit the build step and set the next and prev fields manually for each View.
Alternative flows and branching
Sometimes you want to randomize the order or presentation of Views. For example, your experiment might have two tasks, which are presented in a randomized order. Or, you might have four tasks, and you want one group of participants to see two of the tasks and the other group to see the other two tasks. We call these "alternative flows":
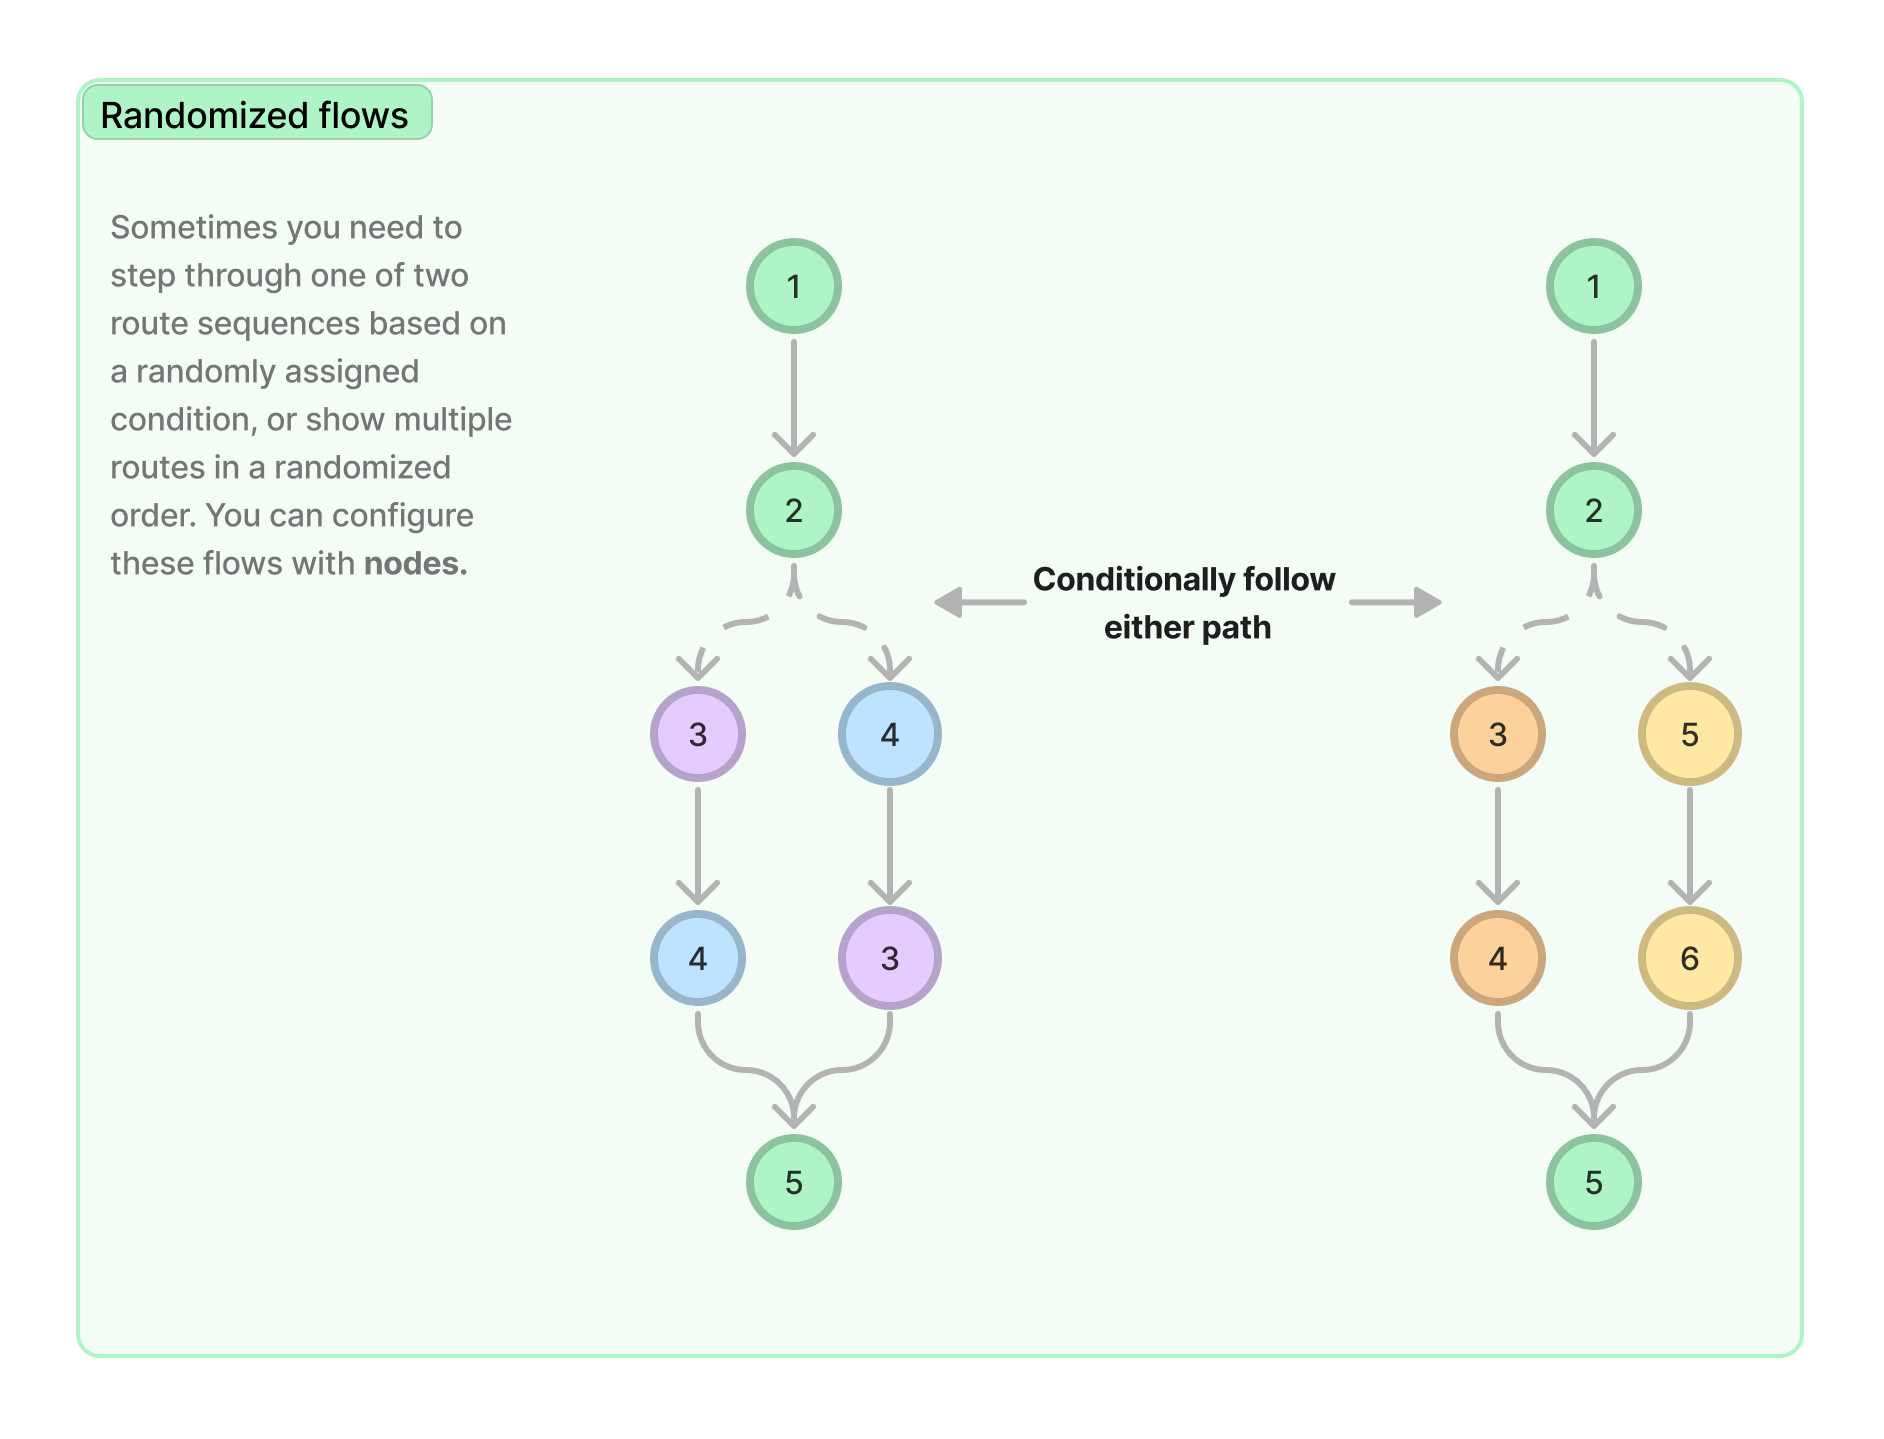
These alternative flows can be accomplished by adding nodes, which you can think of as containing several paths of Views and guiding participants along one of those paths. There are two types of nodes: randomized and conditional.
Randomized nodes
Let's say you want participants to see a page of instructions and then complete two tasks, which should be presented in a random order across participants. After the two tasks, you want to show the debrief View. Here's what your src/design.js file might look like:
import RandomSubTimeline from '@/core/subtimeline'
import Timeline from '@/core/timeline'
const timeline = new Timeline()

// push instructions
timeline.pushSeqView({
  name: 'instructions',
  component: Instructions,
})

// register tasks
randTimeline.registerView({
  name: 'task1',
  component: Task1,
})

randTimeline.registerView({
  name: 'task2',
  component: Task2,
})

// push randomized node with the two orderings
timeline.pushRandomizedNode({
  name: 'randomOrder',
  options: [
    ['task1', 'task2'],
    ['task2', 'task1'],
  ],
})

// push debriefing form
timeline.pushSeqView({
  name: 'debrief',
  component: Debrief,
})

timeline.build()
Note that the Views that make up each path are registered (added with the registerView method), not pushed (with the pushSeqView method). The node describes the two paths is pushed (with the pushRandomizedNode method).
You can adjust the probabilities of the paths by specifying weights—if you want the first path to be twice as likely as the second path, for example, you could do that like this:
timeline.pushRandomizedNode({
  name: 'randomOrder',
  options: [
    ['task1', 'task2'],
    ['task2', 'task1'],
  ],
  weights: [2, 1],
})
Note that the weights are automatically normalized, so [2/3, 1/3] or [4, 2] would generate the same distribution.
Conditional nodes
The View order can also be set by which condition the participant is assigned to, using random condition assignment. This can be more useful than a simple randomized node if other aspects of the experiment will depend on the condition. Here's an example:
import Timeline from '@/core/timeline'
const timeline = new Timeline()

// assign participants to condition specifying task order
api.randomAssignCondition({
  taskOrder: ['AB', 'BA'],
})

// push instructions
timeline.pushSeqView({
  name: 'instructions',
  component: Instructions,
})

// push tasks into timeline as "non-sequential" routes
randTimeline.registerView({
  name: 'taskA',
  component: TaskA,
})

randTimeline.registerView({
  name: 'taskB',
  component: TaskB,
})

timeline.pushConditionalNode({
  name: 'ConditionalRandom',
  taskOrder: {
    AB: ['taskA', 'taskB'],
    BA: ['taskB', 'taskA'],
  },
})

timeline.build()
It's also possible to have nested nodes. In the example below, there are two conditions: task order, and variation. Participants first see tasks A and B in a counterbalanced order (based on the task order condition). Then, separately, participants are randomly assigned to see either task C or task D afterwards (based on the variation condition):
import Timeline from '@/core/timeline'
const timeline = new Timeline()

api.randomAssignCondition({
  taskOrder: ['AB', 'BA'],
})

api.randomAssignCondition({
  variation: ['C', 'D'],
})

// the tasks (registered)
timeline.registerView({
  name: 'taskA',
  component: TaskA,
})

timeline.registerView({
  name: 'taskB',
  component: TaskB,
})

timeline.registerView({
  name: 'taskC',
  component: TaskC,
})

timeline.registerView({
  name: 'taskD',
  component: TaskD,
})

timeline.registerConditionalNode({
  name: 'InnerConditionalRandom',
  variation: {
    C: ['taskC'],
    D: ['taskD'],
  },
})

// the outer node (pushed)
timeline.pushConditionalNode({
  name: 'ConditionalRandom',
  taskOrder: {
    AB: ['taskA', 'taskB', 'InnerConditionalRandom'],
    BA: ['taskB', 'taskA', 'InnerConditionalRandom'],
  },
})

timeline.build()
Using the Timeline
Navigating between Views
So far, we've told you how to set up the Timeline in the design.js file. But how do you actually use the Timeline within each View? How do you get from one View to the next?
In each View, we need to tell the Timeline when that component is "finished," allowing the Timeline to pass control to the next View in the sequence. To do this, the API includes three navigation functions: goNextView(), goPrevView(), and goToView(view_name).
Here is a complete, simple SFC component that imports the API and uses it to advance to the next route in the sequence when the user clicks a button (calling the finish() method):
<script setup>
import useAPI from '@/core/composables/useAPI'
const api = useAPI()
function finish(goto) {
api.goNextView()
}
</script>
<template>
<div class="page">
<h1 class="title is-3">Experiment</h1>
<button class="button is-success is-light" id="finish" @click="finish()">
next <FAIcon icon="fa-solid fa-arrow-right" />
</button>
</div>
</template>IMPORTANT (and helpful!)
One important feature of these navigation functions are that they calls saveData() on the global store prior to View changes. So as a result, you can trust that your data will be saved/synchronized with the persistent store (Firestore) whenever you navigated between sequential Views. See the data storage docs on automatic saving. This only works if you use the API to advance between Views.
Navigation permissions
In developer mode any View can be accessed in any order. However, in live mode (when a participant is accessing the experiment), the timeline enforces a strict order of Views. This is to prevent participants from re-starting the experiment or skipping ahead to the end. However, there are some exceptions to this rule. For example, it is possible to configure any particular View to the reachable from any other View using the meta field (allowAlways: true).
In addition, certain programmatic navigations are always allowed. For example, if the subject had already read the instructions then if a button or link was provided like this:
<a href="/#instructions" class="button">Instructions</a>It would be disallowed in live mode because the subject would be skipping back using a browser navigation event (to the browser, this will appears the same as if the subject modified the URL in the browser directly). However, if the same link was implemented using an internal API navigation function it would be always allowed:
import useAPI from '@/core/composables/useAPI'
const api = useAPI()

function go_to_instructions() {
  console.log('go')
  api.goToView('instructions')
}<button class="button" @click="go_to_instructions()">
Jump to instructions
</button>The premise here is that if the programmer set up a situation where navigation was requested progamatically, it should be allowed. For the first link type, it is unclear whether the programmer or the participant constructed the request. As a result, it should be disallowed.
Special Set-up Options
Repeating a task more than once
The View permissions mean that participants move through the phases of your study in a predictable and determined way. However, at the end of a study they might be allowed to repeat the task. If you want to allow repeats then you can set the VITE_ALLOW_REPEATS variable in the env/.env.
Then, in the last View of your experiment, you can set the resetApp field.
// thanks/submit page
timeline.pushSeqView({
  name: 'thanks',
  component: Thanks,
  meta: {
    requiresDone: true,
    resetApp: smilestore.config.allowRepeats,
  },
})
When this is set, the next request to the app will reset the app to the start deleting the local storage and allowing the participant to start the experiment again. If VITE_ALLOW_REPEATS is not set, then the app will not allow a participant to repeat any part of the task again.
Running custom code before route loading
Sometimes you want to run a little bit of code prior to loading a View. You can do this using route guards, a feature of the Vue Router. Route guards are traditionally used to prevent navigation to a View or redirect it. Here is an example using the 🫠 Smile Timeline object.
// welcome screen
timeline.pushSeqView({
  name: 'welcome',
  component: Advertisement,
  beforeEnter: (to, from) => {
    console.log(to, from)
  },
})
The beforeEnter method will run before the View is loaded. This can be helpful for doing computation prior to the View loading. For example, after the user consents to the study it might make sense to create a database record for them. So we might add a special method to the View after the consent form to handle that.
It is also possible to register route guards to all Views using the .beforeEach() method. In src/core/router.js there is a method addGuards() which has examples of registering global guards.
Note that Vue Router provides a variety of lifecycle hooks that you can customize for all or individual routes. See the documentation here for a full accounting of the order in which things occur.
The
VueRouter.createWebHashHistory()call is what tells the router to use the#navigation strategy. ↩︎