Stepping Through Trials
For some conditions in your experiment, you may want to repeat several trials of the same event. Smile provides a trial stepper for organizing and managing sequenced events within a View.
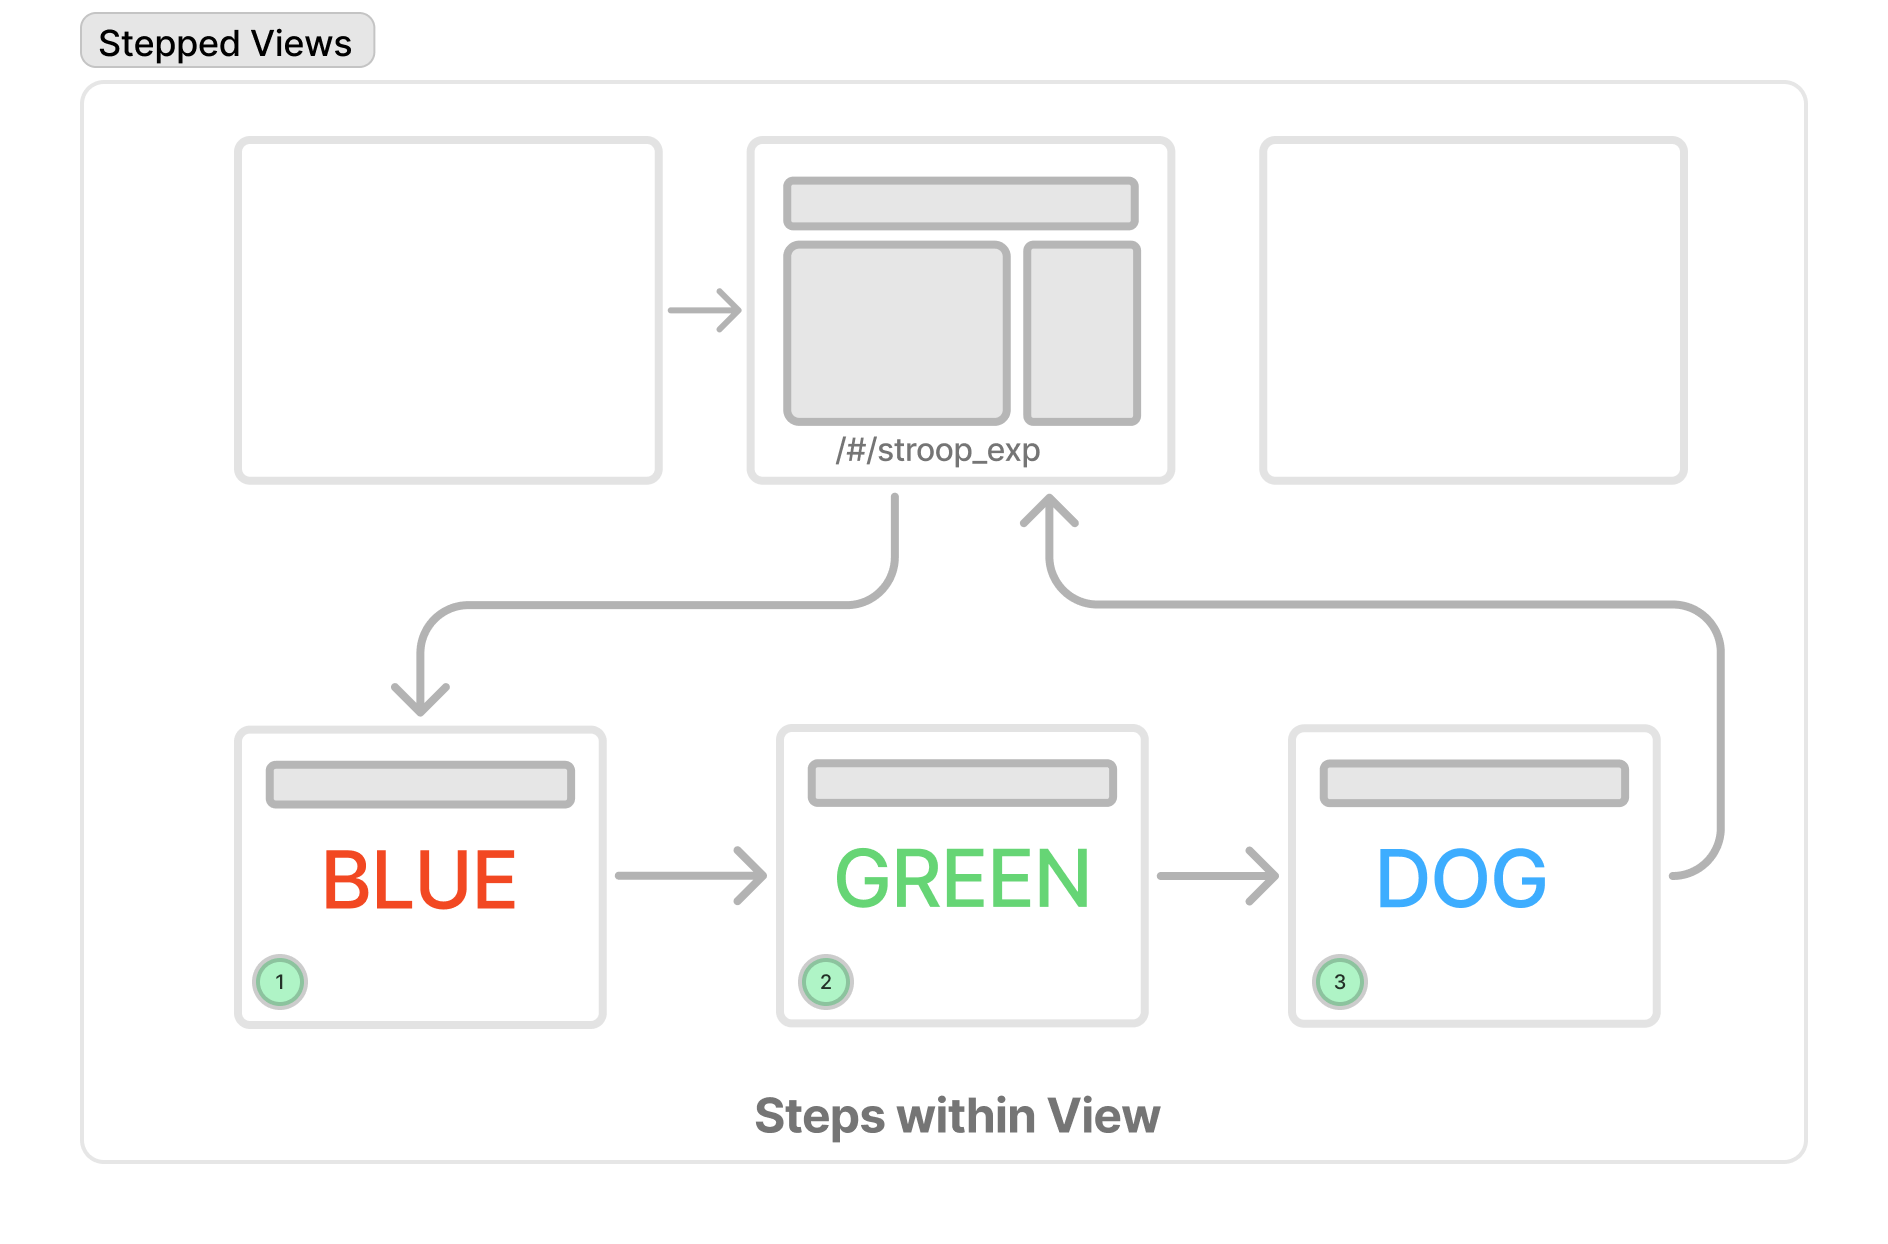
Steps are like builds in a Keynote/Powerpoint animation
By way of analogy, think of different Views as slides in a Keynote/Powerpoint presentation while a step is like a build or animation within a slide.
The trial stepper system consists of two main components:
- A step controller that manages navigation through your trials (moving forward/backward)
- A powerful table builder that helps you create complex sequences of trials
This separation allows you to first build up your trial sequence using the powerful table API, and then control how you move through those trials using the step controller.
A key feature of stepped Views is that their state persists in the browser through the use of local storage. This means that if the subject reloads the page, or navigates to a different site and then returns, the task will resume from the same step. This is nice because it helps ensure that subjects are always completing the set of steps/trials assigned to them and are not able to start the task over (possibly introducing biased data from practice effects or exposure to different manipulations). You can learn more about this feature by reading about how to persist stepper state. The stepper also integrates with the developer mode interface.
Create a stepped View
To create a stepped view, you need to import the SmileAPI and initialize the stepper. Here's how to do it:
Import and Initialize
In your <script setup> section, import the SmileAPI and initialize it. Then use the useHStepper method to get the stepper:
<script setup>
import useAPI from '@/core/composables/useAPI'
const api = useAPI()

// Get the stepper
const stepper = api.useHStepper()
</script>
The stepper object provides methods for controlling trial navigation:
goNextStep()- Advance to the next trial. Returns the index of the next state (0, 1, 2, etc.) ornullif at the endgoPrevStep()- Go back to the previous trial. Returns the index of the previous state ornullif at the beginningreset()- Reset to the beginning, positioning at the first trialstepData- An array of data objects along the current path (e.g.,[{ shape: 'circle', color: 'red' }])index- The path to the current trial as a string (e.g., "0" for first trial, "0-0" for nested trials)
For example:
const stepper = api.useHStepper()

// Create and push some trials
const trials = stepper.t.append([
  { shape: 'circle', color: 'red' },
  { shape: 'square', color: 'blue' },
])
stepper.addSpec(trials)

// After push(), we're at the first trial
console.log(stepper.current) // [{ shape: 'circle', color: 'red' }]
console.log(stepper.index) // "0"

// Move to next trial
stepper.goNextStep()
console.log(stepper.current) // [{ shape: 'square', color: 'blue' }]
console.log(stepper.index) // "1"

// Go back
stepper.goPrevStep()
console.log(stepper.current) // [{ shape: 'circle', color: 'red' }]
console.log(stepper.index) // "0"

// Reset always goes to the first trial
stepper.goFirstStep()
console.log(stepper.current) // [{ shape: 'circle', color: 'red' }]
console.log(stepper.index) // "0"
With nested trials, the index property shows the full path:
const stepper = api.useHStepper()
const trials = stepper.spec().range(2) // Create parent trials

// Add nested trials to first parent
trials[0].spec().append([{ type: 'stim' }, { type: 'feedback' }])

trials.push()

console.log(stepper.current) // [{ range: 0 }, { type: 'stim' }]
console.log(stepper.index) // "0-0"

stepper.goNextStep()
console.log(stepper.current) // [{ range: 0 }, { type: 'feedback' }]
console.log(stepper.index) // "0-1"
Both current and index are reactive properties that automatically update when you navigate through trials. You can use them directly in your Vue templates:
<template>
  <div>
    Current trial data: {{ stepper.current }}
    <!-- Returns array of data objects -->
    Current path: {{ stepper.index }}
    <!-- Returns path string like "0" or "0-0" -->
  </div>
</template>
The stepper also provides methods for building trial sequences through its table() method, which we'll cover next.
Building Trial Tables
The stepper provides a powerful API for creating and manipulating trial sequences. You start by calling table() or t() to create a fresh table, then use various chainable methods to build up your sequence:
const stepper = api.useHStepper()

// Create a new table and append some trials
const trials = stepper.spec().append([
  { shape: 'circle', color: 'red' },
  { shape: 'square', color: 'green' },
])

// Push the trials
trials.push()
The API for building tables is similar to libraries like D3 where different operations are chained together in a easy to read manner. Many functions are provided to make it easy to build up complex trial sequences.
Saving Tables with push()
The push() method is used to save your completed trial table to the state machine. Think of it as a "save" or "commit" operation that writes your trial sequence into the stepper's state:
const stepper = api.useHStepper()

const trials = stepper.t
  .append({ shape: 'circle', color: 'red' })
  .append({ shape: 'square', color: 'green' })
  .push() // Save the trials to the state machine
Read-Only After Push
After calling push(), the table becomes read-only. You can still perform read operations like:
- Getting the number of rows with
table.length - Printing the table contents with
table.print() - Reading rows with array indexing like
table[0] - Using the spread operator like
[...table] - Searching for rows with
table.indexOf(row)
Length Property Behavior
The length property behaves differently for tables and entries:
- For a table: Returns the number of rows in the table
- For an entry with a nested table: Returns the number of rows in the nested table
- For an entry without a nested table: Returns
nullsince it's a single node, not a list
For example:
const trials = stepper.spec().range(2)
trials[0].spec().append([{ type: 'stim' }, { type: 'feedback' }])

console.log(trials.length) // 2 (number of rows in parent table)
console.log(trials[0].length) // 2 (number of rows in nested table)
console.log(trials[0][0].length) // null (single node, not a list)
But you cannot perform any modifications like:
- Adding new rows with
append() - Shuffling rows with
shuffle() - Sampling rows with
sample() - Repeating rows with
repeat() - Zipping with other tables using
zip() - Creating outer products with
outer() - Creating ranges with
range() - Taking head/tail with
head()/tail() - Modifying rows with
forEach()
If you need to modify your trials after pushing, you'll need to create a new table.
:::
Nested Tables
You can create nested tables within individual rows. This is particularly useful when you want to create hierarchical trial structures or when each trial needs its own sequence of sub-trials.
Each row in a table can have its own nested table, which you can access using array-like indexing:
const stepper = api.useHStepper()

// Create a parent table with 3 trials
const trials = stepper.spec().range(3)

// Create nested tables for specific trials
trials[0].spec().range(3) // First trial gets 3 sub-trials
trials[1].spec().range(5) // Second trial gets 5 sub-trials

// Access nested table rows using array indexing
console.log(trials[0][0]) // First row of first trial's nested table
console.log(trials[1][2]) // Third row of second trial's nested table

// You can chain operations on nested tables
trials[0].t
  .range(3)
  .forEach((row) => ({ ...row, type: 'test' }))
  .append([{ index: 3, type: 'extra' }])
Multiple Nested Tables
Each row can only have one nested table at a time. Creating a new nested table will overwrite any existing one:
const stepper = api.useHStepper()

// Create two nested tables for the first trial
const trials = stepper.spec().range(2)
trials[0].spec().range(2) // First nested table
trials[0].spec().range(3) // Second nested table overwrites the first

// The second table (with 3 rows) is now accessible
console.log(trials[0][0]) // First row of the nested table
console.log(trials[0][1]) // Second row of the nested table
console.log(trials[0][2]) // Third row of the nested table
Data Serialization
Nested tables follow the same serialization rules as regular tables. When storing nested tables, make sure all data is serializable according to the guidelines in the Data Serialization Limitations section.
Dimensionality Changes
Once you create nested tables within a parent table, you cannot modify the dimensionality of the parent table. Operations that would change the number of rows (like sample(), head(), tail(), and slice()) will throw an error with a message like "Cannot sample/take head/take tail/slice a table that has nested tables. This would break the relationship between parent and child tables."
This restriction exists because changing the parent table's dimensionality could leave nested tables referencing rows that no longer exist. Instead, make sure to finalize your parent table's structure before creating any nested tables.
Array-like Access
Tables provide array-like access to their rows:
const stepper = api.useHStepper()

const trials = stepper.spec().append([
  { shape: 'circle', color: 'red' },
  { shape: 'square', color: 'green' },
])

// Access rows by index
console.log(trials[0]) // { shape: 'circle', color: 'red' }

// Get length
console.log(trials.length) // 2

// Iterate over rows
for (const row of trials) {
  console.log(row)
}

// Use array methods
console.log(trials.indexOf({ shape: 'circle', color: 'red' })) // 0
console.log(trials.slice(0, 1)) // [{ shape: 'circle', color: 'red' }]
Combining Trials with zip()
The zip() method combines multiple arrays of values into trial objects, pairing values by their position:
const stepper = api.useHStepper()

const trials = stepper.spec().zip({
  shape: ['circle', 'square', 'triangle'],
  color: ['red', 'green', 'blue'],
})

// Results in:
// [
//   { shape: 'circle', color: 'red' },
//   { shape: 'square', color: 'green' },
//   { shape: 'triangle', color: 'blue' }
// ]

// Push the trials
trials.push()
By default, zip() requires all arrays to have the same length. If the arrays have different lengths, you must specify how to handle this using the method option:
const stepper = api.useHStepper()

// Loop shorter arrays
const trials1 = stepper.spec().zip(
  {
    shape: ['circle', 'square'],
    color: ['red', 'green', 'blue'],
  },
  { method: 'loop' }
)
// Results in:
// [
//   { shape: 'circle', color: 'red' },
//   { shape: 'square', color: 'green' },
//   { shape: 'circle', color: 'blue' }
// ]

// Pad with a specific value
const trials2 = stepper.spec().zip(
  {
    shape: ['circle', 'square'],
    color: ['red', 'green', 'blue'],
  },
  { method: 'pad', padValue: 'unknown' }
)
// Results in:
// [
//   { shape: 'circle', color: 'red' },
//   { shape: 'square', color: 'green' },
//   { shape: 'unknown', color: 'blue' }
// ]

// Repeat the last value
const trials3 = stepper.spec().zip(
  {
    shape: ['circle', 'square'],
    color: ['red', 'green', 'blue'],
  },
  { method: 'last' }
)
// Results in:
// [
//   { shape: 'circle', color: 'red' },
//   { shape: 'square', color: 'green' },
//   { shape: 'square', color: 'blue' }
// ]
Different Lengths
When using zip(), if the arrays have different lengths:
- By default, it will throw an error
- You must specify a
methodto handle the difference:'loop': Repeats the shorter array values'pad': Fills with a specifiedpadValue(required)'last': Repeats the last value of each shorter array
Non-Array Values
The zip() method can handle non-array values by treating them as single-element arrays:
const stepper = api.useHStepper()

const trials = stepper.spec().zip(
  {
    shape: 'circle', // Treated as ['circle']
    color: ['red', 'green', 'blue'],
  },
  { method: 'loop' }
)

// Results in:
// [
//   { shape: 'circle', color: 'red' },
//   { shape: 'circle', color: 'green' },
//   { shape: 'circle', color: 'blue' }
// ]

// Push the trials
trials.push()
Creating All Combinations with outer()
The outer() method creates all possible combinations of values:
const stepper = api.useHStepper()

const trials = stepper.spec().outer({
  shape: ['circle', 'square'],
  color: ['red', 'green'],
})

// Results in:
// [
//   { shape: 'circle', color: 'red' },
//   { shape: 'circle', color: 'green' },
//   { shape: 'square', color: 'red' },
//   { shape: 'square', color: 'green' }
// ]

// Push the trials
trials.push()
Safety Limit
The outer() method has a safety limit of 5000 combinations to prevent accidentally creating too many trials. If you exceed this limit, it will throw an error.
Non-Array Values
Like zip(), the outer() method can handle non-array values by treating them as single-element arrays:
const stepper = api.useHStepper()

const trials = stepper.spec().outer({
  shape: 'circle', // Treated as ['circle']
  color: ['red', 'green'],
})

// Results in:
// [
//   { shape: 'circle', color: 'red' },
//   { shape: 'circle', color: 'green' }
// ]

// Push the trials
trials.push()
Repeating Blocks of Trials
The repeat() method allows you to repeat all trials a specified number of times, in order:
const stepper = api.useHStepper()

const trials = stepper.t
  .append([
    { shape: 'circle', color: 'red' },
    { shape: 'square', color: 'green' },
  ])
  .repeat(2)

// Results in:
// [
//   { shape: 'circle', color: 'red' },
//   { shape: 'square', color: 'green' },
//   { shape: 'circle', color: 'red' },
//   { shape: 'square', color: 'green' }
// ]

// Push the trials
trials.push()
Creating Sequences with range()
The range() method allows you to create a sequence of trials with incrementing index values. This is particularly useful when you need to create a series of numbered trials or when you want to build a sequence that you'll modify later:
const stepper = api.useHStepper()

const trials = stepper.spec().range(3)

// Results in:
// [
//   { range: 0 },
//   { range: 1 },
//   { range: 2 }
// ]

// Push the trials
trials.push()
You can combine range() with other methods like forEach() to create more complex sequences:
const stepper = api.useHStepper()

const trials = stepper
  .spec()
  .range(2)
  .forEach((row) => ({
    ...row,
    condition: row.range % 2 === 0 ? 'A' : 'B',
  }))

// Results in:
// [
//   { range: 0, condition: 'A' },
//   { range: 1, condition: 'B' }
// ]

// Push the trials
trials.push()
Positive Numbers Only
The range() method requires a positive integer as its argument. It will throw an error if called with zero or a negative number.
Printing Table Contents with print()
The print() method provides a convenient way to inspect the contents of your trial table, including any nested tables. This is particularly useful during development and debugging:
const stepper = api.useHStepper()

const trials = stepper.spec().append([
  { shape: 'circle', color: 'red' },
  { shape: 'square', color: 'blue' },
])

trials.print()
// Output:
// Table with 2 rows:
// [0]: { shape: 'circle', color: 'red' }
// [1]: { shape: 'square', color: 'blue' }

// Push the trials
trials.push()
The print() method also handles nested tables with proper indentation:
const stepper = api.useHStepper()

const trials = stepper.spec().range(2)
trials[0].spec().append([
  { type: 'stim', value: 1 },
  { type: 'feedback', value: 2 },
])
trials[1].spec().append([{ type: 'stim', value: 3 }])

trials.print()
// Output:
// Table with 2 rows:
// [0]: { range: 0 }
//   Table with 2 rows:
//   [0]: { type: 'stim', value: 1 }
//   [1]: { type: 'feedback', value: 2 }
// [1]: { range: 1 }
//   Table with 1 rows:
//   [0]: { type: 'stim', value: 3 }

// Push the trials
trials.push()
Method Chaining
The print() method returns the table object, allowing it to be chained with other methods:
const stepper = api.useHStepper()

const trials = stepper.t
  .append({ shape: 'circle' })
  .print() // Print current state
  .append({ shape: 'square' })
  .print() // Print updated state

// Push the trials
trials.push()
Interleaving Trials with interleave()
The interleave() method combines two sets of trials by alternating between them. This is useful when you want to create a sequence that alternates between different trial types:
const stepper = api.useHStepper()

const trials1 = stepper.spec().append([
  { type: 'stim', id: 1 },
  { type: 'stim', id: 2 },
])

const trials2 = stepper.spec().append([
  { type: 'feedback', id: 3 },
  { type: 'feedback', id: 4 },
])

const trials = trials1.interleave(trials2)
// Results in:
// [
//   { type: 'stim', id: 1 },
//   { type: 'feedback', id: 3 },
//   { type: 'stim', id: 2 },
//   { type: 'feedback', id: 4 }
// ]

// Push the trials
trials.push()
The method can handle tables of different lengths, arrays, or single objects:
const stepper = api.useHStepper()

// Different length tables
const trials1 = stepper.spec().append([
  { type: 'stim', id: 1 },
  { type: 'stim', id: 2 },
  { type: 'stim', id: 3 },
])

const trials2 = stepper.spec().append([
  { type: 'feedback', id: 4 },
  { type: 'feedback', id: 5 },
])

const trials = trials1.interleave(trials2)
// Results in:
// [
//   { type: 'stim', id: 1 },
//   { type: 'feedback', id: 4 },
//   { type: 'stim', id: 2 },
//   { type: 'feedback', id: 5 },
//   { type: 'stim', id: 3 }
// ]

// Push the trials
trials.push()

// Array input
const trialsWithArray = trials1.interleave([
  { type: 'feedback', id: 4 },
  { type: 'feedback', id: 5 },
])

// Single object
const trialsWithObject = trials1.interleave({ type: 'feedback', id: 4 })
Safety Limit
Like other table operations, interleave() has a safety limit of 5000 rows to prevent accidentally creating too many trials. If the combined length would exceed this limit, it will throw an error.
Method Chaining
The interleave() method returns the table object, allowing it to be chained with other methods:
const stepper = api.useHStepper()

const trials = stepper.t
  .append([
    { type: 'stim', id: 1 },
    { type: 'stim', id: 2 },
  ])
  .interleave([
    { type: 'feedback', id: 3 },
    { type: 'feedback', id: 4 },
  ])
  .forEach((row) => ({ ...row, condition: 'test' }))

// Push the trials
trials.push()
Taking First or Last Elements with head() and tail()
The head() and tail() methods allow you to take a subset of trials from the beginning or end of your trial table:
const stepper = api.useHStepper()

// Take the first 3 trials
const trials1 = stepper.spec().range(5).head(3)

// Results in:
// [
//   { range: 0 },
//   { range: 1 },
//   { range: 2 }
// ]

// Push the trials
trials1.push()

// Take the last 3 trials
const trials2 = stepper.spec().range(5).tail(3)

// Results in:
// [
//   { range: 2 },
//   { range: 3 },
//   { range: 4 }
// ]

// Push the trials
trials2.push()
Both methods maintain the original order of the trials. When using tail(), the last n elements are returned in their original sequence (not reversed).
You can combine these methods with other operations:
const stepper = api.useHStepper()

const trials = stepper.t
  .range(5)
  .tail(3)
  .forEach((row) => ({ ...row, condition: 'test' }))

// Results in:
// [
//   { range: 2, condition: 'test' },
//   { range: 3, condition: 'test' },
//   { range: 4, condition: 'test' }
// ]

// Push the trials
trials.push()
Positive Numbers Only
Both head() and tail() require a positive integer as their argument. They will throw an error if called with zero or a negative number.
Handling Large n
If n is greater than the length of the trial table:
head(n)will return all trials from the beginningtail(n)will return all trials from the end
In both cases, the original order of trials is preserved.
Modifying Trials with forEach()
The forEach() method allows you to modify each trial:
const stepper = api.useHStepper()

const trials = stepper.t
  .append([
    { shape: 'circle', color: 'red' },
    { shape: 'square', color: 'green' },
  ])
  .forEach((row, index) => {
    if (index === 0) {
      return { ...row, color: 'blue' }
    }
    return row
  })

// Results in:
// [
//   { shape: 'circle', color: 'blue' },
//   { shape: 'square', color: 'green' }
// ]

// Push the trials
trials.push()
Shuffling Trials
The shuffle() method allows you to randomize the order of trials. This is particularly useful for counterbalancing trial order across participants. The shuffle operation respects the seeded random number generation system (see Randomization for more details).
const stepper = api.useHStepper()

const trials = stepper.t
  .append([
    { shape: 'circle', color: 'red' },
    { shape: 'square', color: 'green' },
    { shape: 'triangle', color: 'blue' },
  ])
  .shuffle()

// Results in a randomly ordered array of the same trials
// The order will be deterministic based on the current seed

// Push the trials
trials.push()
You can also provide a specific seed to the shuffle operation for custom randomization:
const stepper = api.useHStepper()

const trials = stepper.t
  .append([
    { shape: 'circle', color: 'red' },
    { shape: 'square', color: 'green' },
    { shape: 'triangle', color: 'blue' },
  ])
  .shuffle('custom-seed-123')

// Results in a deterministically ordered array based on the provided seed

// Push the trials
trials.push()
Seeded Randomization
The shuffle operation uses the same seeded random number generation system as the rest of Smile. When no seed is provided, it uses the current route-specific seed (see Randomization for details). This ensures that:
- Each participant gets a unique but reproducible order
- The order remains consistent if the page is refreshed
- You can recreate any participant's exact trial order using their seed ID
Sampling Trials
The sample() method provides various ways to sample from your trials, all of which respect Smile's seeded randomization system (see Randomization for details). The method supports several sampling types:
const stepper = api.useHStepper()

const trials = stepper.spec().append([
  { id: 1, shape: 'circle', color: 'red' },
  { id: 2, shape: 'square', color: 'green' },
  { id: 3, shape: 'triangle', color: 'blue' },
  { id: 4, shape: 'star', color: 'yellow' },
])

// Push the trials
trials.push()
Special Data Fields
The id Field
When building trial tables, you can use a special id field in your trial data to explicitly control the node identifiers in the state machine. This is useful when you need specific path values rather than the default sequential numbering:
const stepper = api.useHStepper()

const trials = stepper.spec().append([
  { id: 'intro', type: 'instruction' },
  { id: 'practice', type: 'trial' },
  { id: 'main', type: 'trial' },
])

// Results in nodes with paths:
// - "intro"
// - "practice"
// - "main"
// Instead of the default:
// - "0"
// - "1"
// - "2"

// Push the trials
trials.push()
This also works with nested tables:
const stepper = api.useHStepper()

const trials = stepper.spec().append({ id: 'block1' })
trials[0].spec().append([
  { id: 'stim', type: 'stimulus' },
  { id: 'feedback', type: 'feedback' },
])

// Results in paths:
// - "block1/stim"
// - "block1/feedback"

// Push the trials
trials.push()
If no path field is provided, the stepper will use default sequential numbering for node identifiers.