Key Concepts
Smile introduces a new way to build behavioral experiments which promotes modularity and reusability. Smile leverages the capabilities of existing open source libraries including Vite and Vue, while providing an entirely new interface for specifying and debugging interactive experiments.
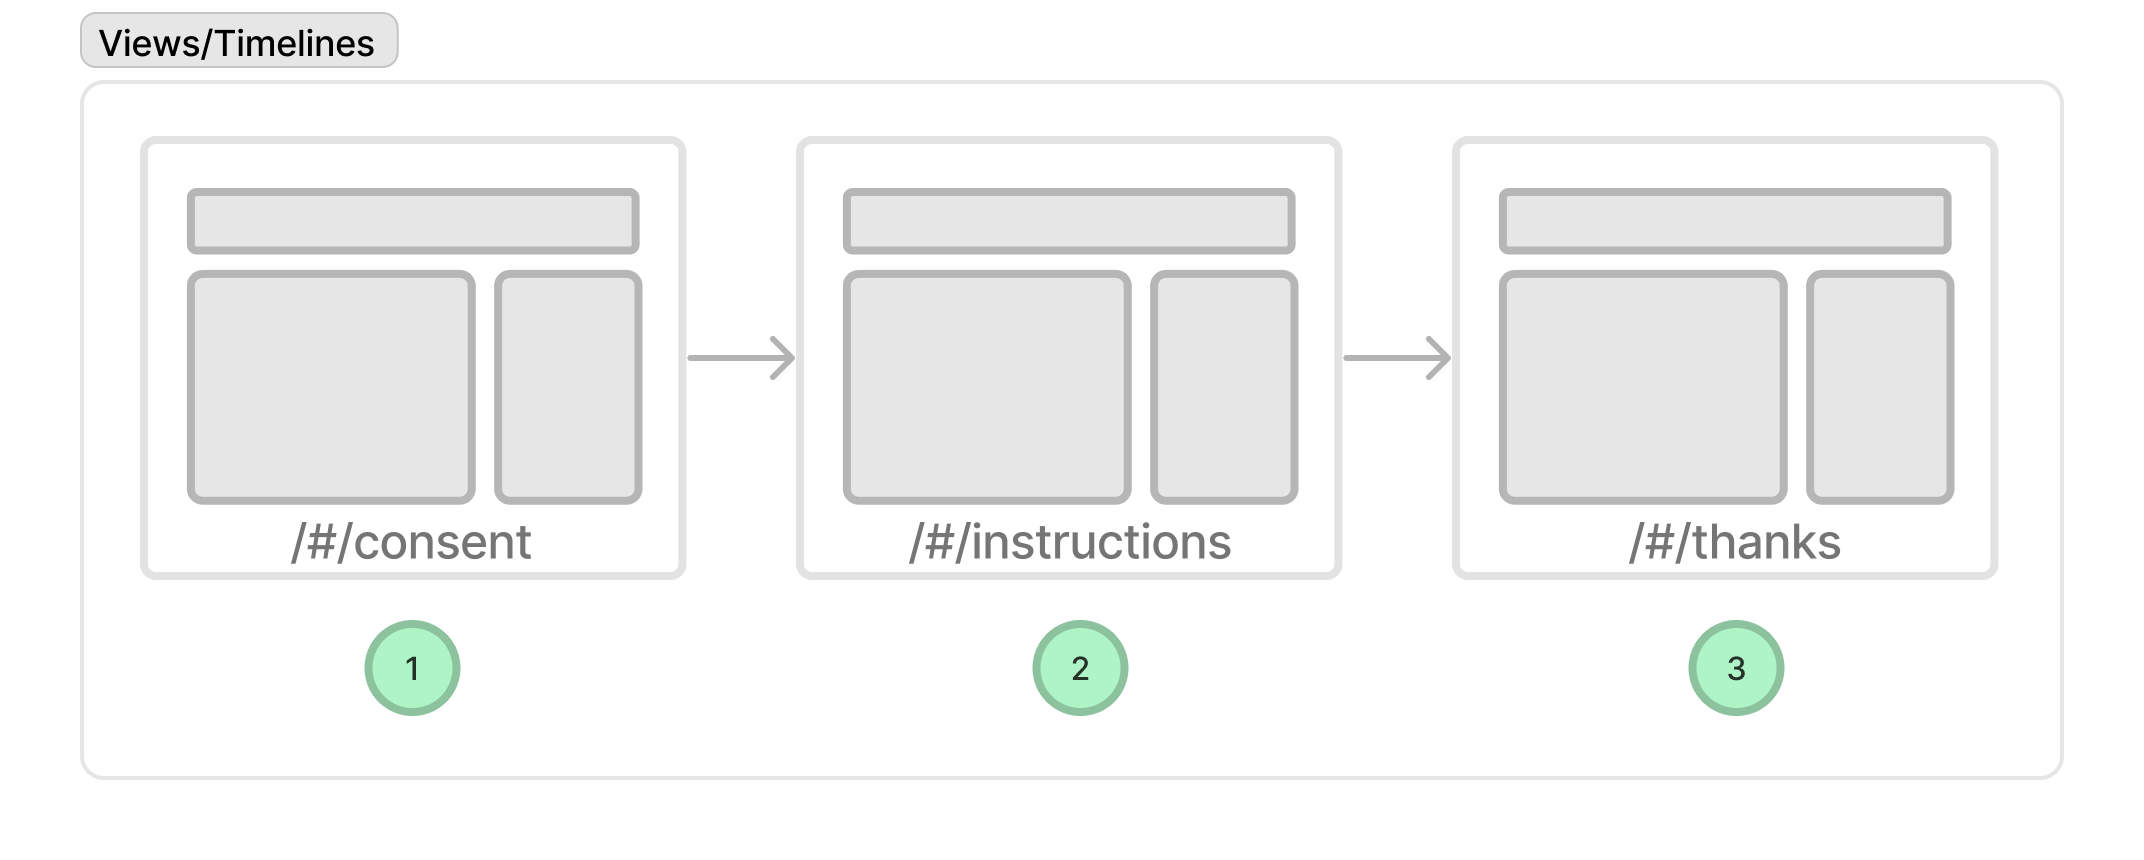
The first concept to introduce is the notion of a View. A View is a self-contained bit of code that represents a single "phase" or part of an experiment. For example, the part of your experiment that collects informed consent might be one View. Another View might be the debriefing form. Below we will describe how to define the sequence of Views in your experiment.
Each View is minimally a Vue component (a special type of web development file) which can be written in whatever way you please. However, Smile provides a custom API for building Views.
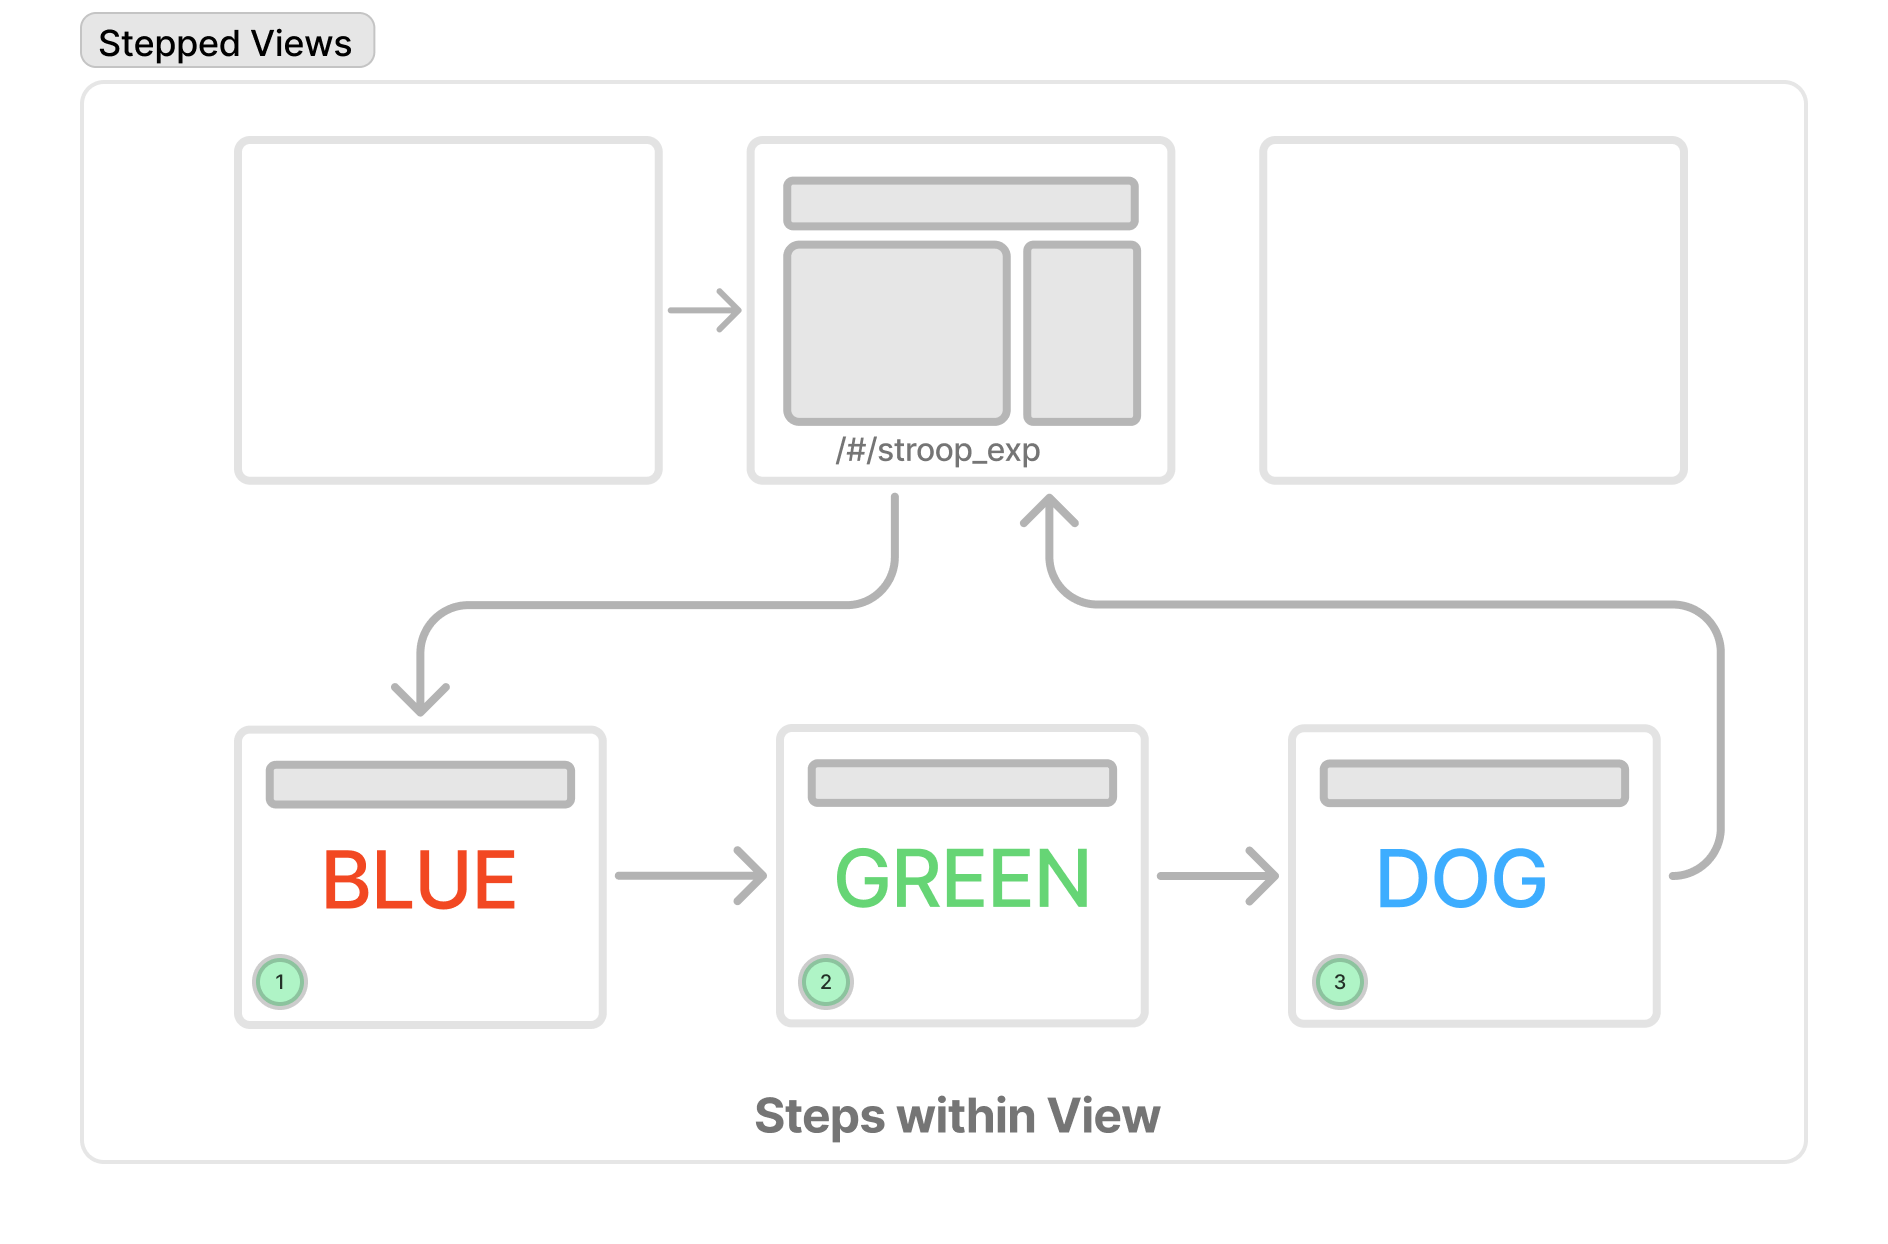
The key idea behind this API is the concept of 'steps'. A step is a sequenced event that occurs within a view. For example, a View might have a step that presents a question to the participant, a step that collects a response, and a step that displays the results.
A useful way to think about it is that Views are like slides in a presentation software like Powerpoint/Keynote and steps are like "builds" or "animation steps" that occur within a slide.
Creating a simple Experiment View
To help make these concepts more concrete, we will walk through the process of creating a simple experiment view. We will start with a simple view that presents the user with a sequence of words on the screen and collects a response. We will slowly build this up by adding complexity and features to help illustrate the key concepts in Smile.
Each View is a Vue component. You can create a new view by creating a new file in the src/user/components folder. For example, if you want to create a new view called MyView.vue, you would create a new file in the src/user/components folder called MyView.vue.
A typical Vue component has three parts:
- A script (JavaScript or TypeScript)
- A template (HTML + Vue syntax)
- A style (CSS)
The script section contains the JavaScript (or TypeScript) that controls the component's behavior. The template is the HTML that is displayed to the user. The style is the CSS that is used to style the component.
<script setup></script>

<template>
  <div>
    <h1>My Experiment</h1>
  </div>
</template>

<style scoped></style>
This example View component does nothing except display the text "My Experiment" in a large (h1) font.
To begin using Smile, import the Smile API and use it to define the steps in the experiment.
<script setup>
// import and initialize smile API
import useViewAPI from '@/core/composables/useViewAPI'
const api = useViewAPI()

api.steps.append([
  { word: 'THIS' }, // step 1
  { word: 'IS' },   // step 2
  { word: 'A' },    // step 3
  { word: 'TEST' }, // step 4
])
</script>

<template>
  <div>
    <h1>My Experiment</h1>
  </div>
</template>

<style scoped></style>
This defines four steps in the experiment. Each step has a word property. This is incomplete, however, because it doesn't actually show the word to the user. We want to advance through these steps each time the user presses the spacebar.
<script setup>
// import and initialize smile API
import useViewAPI from '@/core/composables/useViewAPI'
const api = useViewAPI()

api.steps.append([
  { word: 'THIS' },
  { word: 'IS' },
  { word: 'A' },
  { word: 'TEST' },
])

api.onKeyDown(' ', () => {
  api.goNextStep()
})
</script>

<template>
  <div>
    <h1>My Experiment</h1>
  </div>
</template>

<style scoped></style>
This uses the api.onKeyDown method to listen for a spacebar key press and advance to the next step. You can also go to the previous step with api.goPrevStep() or jump to a specific step with api.goToStep(pathname). We will talk about paths in a later section of the documentation.
Now we need to actually display the word to the user. We can do this by updating the template part of the component.
<script setup>
// import and initialize smile API
import useViewAPI from '@/core/composables/useViewAPI'
const api = useViewAPI()

api.steps.append([
  { word: 'THIS' },
  { word: 'IS' },
  { word: 'A' },
  { word: 'TEST' },
])

api.onKeyDown(' ', () => {
  api.goNextStep()
})
</script>

<template>
  <div>
    <h1>{{ api.stepData.word }}</h1>
  </div>
</template>

<style scoped></style>
This uses the api.stepData object to access the data for the current step. The .word property is defined because we added it to the step data in the api.steps.append method.
When we advance to the next step using the api.goNextStep() method, it automatically changes the api.stepData to refer to the next step and reactively updates the template to display the new word.
This is already a working View! On first load it will show the word "THIS" since that is the first step. Then if the user presses the spacebar, it will advance to the next step and show the word "IS" and so on. When it gets to the last step, subsequent presses of the spacebar will do nothing since there are no more steps to advance to.
This covers only part of the Smile API and development approach but we hope it illustrates how Smile makes it easy to build experiments.
Adding a timer to the experiment
The examples so far could be easily done in raw Vue syntax using reactive properties e.g., ref(). Let's go a little bit deeper to explore some unique functionality provided by Smile's API.
We usually want to record some information about the user's actions. In this example, it might make sense to record the amount of time it took them to press each spacebar. We can use Smile's API to add a timer to the View to measure the user's reaction time.
<script setup>
// import and initialize smile API
import useViewAPI from '@/core/composables/useViewAPI'
const api = useViewAPI()

api.steps.append([
  { word: 'THIS' },
  { word: 'IS' },
  { word: 'A' },
  { word: 'TEST' },
])

// start the timer if it is not already started
if (!api.isTimerStarted()) {
  api.startTimer()
}

api.onKeyDown(' ', () => {
  const reactionTime = api.elapsedTime()
  api.stepData.reactionTime = reactionTime
  api.recordStep()
  api.goNextStep()
})
</script>

<template>
  <div>
    <h1>{{ api.stepData.word }}</h1>
  </div>
</template>

<style scoped></style>
First, we start the timer if it is not already started. You might wonder why we need to check if it is already started, since the <script setup> section only runs once. The reason is that Smile persists information across page reloads. This way if your participant reloads the page in their browser, Smile will detect the timer was already started and continue measuring time with respect to the first time it was started. Of course, if you don't want this more advanced behavior, you can just call api.startTimer() without checking if it was already started, which will restart it to measure from the last page load.
This example shows another aspect of Smile's API. We use api.elapsedTime() to measure the time it took the user to press the spacebar. Then we write the resulting data to a new property in the api.stepData object called api.stepData.reactionTime. We are free to make new properties on the current api.stepData or to modify existing ones.
Then we call api.recordStep() to record the step data. This persists the data so that it will be written to the database record for this participant. It's worth mentioning that this doesn't mean the data will be immediately stored in the database. For example, Firebase (the recommended database for Smile) limits how frequently we can write to documents, but rest assured, api.recordStep() will buffer your participant's trial data so that it is safely written to the database at the next opportunity. In addition, even if the subject reloads the browser at this point, the data for that trial will be restored for later syncing, limiting data loss.
What this section reveals is that Smile's API goes beyond basic Vue components to provide ways to define steps or trials in an experiment, save data to a database, persist data across page loads, and conveniently record data typically needed in behavioral experiments.
It gets much more advanced and powerful from there. For example here is a more complex example of a Stroop experiment which uses hierarchically nested steps, randomization, and more. We provide complete documentation of steps and the API.
Transitioning to the next View
The last step is to leave this View and go to the next one. To do this we should change it so that when there are no more steps we exit to the next View.
<script setup>
// import and initialize smile API
import useViewAPI from '@/core/composables/useViewAPI'
const api = useViewAPI()

api.steps.append([
  { word: 'THIS' },
  { word: 'IS' },
  { word: 'A' },
  { word: 'TEST' },
])

// start the timer if it is not already started
if (!api.isTimerStarted()) {
  api.startTimer()
}

api.onKeyDown(' ', () => {
  const reactionTime = api.elapsedTime()
  api.stepData.reactionTime = reactionTime
  api.recordStep()
  if (api.isLastStep()) {
    api.goNextView()
  } else {
    api.goNextStep()
  }
})
</script>

<template>
  <div>
    <h1>{{ api.stepData.word }}</h1>
  </div>
</template>

<style scoped></style>
Here, the api.isLastStep() method is used to check if the current step is the last one. There are several equivalent ways to do that as well, for example, !api.hasNextStep() or api.stepIndex >= api.nSteps, but part of Smile's API design principle is to give you very clear, commonly used function names to help avoid typos or logic errors. If it is the last step, we exit to the next View with api.goNextView(). If it is not, we advance to the next step with api.goNextStep().
The use of api.goNextView() means that even if we change the order of our Views in the overall flow of our experiment, we don't need to update our code. This makes it easy to share your Views with others and reuse them in different experiments.
Hopefully this gives you a sense of how Smile's API can be used to build experiments. Smile's API provides many more complex features which are introduced in the rest of the documentation. But before we get into these advanced features, let's walk through the process of placing this View in the Timeline.
Placing your new Experiment View in the Timeline
All the files that you regularly need to edit are in the src/user folder. The design.js file is the main entry point for your experiment. It is where you define the overall flow of your experiment.
We recommend you take a look at this file. It is fairly long and starts with some boilerplate configuration and importing. But the key section is where the timeline is defined. For example, look for a code section like this:
// demographic survey
timeline.pushSeqView({
  name: 'demograph',
  component: DemographicSurvey,
})

// windowsizer
timeline.pushSeqView({
  name: 'windowsizer',
  component: WindowSizer,
})

// instructions
timeline.pushSeqView({
  name: 'instructions',
  component: Instructions,
})
This shows the three Views that are currently defined in the experiment. The timeline.pushSeqView method is used to add a new View to the timeline. The name property is used to identify the View. The component property is the Vue component that is used to display the View.
We can add our new View to the timeline by adding a new pushSeqView call. Let's say we want to add it after the windowsizer View. We would add it like this:
// put this up at the top of the design.js file with the other imports
import MyView from '@/user/components/MyView.vue'

// demographic survey
timeline.pushSeqView({
  name: 'demograph',
  component: DemographicSurvey,
})

// windowsizer
timeline.pushSeqView({
  name: 'windowsizer',
  component: WindowSizer,
})

// myview inserted here
timeline.pushSeqView({
  name: 'myview',
  component: MyView,
})

// instructions
timeline.pushSeqView({
  name: 'instructions',
  component: Instructions,
})
Here, we imported our new View (you should do this at the top of the design.js file with the other imports). Then we added a new pushSeqView call to add it to the timeline. The name property is used to identify the View. The component property is the Vue component that is used to display the View.
You'll notice that there are many other Views in the default timeline including WindowSizer, Instructions, and Consent. These are all built in Views that are provided by Smile which are commonly used in experiments. You can of course remove any of these, or edit them to your liking. Some are quite sophisticated and can save you a lot of time such as the InstructionsQuiz View which can be used to quickly build comprehension check quizzes.
With this change, there is a new sequence to the experiment:
... -> demographic survey -> windowsizer -> myview -> instructions -> ...
If we had placed the myview View before the windowsizer View, the sequence would have been:
... -> demographic survey -> myview -> windowsizer -> instructions -> ...
Smile's timeline API also allows randomized flows for showing different sequences depending on the condition a participant is assigned to.
Now that we have defined a simple View and placed it in the design/timeline, we are ready to test it out.
Developing and debugging your experiment
A final key concept of Smile is the set of advanced tools that help you develop and debug your experiment. We think of it as enabling "brain surgery" on your experiment. You can use these tools to bounce around, inspect various elements of your interface, and check the format of your data. You can read more about development in the remainder of the documentation. However, assuming you've installed the required software, set up, and configured your repo, you can type
npm run devto start the development server. This will show you something like this:
> smile@0.0.0 dev
> vite

  ➜  Regenerating local environment file based on git info env/.env.git.local

  VITE v6.3.3  ready in 474 ms

  ➜  Local:   http://localhost:3010/nyuccl/smile/main/
  ➜  Network: use --host to expose
  ➜  Inspect: http://localhost:3010/nyuccl/smile/main/__inspect/
  ➜  press h + enter to show help
  ➜  stripping dev/present mode components from src/core/App.vue
  ➜  stripping dev/present mode components from src/core/SmileApp.vue
Then you simply open the URL labeled "Local" in your browser.